Branch Product master in Jaldi Lifestyle POS
Branch Product master is the master screen where we can create an inventory products. We have two types of products,
- Standard Product – No need to update IMEI number during stock inwards & outwards
- IMEI Product – Need to Update IMEI number during stock inwards & outwards (Ex:- Mobile products)
For Example, Lets consider the below two practical scenario to learn the Branch product master well,
- You wants to create a standard product “Shoe” with multiple attribute combinations
- You Wants to create a mobile product “Samsung” with multiple attribute combinations and IMEI number.
How to create a standard product, Example “shoe” ?
- To create a new product for your branch, go to application path Masters > Product Management > branch product master.
- Press the branch product master menu to create a new product.
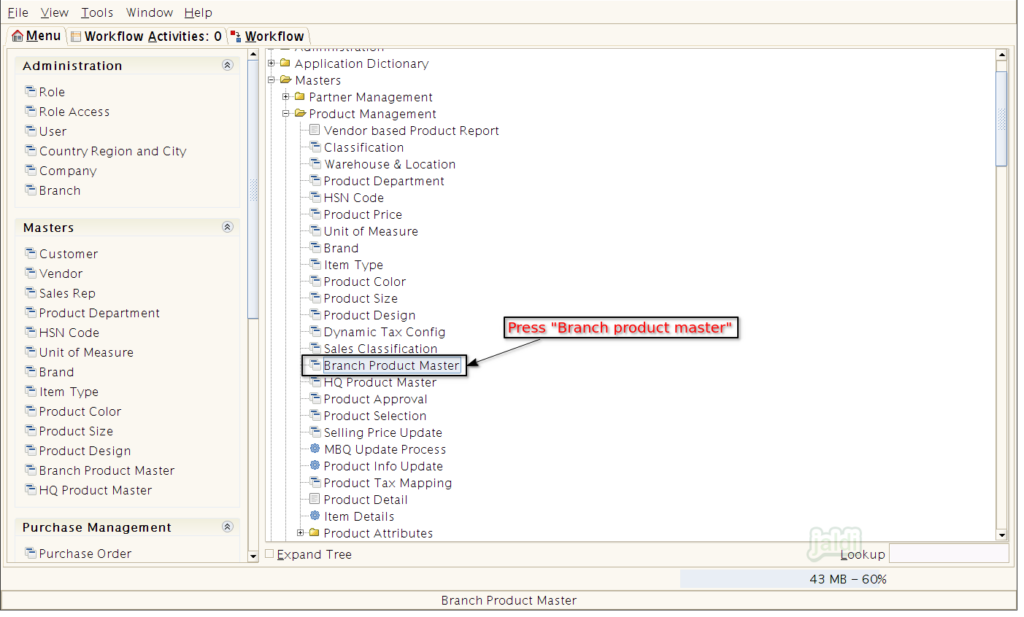
- In Product master screen, Press “New” button and system will clear the screen to create a new product.
- Enter the following field in “Product” tab,
- Name – Enter the Product name in this field
- S.name – This will be auto filled from the name.
- Code – Product code will be auto generated after saving the product details.
- Category – Create new or select the existing category from the list.
- Department – Auto loaded from the category.
- Sub Category – Create new or select existing sub category.
- HSN Code – Select the HSN code from existing HSN code
- Sales Tax – Select the Sales tax GST rate
- Purchase tax – Select the Purchase tax GST rate
- UOM – Select the base UOM
- Class – Select “weighing” from the list if the products is weigh-able product or other wise leave it empty.
- Press “Save” button to save the data in the product tab.
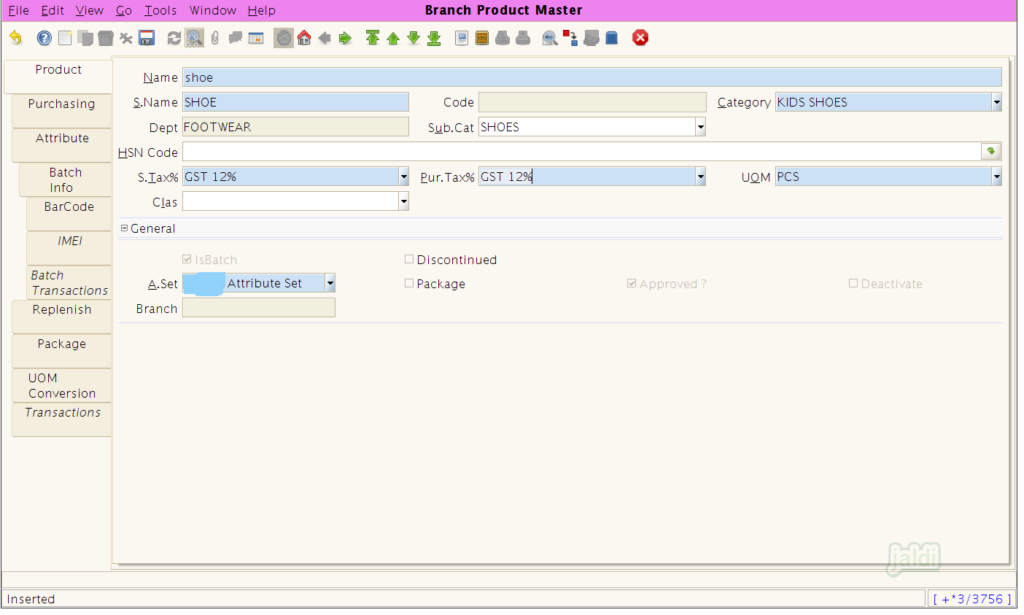
- In the above image, we have creating the product “shoe” and we have selected category as “Kids shoe” from existing list.
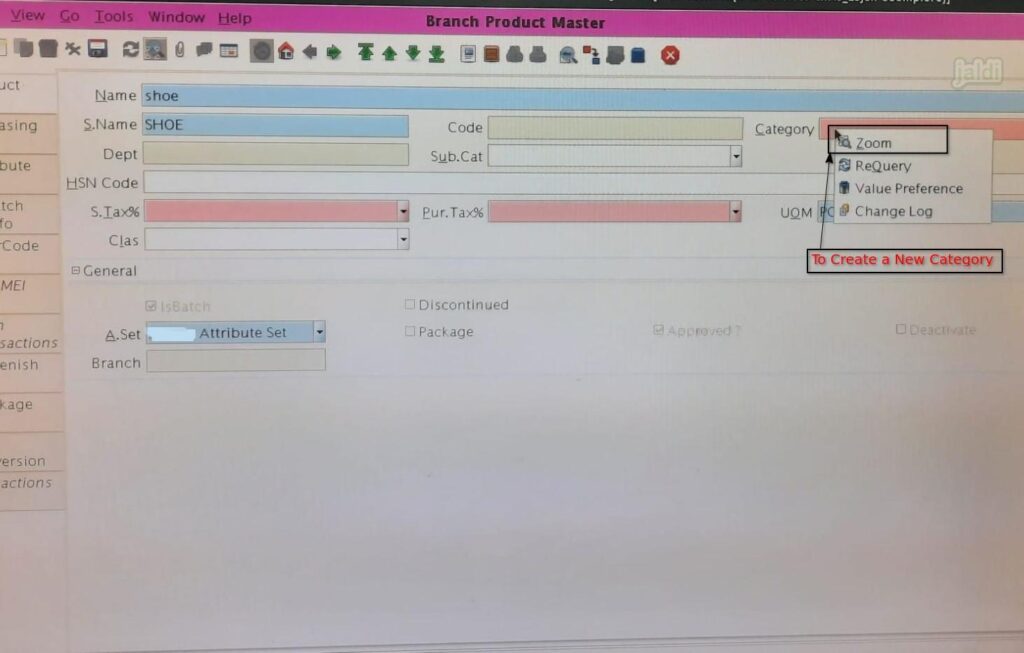
- If you want to create a new category then press “right click in the mouse” on the category field, Then system will show few drop down options (Same for sub category).
- Click on the “Zoom” in drop down value it will lead you to the product department screen, where we can create the Category and sub category under predefined departments.
- To know how to create the “Product Department”, Click on the following link ” https://jaldi.store/jaldi-product-department/”
- For HSN code also we can select the existing HSN code from the HSN code master or right click on the HSN code and click on “Zoom” and it will lead you to the HSN code master where you can new HSN code details.
- To know how to create the “HSN Code”, Click on the following link ” https://jaldi.store/hsn-code-master/“
- If the newly created details is not listed in product screen, then click on the “Requery” to refresh, So the new details will show now.
- Once the Product tab details are saved successfully, move to Purchasing tab
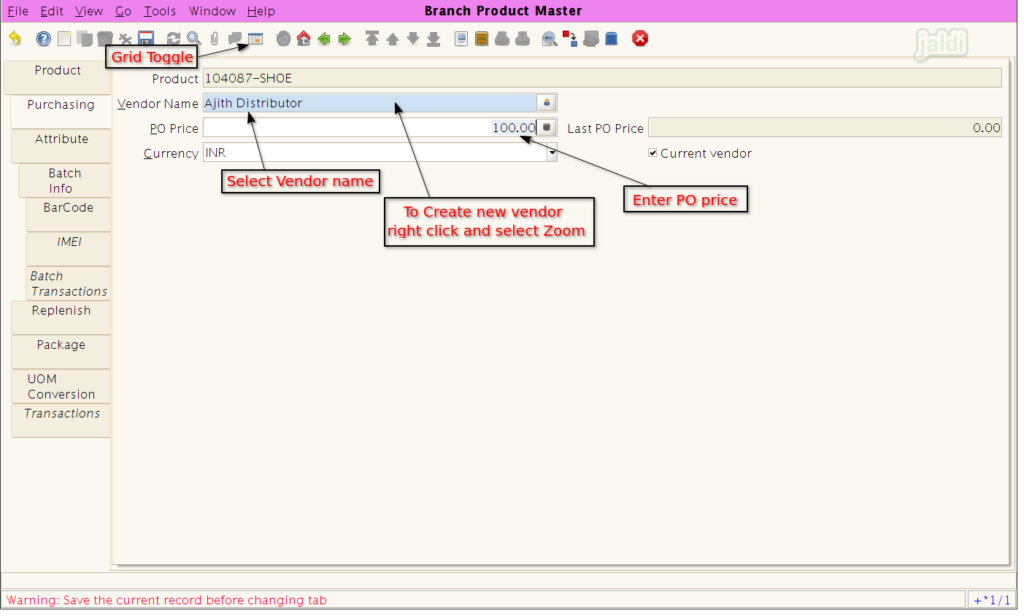
- Enter the following details in “Purchasing tab”
- Vendor name – Create or select the vendor name by searching their name
- PO price – To create a purchase order before GRN entry.
- Then press “Save” button to save the data.
- To create a new vendor right click on the “Vendor name” and press “Zoom” and it will lead to the “Vendor” master screen.
- To know more about new vendor creation, click the following link “https://jaldi.store/vendor-master-in-jaldi-lifestyle-pos/“
- We can add multiple vendors for single products.
- To see all the vendor details, press “Grid Toggle” System will show the mapped vendors for the particular products.
- Now move to Attribute tab, where the following details of an items will be mapped,
- Brand
- Product design
- Item Type
- Product colour
- Product size
- Except brand other details are optional to create and maintain. To maintain inventory effectively, we recommend to create and maintain all the attribute for items like mobile, cloths, foot wear, etc.
- If Attributes are already created in their respective master then we can easy search and select the respective data.
- If new attribute need to be created then, right click on the respective field and click “zoom” to go to respective master screen to create a new attribute (Brand, Product design, Product colour, Product size and item type).
- To learn more about the Attribute masters, click on the following link https://jaldi.store/attributes-creation/
- Once required attribute details are filled then save data by click on the “Save” button.
How to create a IMEI product, Example “Samsung” ?
- To create IMEI product we need to follow all the above steps which is involved in standard products creation.
- But while creating the IMEI products, you need to careful with the category selection or creation, i.e while creating the category for the IMEI products, Is IMEI? field must be selected during the category creation.
- To know more about this, click on the following link ” https://jaldi.store/jaldi-product-department/”
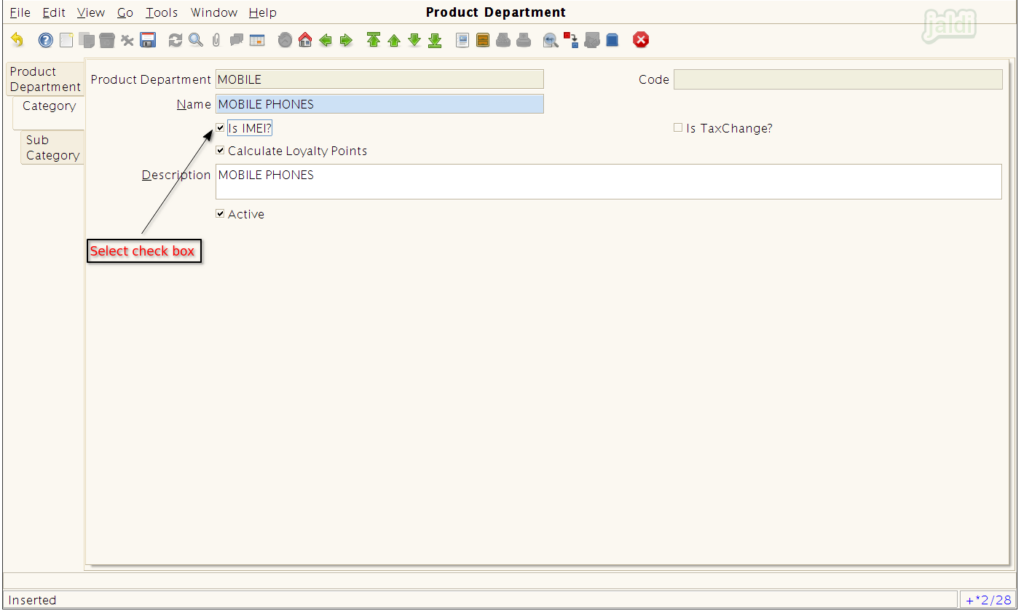
- Once that is IMEI? field is selected then, during the GRN entry of an IMEI product (Samsung) system will ask to enter the IMEI numbers for each received quantity.
- To learn more about the IMEI update, refer the following link “GRN entry”.
Once the first three tabs like Product, Purchasing and Attributes are filled with required details then we can start Stock inwards entry like GRN entry. Other tabs are get updated later during or after GRN entries.
Uses of Other Branch product master tabs
Batch Info
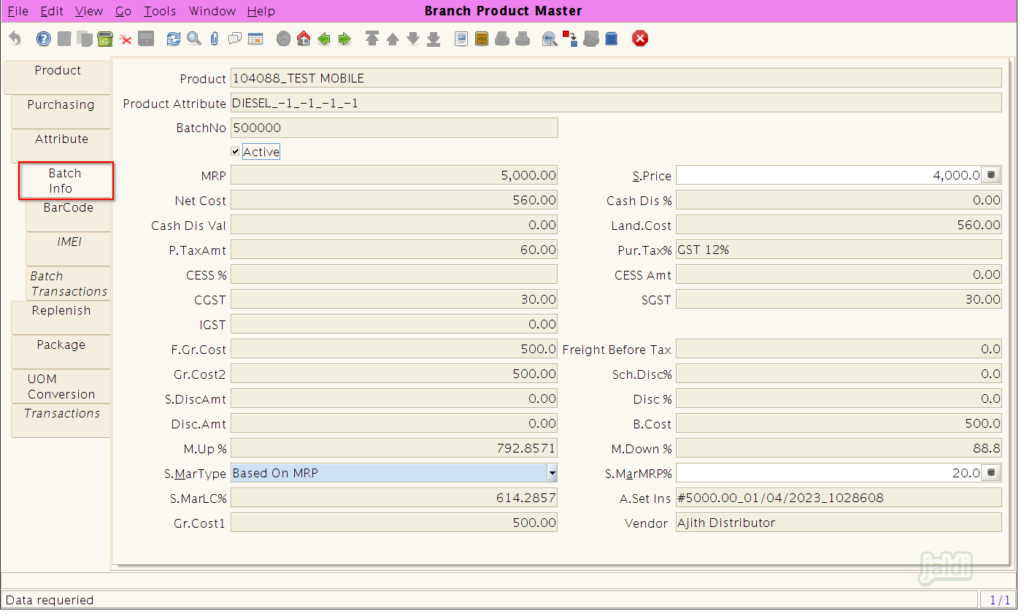
- In this tab, we can see the batch wise information based on GRN entries.
BarCode
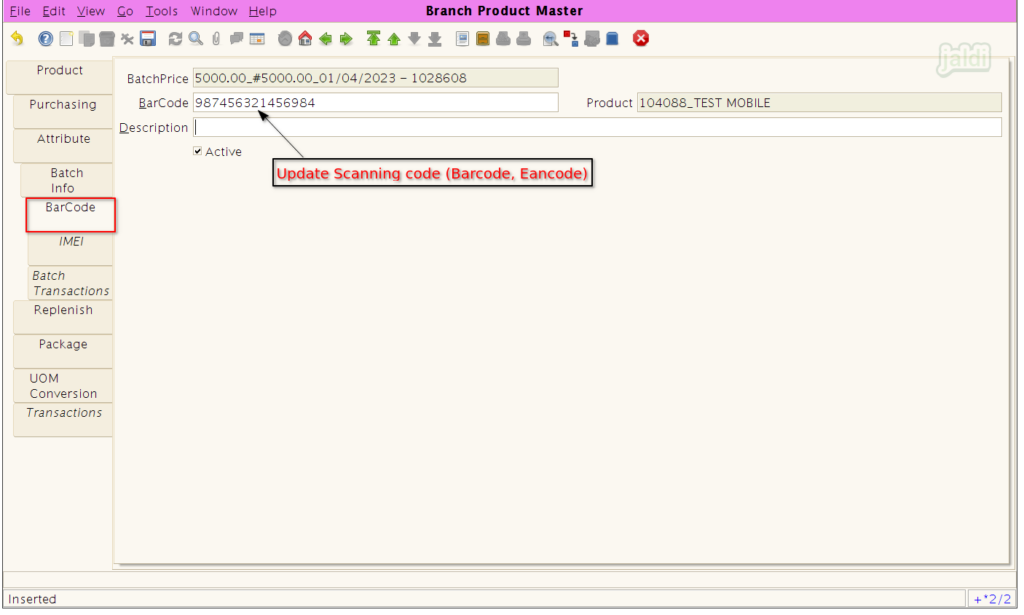
- Barcode tab is used to update the scanning code of a each product by batch wise.
- We can update our own code, Eancode or existing barcode in this screen for the products.
- The updated scanning codes can be scanned in transactions screen like POS billing to fast loading of an items for sales.
- We can update multiple Scanning code for single products. But scanning code should not be duplicated, system also not allow to enter same code again.
IMEI
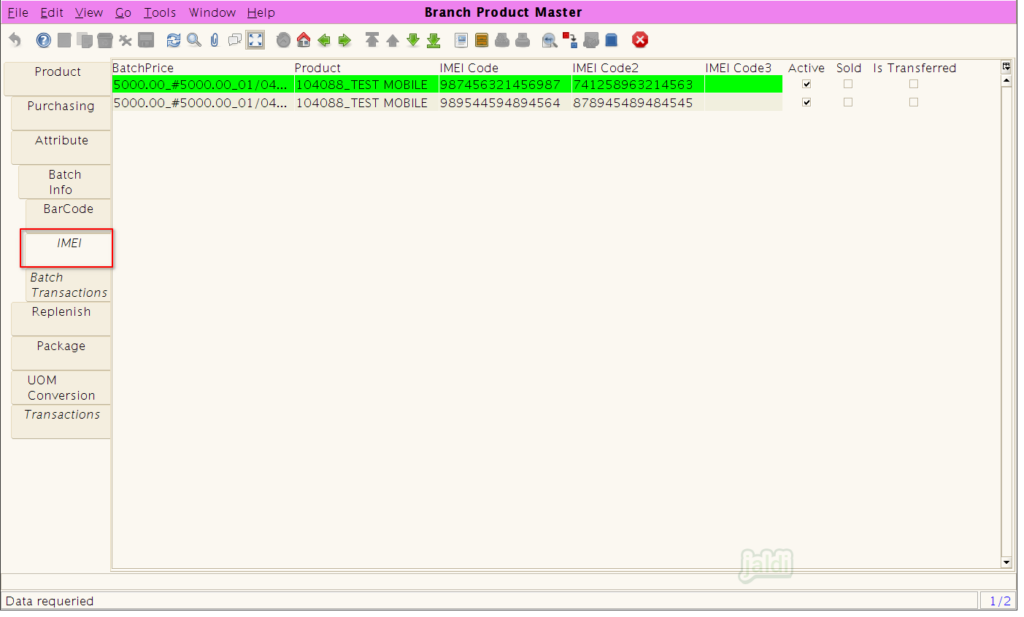
- The Updated IMEI numbers from GRN entries will be listed here, We can check all the available IMEI numbers.
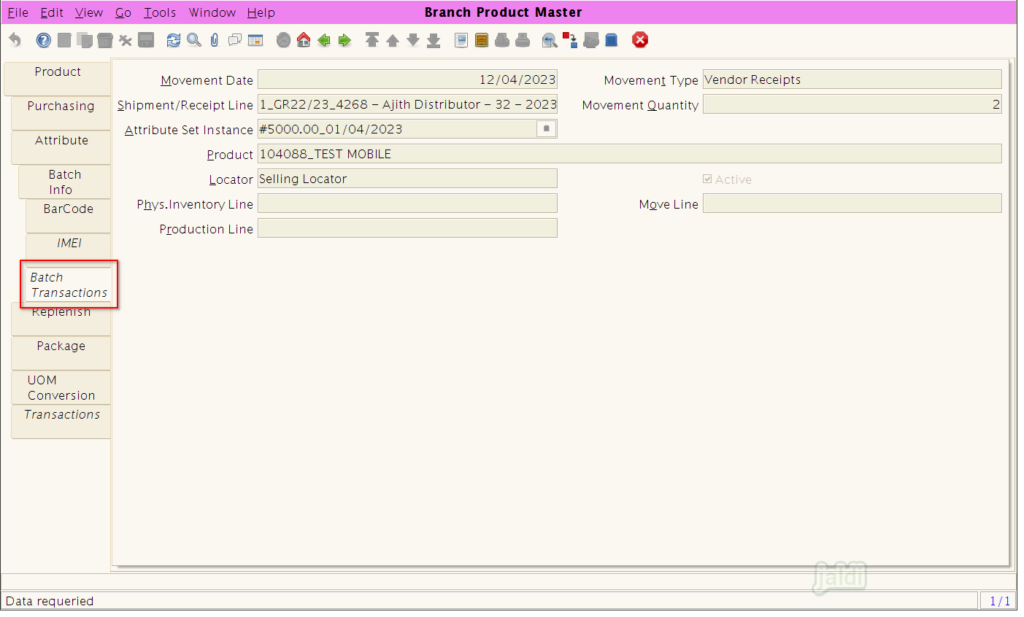
Batch Transactions
- In Batch Transaction screen, User can find the batch wise transaction entries details of each products. Check the below image for more clarity.
UOM Conversion
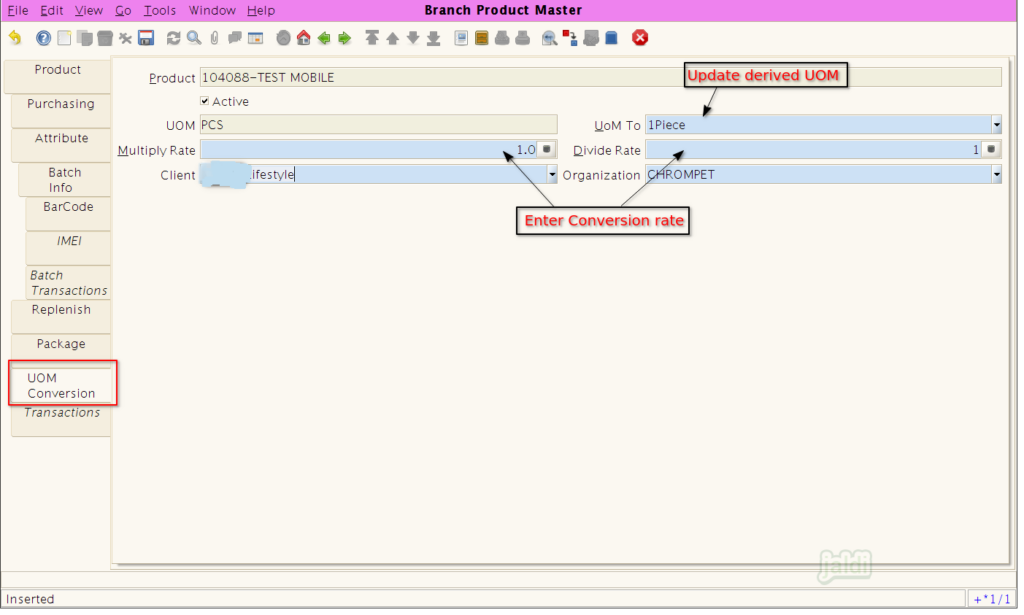
- In this UOM conversion screen, we can update the derived or sub UOM of a product with base UOM.
- We ca also enter the conversion rate between Base UOM (UOM) and Sub or derived UOM (UOM To)
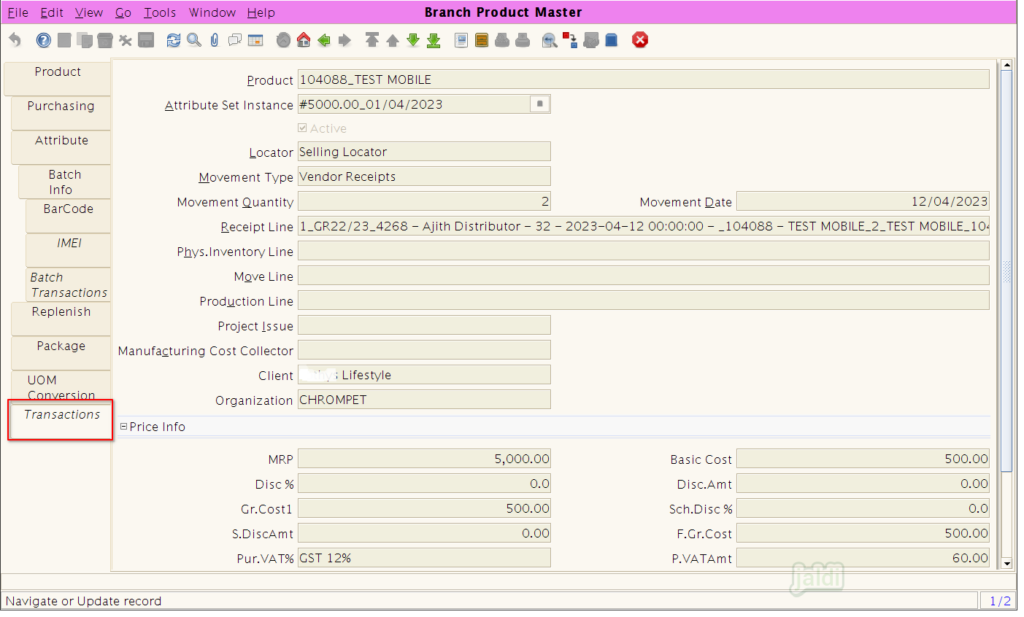
Transactions
- In Transaction screen, User can find the transaction entries details of each products. Check the below image for more clarity.
How to edit product details in branch product master ?
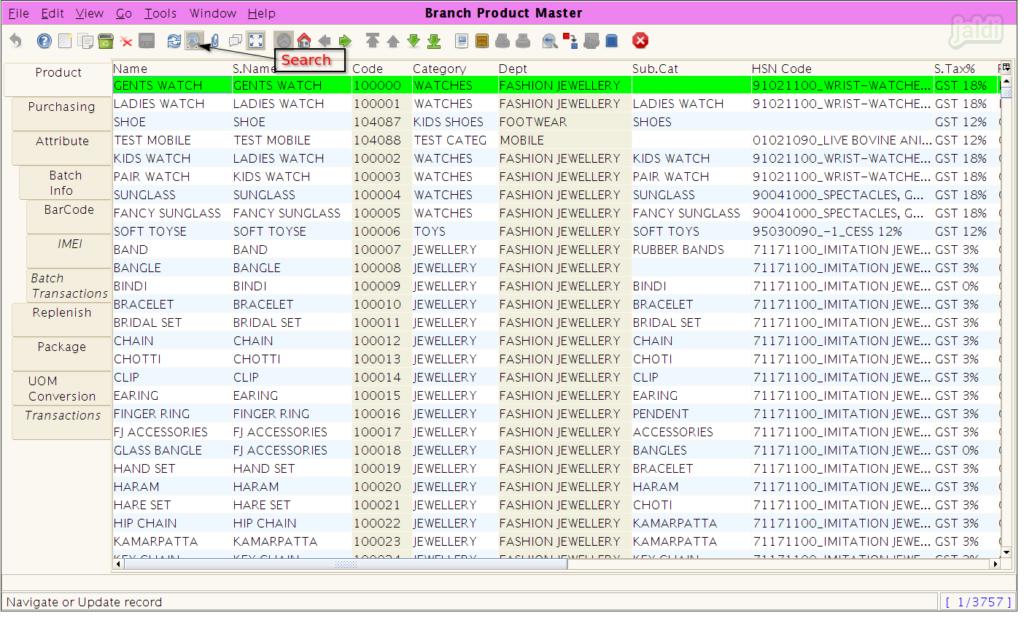
- There is a function key for search or lookup in list grid toggle view which is shown in image.
- Press that search option, it will lead you to the lookup screen
- In lookup, Enter the data to search.
- We can search using product name, s.name, code and HSN code
- After entering the required data, start the lookup by clicking on the green tick button which is shown in below image.
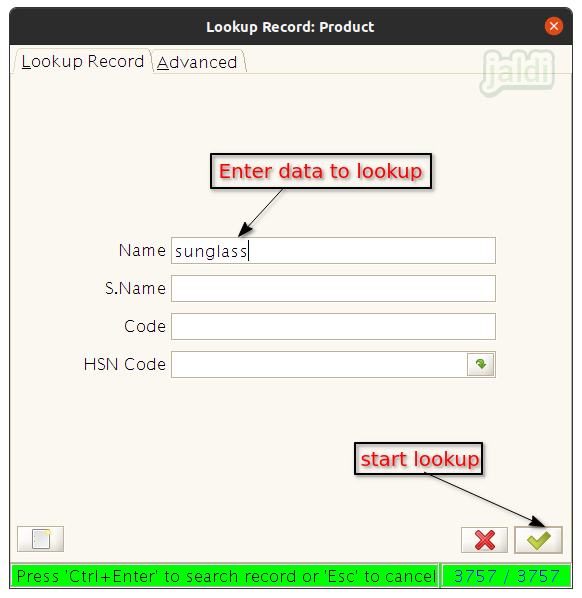
- After lookup the data will be shown and now we can edit the details we wanted.
- Not all the fields are allowed to edit in branch product master screen, only few are allowed to edit. We can edit those details and save the data by using “save” function button.