GRN Entry in Jaldi Lifestyle POS
Goods Receiving Note (GRN) entry is the transaction screen where we can update the purchase invoice details of a goods which is received from the specific supplier or vendor. i.e when the goods are received from the supplier, supplier will send purchase invoice for the goods with all the details of purchase like product name, qty, cost, MRP, GST details and other details. User need to enter the invoice detail in POS GRN entry screen to inward the stock with all correct details. Stock of system will get affected after this entry.
Ex:- Lets imagine the real time scenario where we receiving the 10 shoes as goods and it’s invoice bill from the vendor “Vinayaga Enterprises” with 10 number of quantity.
Now follow the below steps to create a GRN entry in Jaldi Lifestyle POS.
How to create a Direct GRN entry (without PO) ?
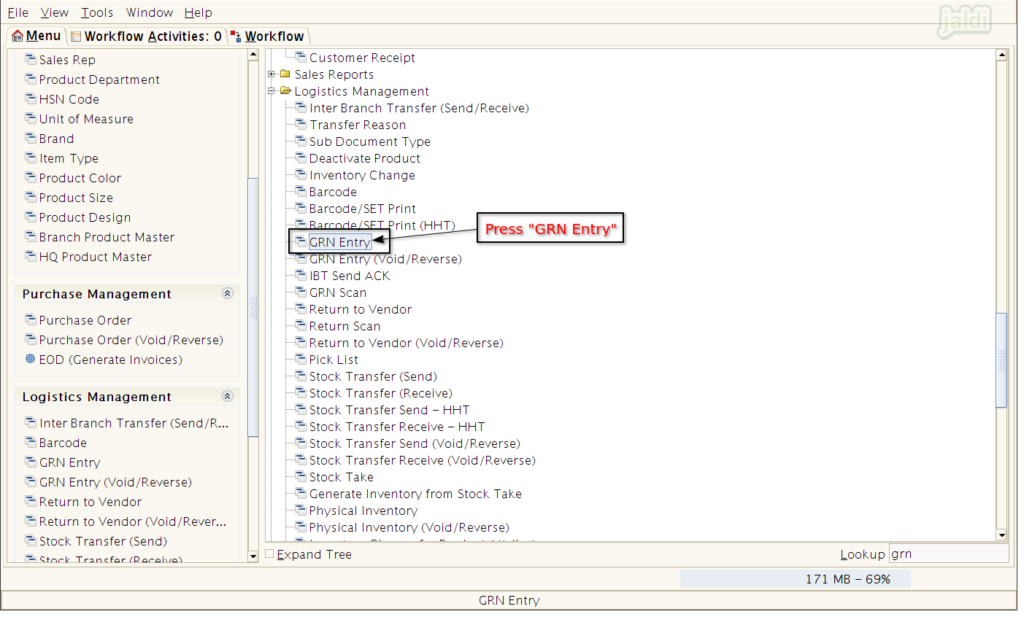
- To create a new GRN, go to application path Logistics Management > GRN Entry.
- Press the menu named “GRN Entry” to create a new GRN entry.
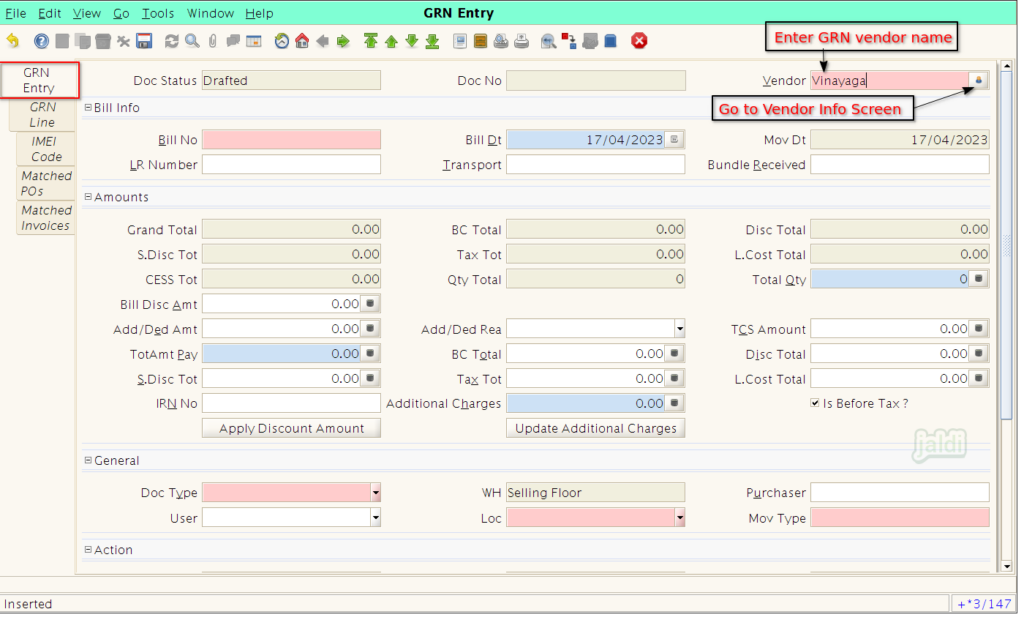
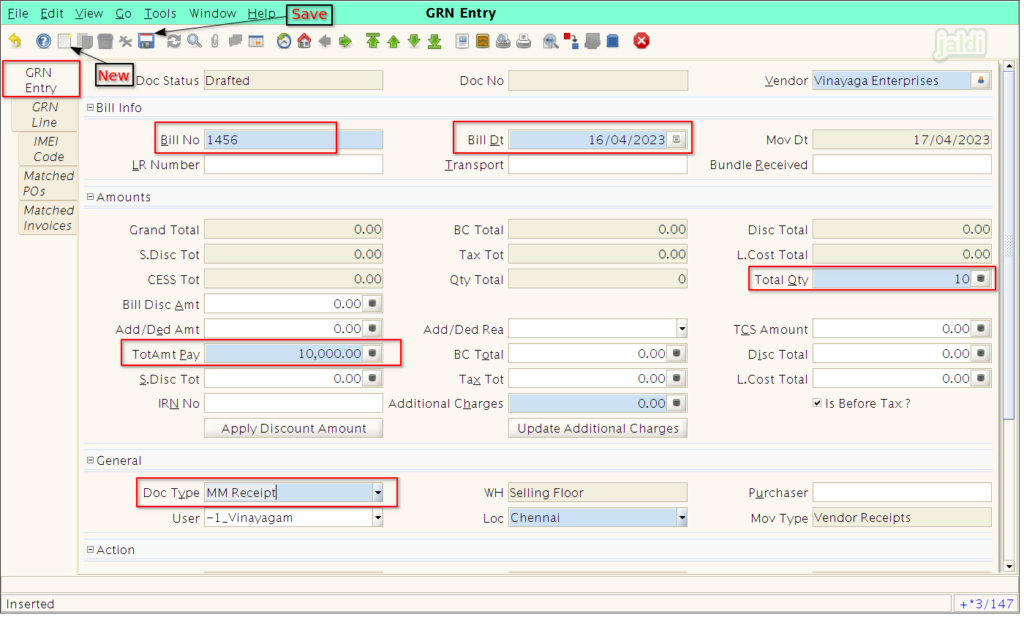
- In GRN entry tab, Press new and then search the supplier details in first step in vendor field,
- Vendor – Select Vendor name from existing vendor details or right click and press “Zoom” to create new Vendor details for current GRN entry.
- To create a new vendor, follow the steps in following link https://jaldi.store/vendor-master-in-jaldi-lifestyle-pos/
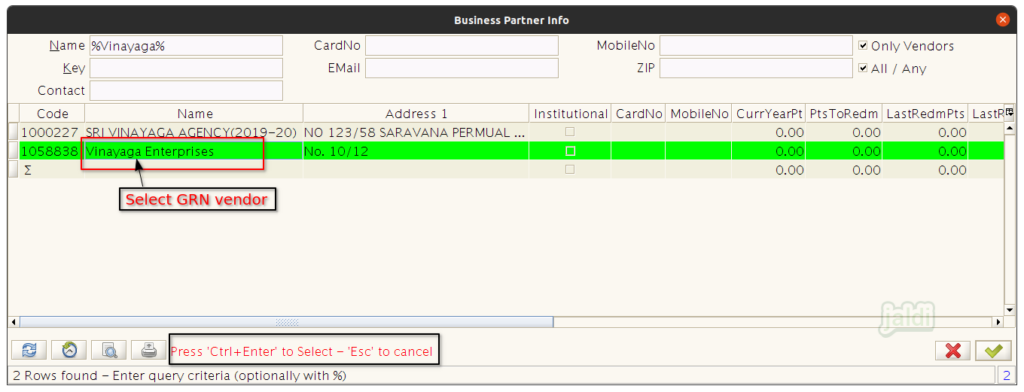
- We can also go to vendor info screen, to search the exact vendor using multiple data.
- In supplier info or business partner info, we can find the following fields to search the exact supplier name.
- Name – Vendor name
- Card No
- Mobile number
- Key
- Contact
- ZIP (Pin code)
- Once we entered data in search fields, the approximate search values will list out, select any particular vendor and press Ctrl+ Enter to load the vendor name in vendor field.
- After selecting or creating the GRN vendor, Enter the following details,
- Bill number – Invoice number or bill number from the supplier invoice
- Bill Date – Invoice date or bill date from the supplier invoice
- Total Qty – Total invoice quantity
- TotalAmt Pay – Invoice or Bill amount in supplier invoice.
- Doc type – Select document type as “MM Receipt”
- Once every required fields are filled in GRN Entry screen, press “Save” to save the “GRN Entry” tab.
- Once GRN entry tab is filled and saved, now move to GRN Line tab.
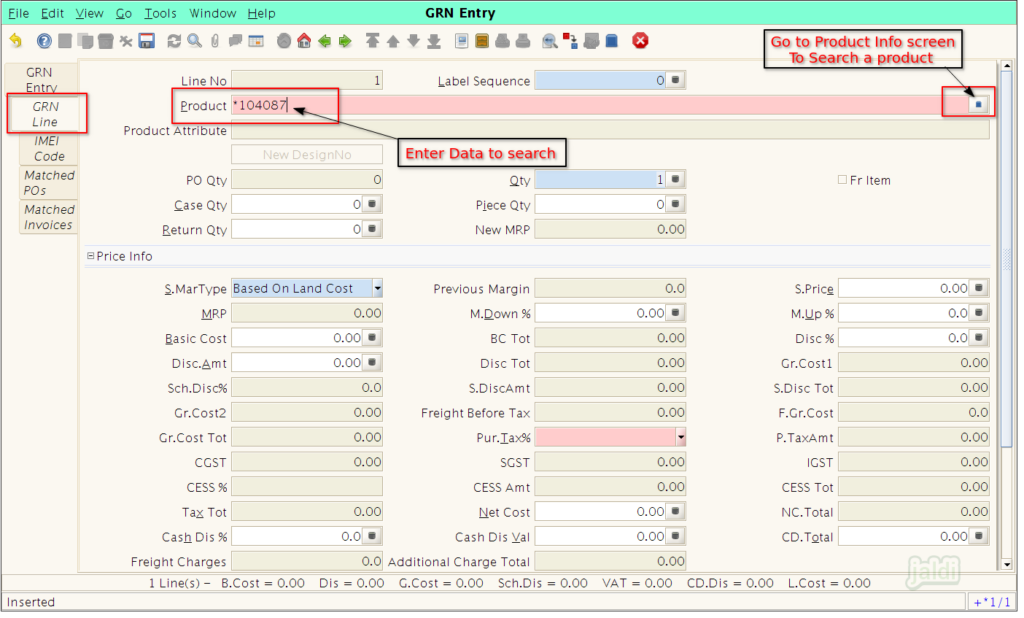
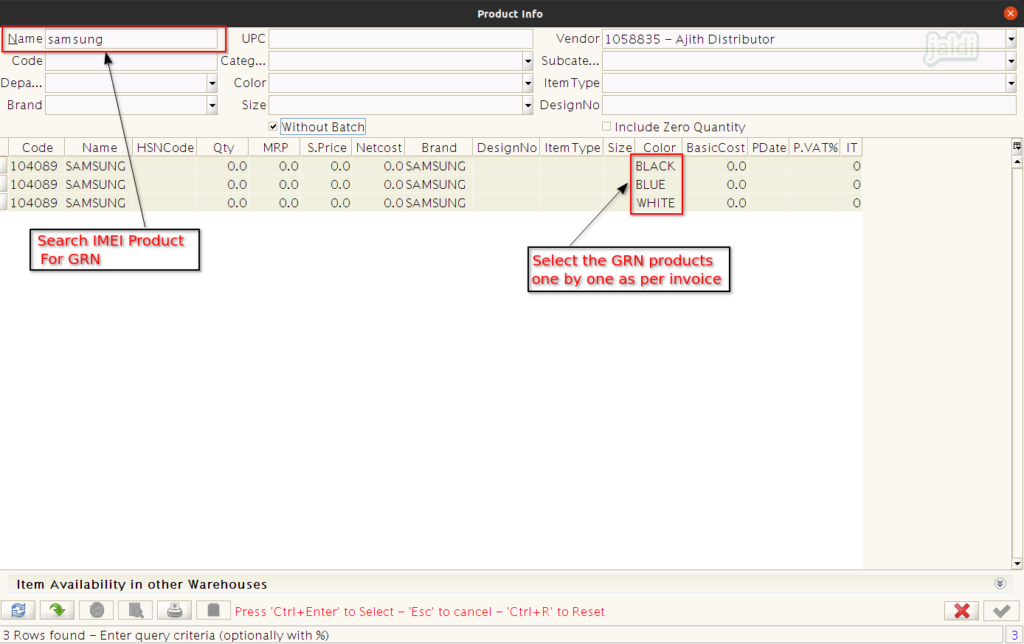
- There is a product field, where we can search the product (shoe) which is available in GRN Entry.
- Find few way to search the product,
- Enter * as prefix with product code and name in GRN line screen will easy help to load the products as shown in below.
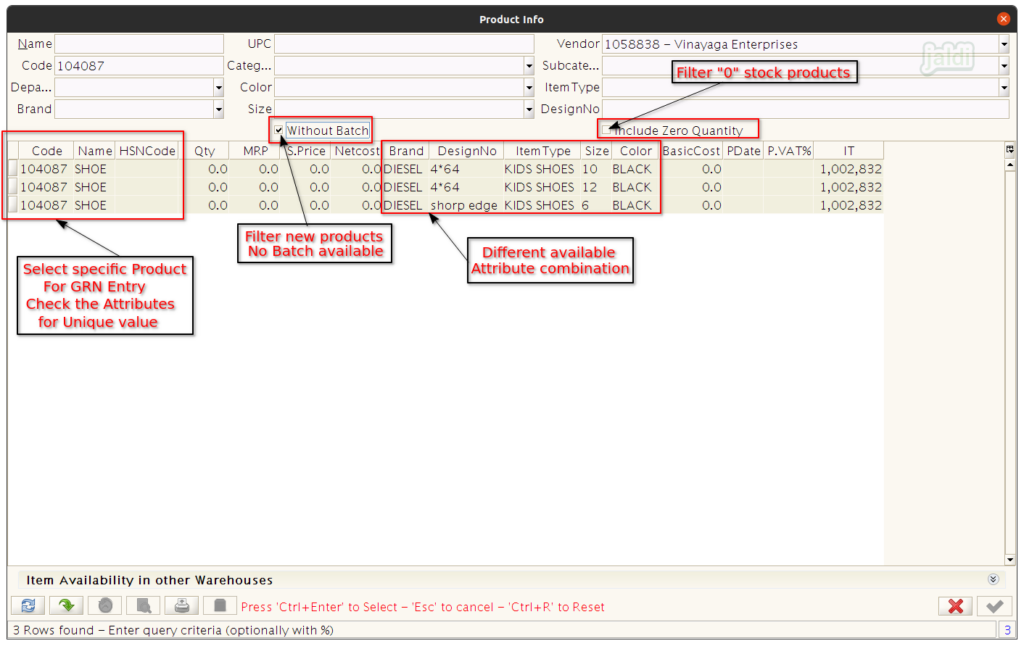
- After searching code with *, if there is multiple batch or multiple attribute combination then system will show all the available products in Product info screen, select the exact product there.
- To go to product info screen to search a product, Click on the marked button in below image.
- To create a new product, right click on the “product” field and press “zoom” and then follow the following link https://jaldi.store/branch-product-master/.
- In product info screen, you can use the following filters and options to find the exact products.
- Name – Product Name
- Code – Product Code
- UPC – Search using the EAN code
- Department – Filter department
- Category – Filter category
- Subcategory – Filter subcategory
- Brand – Filter Brand
- Color – Filter colour
- Item type – Filter item type
- Size – Filter Product size
- Design No – Filter design number
- We can find two following check box to filter the items more (filter using batch and stock)
- Without batch – The products which is not having batch will show if it is selected (mostly new products will not have the batch until any stock inward entry (GRN or stock update or stock transfer)
- Include Zero Quantity – Load the products which is having zero quantity stock with other stock products.
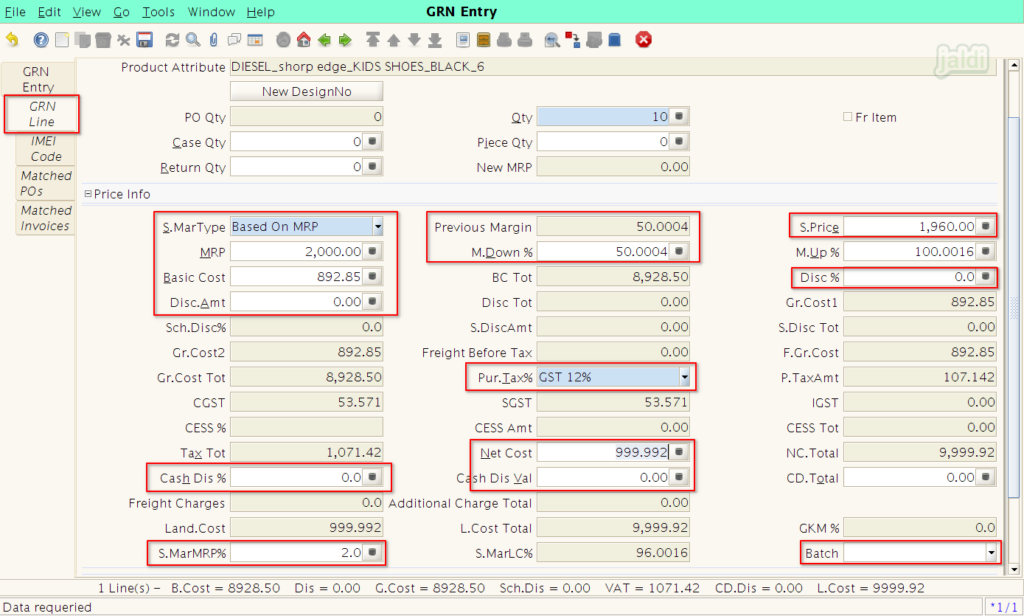
- Once a particular product is selected, start to enter the following details for a selected product in GRN line.
- S. MarType – Sales margin type > Select any one from the following
- Based On MRP – system allows to enter MRP
- Based On Landing Cost – No need to enter MRP (Selling price = MRP)
- MRP – Enter MRP of a selected product
- Basic Cost – Enter the purchase cost of a single unit with out GST
- Purchase Tax% – Purchase tax rate of a selected product will auto load, we can also change the data if needed.
- Net Cost – We can also enter the purchase cost of a single unit with GST (When Basic cost not available in supplier invoice).
- M.Down % & M.Up % – Auto calculate from MRP and Net cost to compare the current and previous margin.
- Disc % and Disc. Amt – Enter the product line discount % or Product discount amount on the respective field based on given supplier invoice.
- S.MarMRP % – Enter the Mark down percentage from MRP to fix the selling price.
- S.Price – Auto loaded using MRP & S.MarMRP %.
- S. MarType – Sales margin type > Select any one from the following
- Once all the details for particular product is entered then press “Save” function button to save the data.
- Follow the same process to load remaining products which is in the supplier invoice.
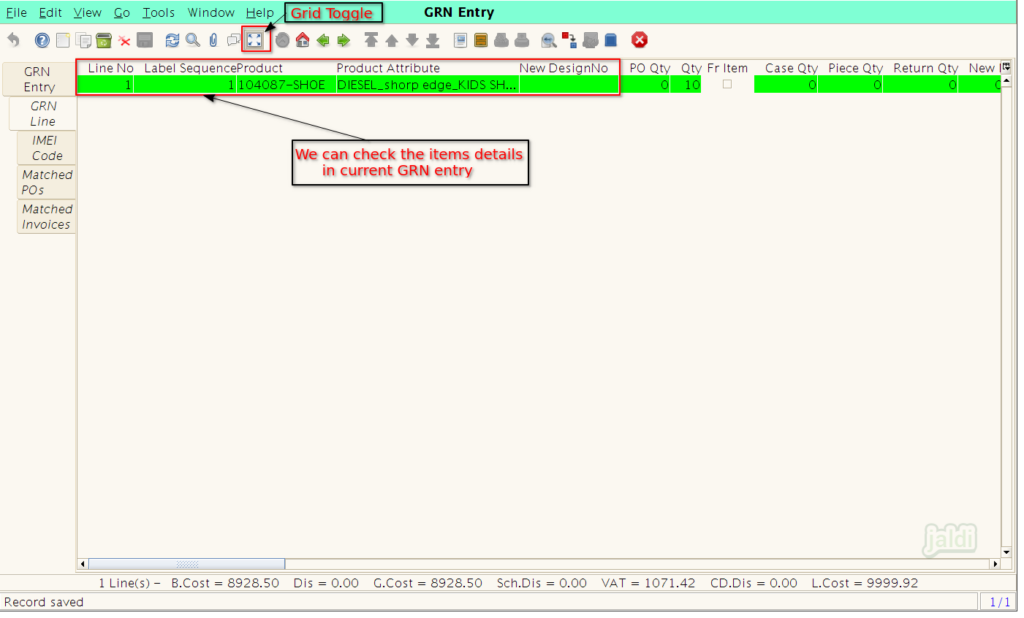
- Once every products are loaded and filled with details then click on the “Grid Toggle” to see all the loaded products in list view.
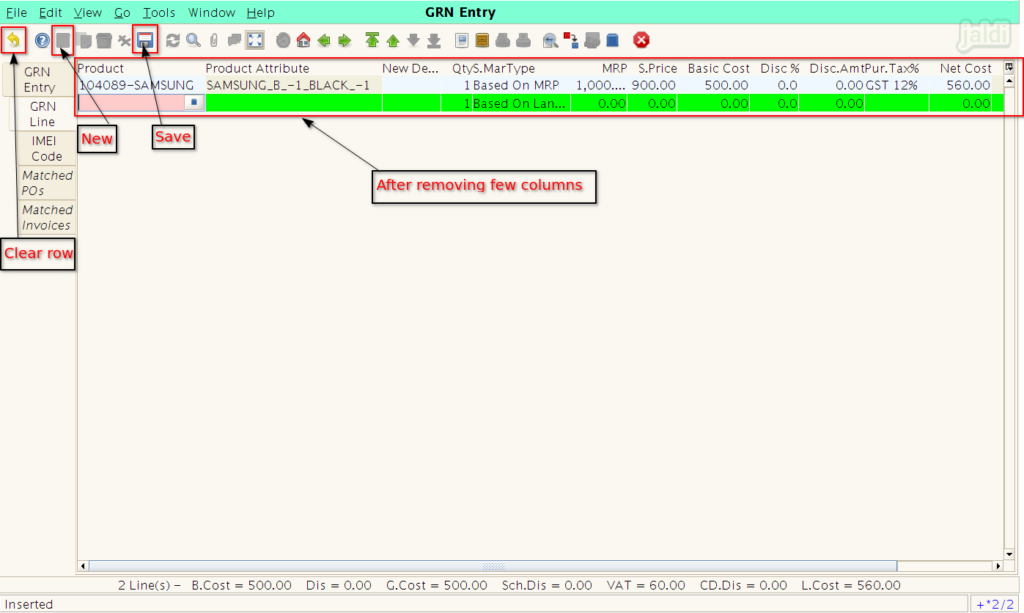
- Once “Grid Toggle” is pressed, system will show all the available products in current GRN like below shown image.
- Not only in the detailed view, in list view (the screen which is showing in below image) also we can add new products.
- Press “new” option, so new row will be added next to last product, select the product in “Product” column and enter other details like qty, MRP and other required invoice details which are available in columns and press save after entering each row.
- Once the GRN Line details are filled now go to “GRN Entry” screen.
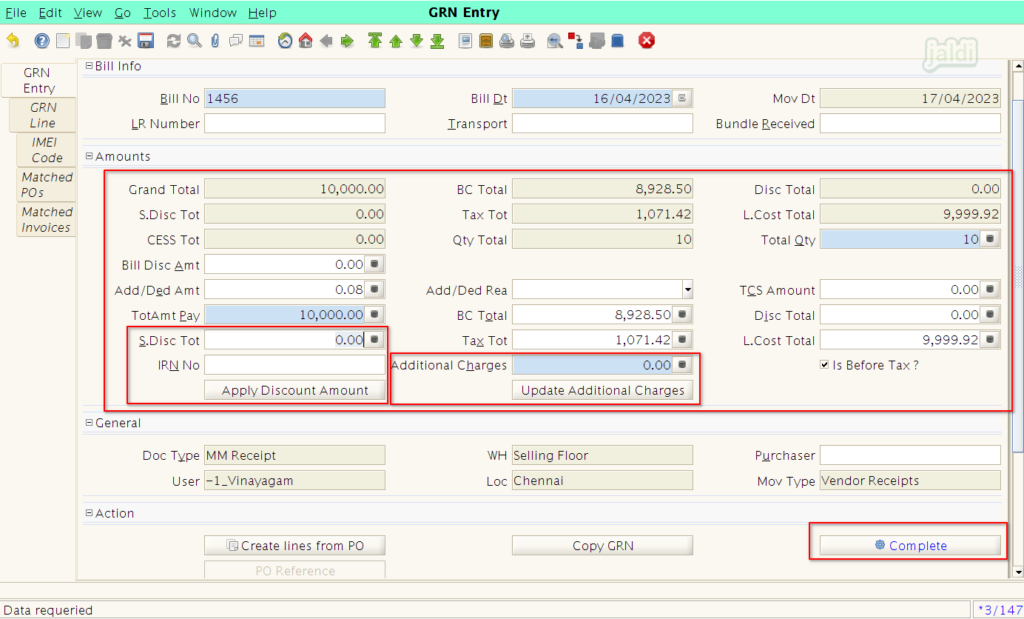
- There you can find few fields which is auto calculated based on the GRN line data.
- Grand Total should be matched equally with TotAmt Pay. If it is not matched use “Add/Ded Amt” to round off the Grand total so that Grand total will matched with TotAmt Pay.
- Also enter the Bill disc Amt – Total invoice bill discount amount from the supplier (based on supplier invoice – If supplier given enter).
- S.Disc Tot – Enter Scheme discount if given (press Apply discount to apply the Bill and Scheme discount).
- Additional Charges – If any additional charges are mentioned in Invoice enter those details in this field (like freight or other charges)
- Press “Update Additional charges” after entering the additional charges.
- Enter BC total, Tax total, Discount total and L.cost total Which is shown in BC total, Tax total, Discount total and L.cost total respectively.
- Once all the data is filled, click on “Complete” function key which is marked in below image.
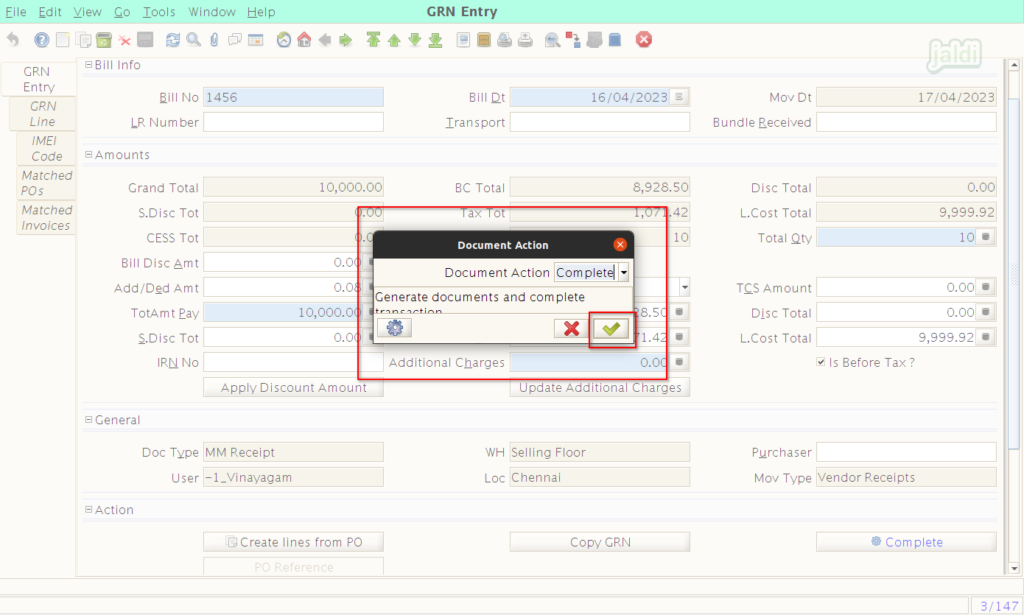
- Once complete function key is pressed, system will show the document action popup which is shown in below image, press “Green” tick to complete the GRN entry.
- If any data is mismatched, then system will show the error popup in screen with error details.
- Fix the shown error and click on the “complete” function key again.
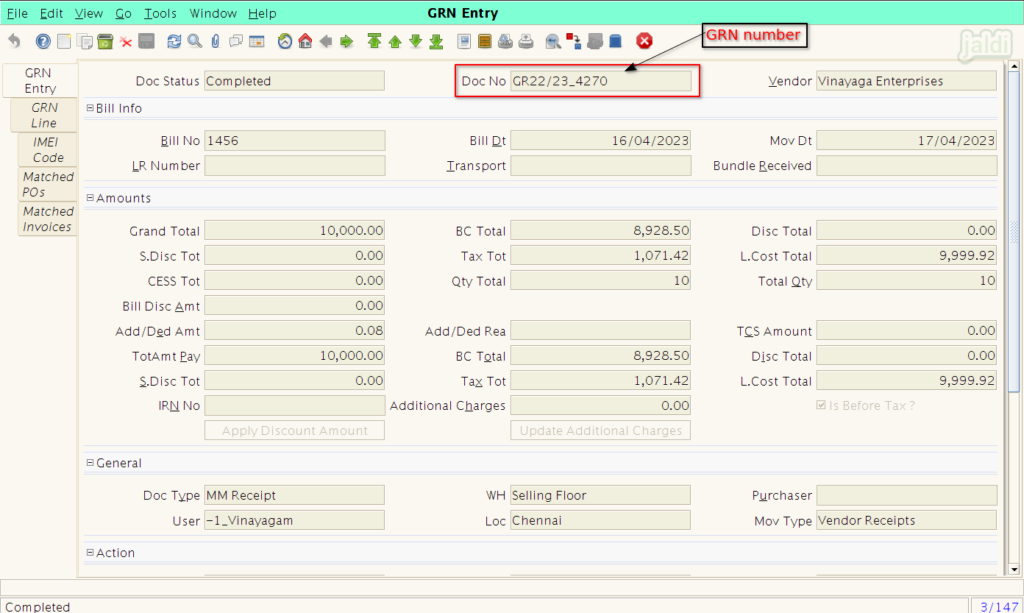
- Once the GRN is completed, we can find the GRN number in “Doc No”. This is the system generated GRN entry number.
Barcode Generation after GRN Entry
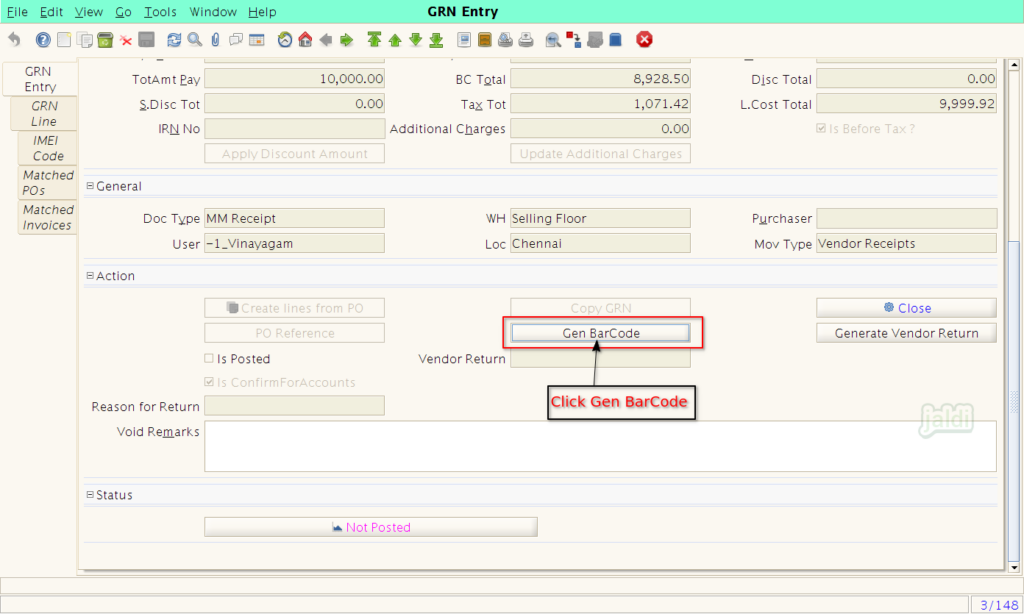
- Once GRN is completed, We can find the “Gen BarCode” field for completed GRN.
- Click on “Gen BarCode” to go to BarCode screen.
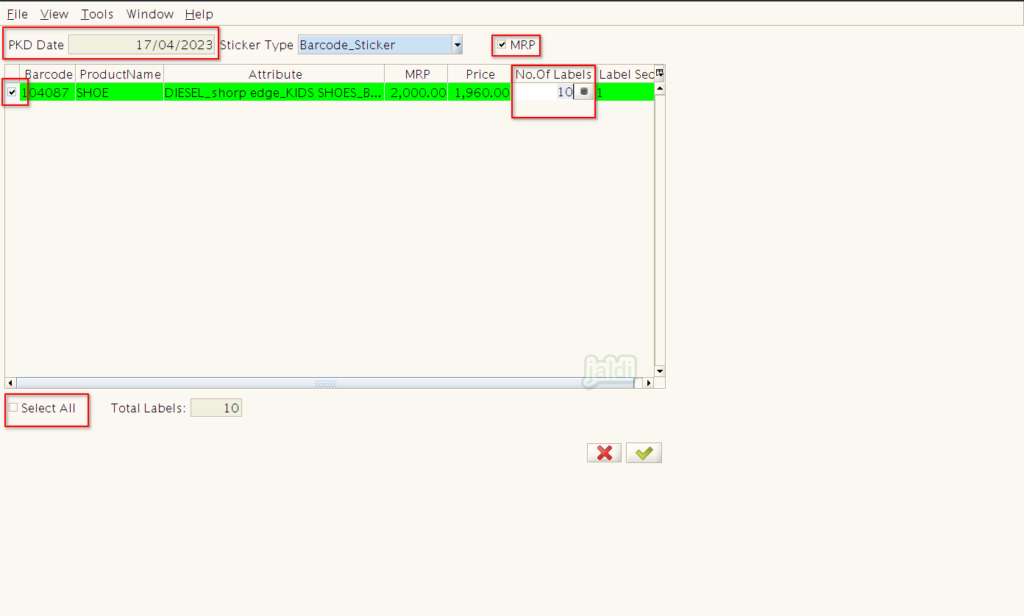
- In Barcode screen, Every GRN line items with MRP, Selling price, Quantity will be auto loaded.
- Select required products or click on “Select all” function key.
- We can also edit the “No of Labels” and also we can Select “MRP” If MRP needed to print in the barcode labels.
- After selecting and entering the required details, press “Green tick” mark to print the barcode of selected products.
How to Void GRN and How to re-use the Voided GRN ?
Completed GRN entries are not allowed to edit, But we can void and re load the void products from the specific GRN. To know more about this check the following steps.
- Only completed GRN can be voided and only voided GRN can be re-used.
- Open completed “GRN number”, Under GRN Entry tab we can find the “function” key called “close”.
- Click on that “Close” function key.
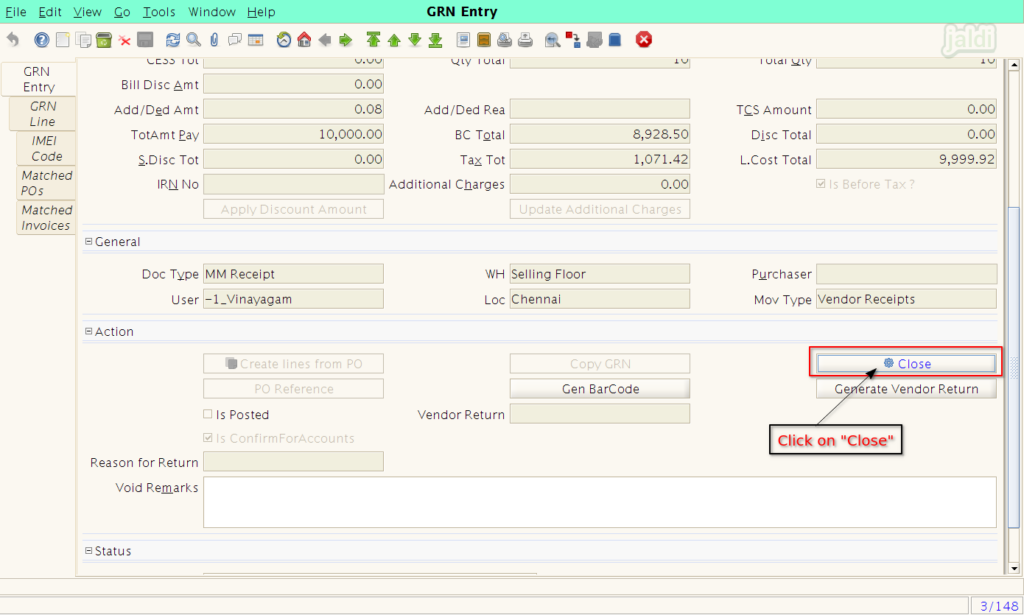
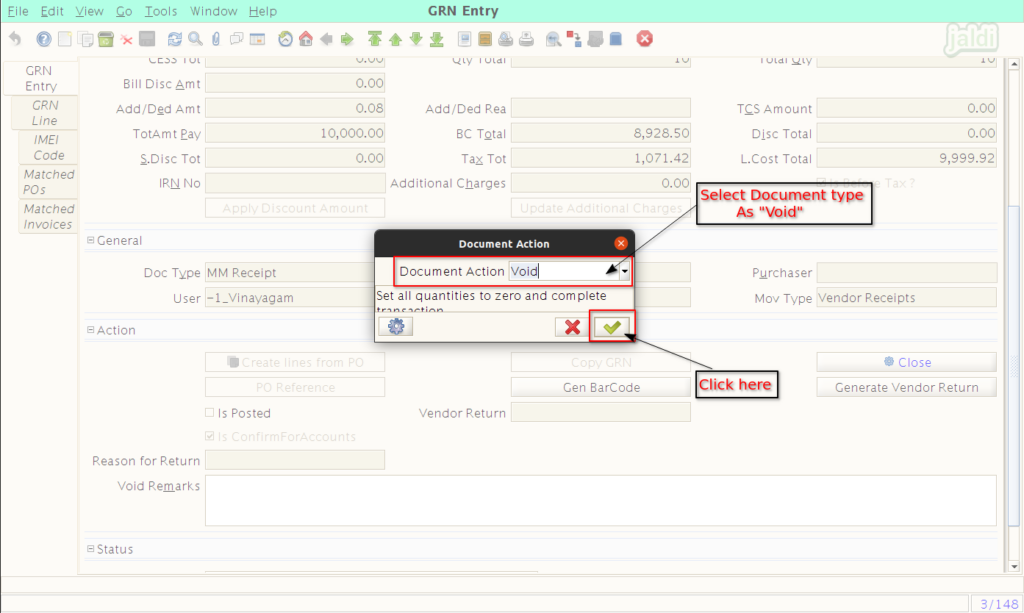
- Once “Close” function key is clicked, then system will show the “Document Action” Popup.
- Select “Void” option in Document action drop down.
- Then press “Green tick” to complete the void action.
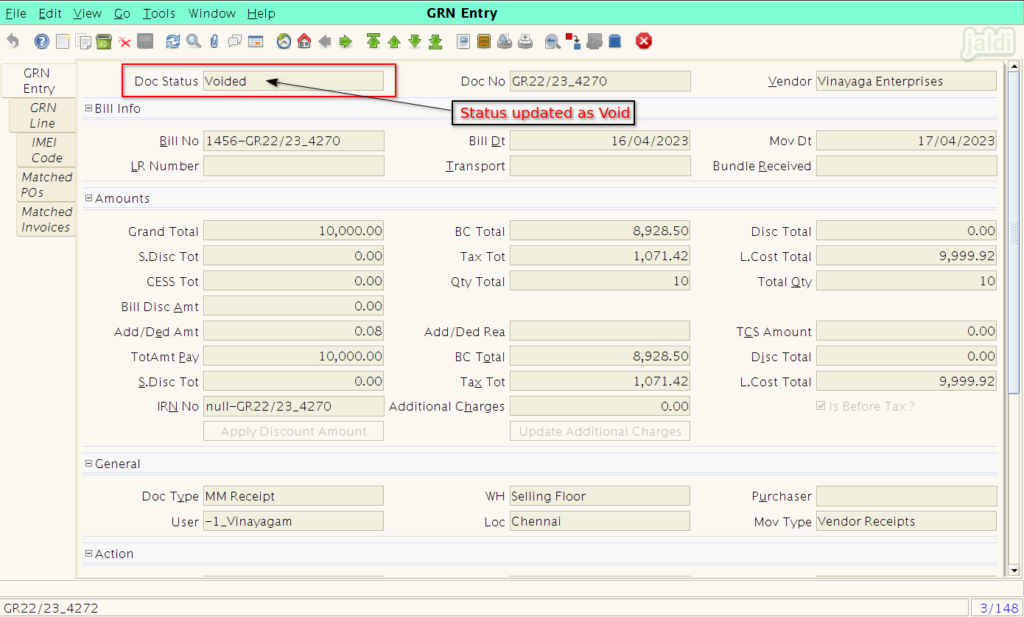
- Once void completed the “Doc status” will be updated as “Voided” as shown in below image.
- To re-use the same GRN deails, Open new GRN entry screen.
- Select the Vendor, Enter Bill number, Bill date, Total Qty & TotAmt Pay and save the GRN Entry tab.
- In GRN entry tab and under Action details we can find the function key “Copy GRN” as marked in below image.
- Click on “Copy GRN” function key. Now system will show the popup screen.
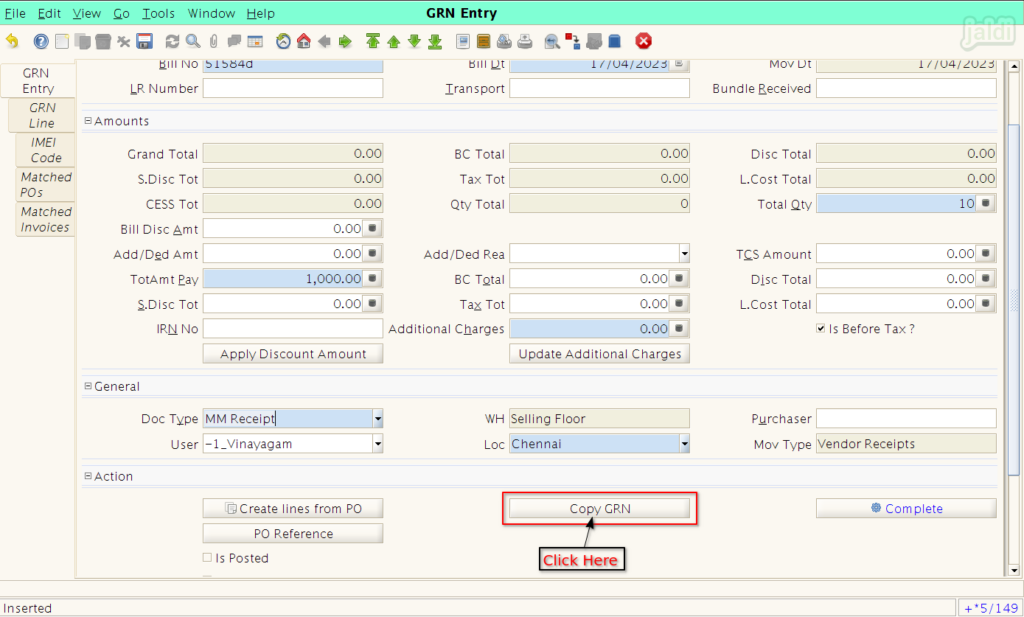
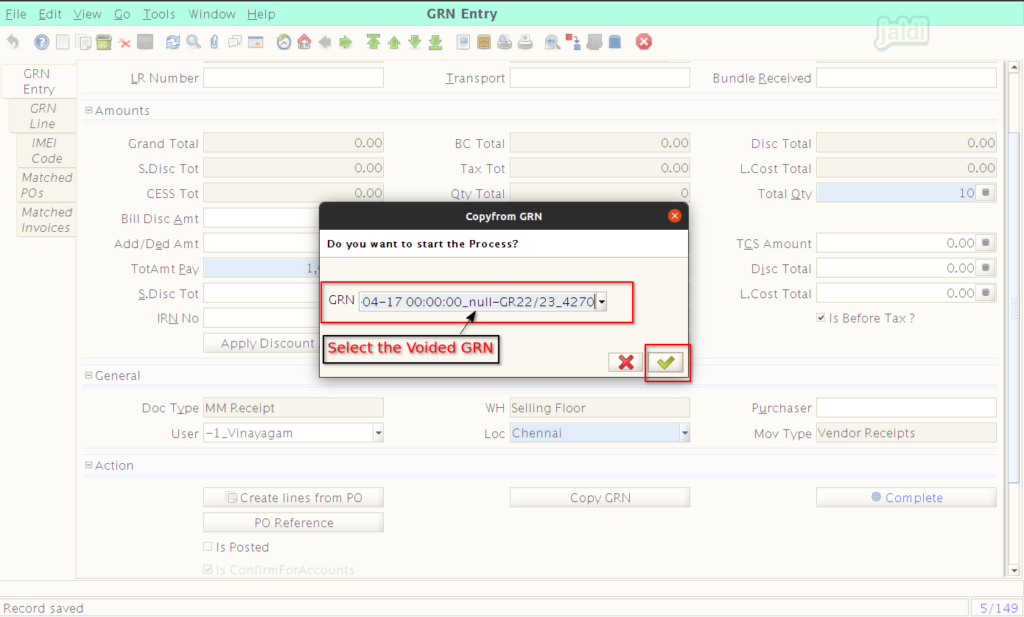
- Once “Copy GRN” is clicked, the voided GRN numbers will be shown in “GRN” drop down list.
- Select the required “Voided GRN” and press “Green tick” to update.
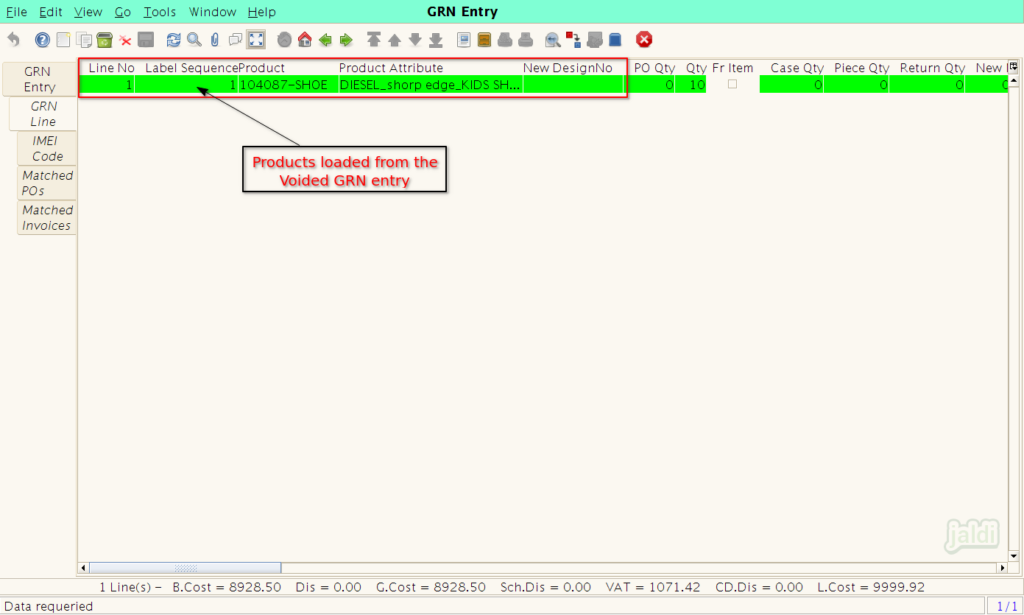
- Then system will load all voided item’s details in current GRN entry.
- We can edit the loaded details if needed.
- Then after entering all the details save the New GRN Entry.
How to do GRN Entry for IMEI Product ?
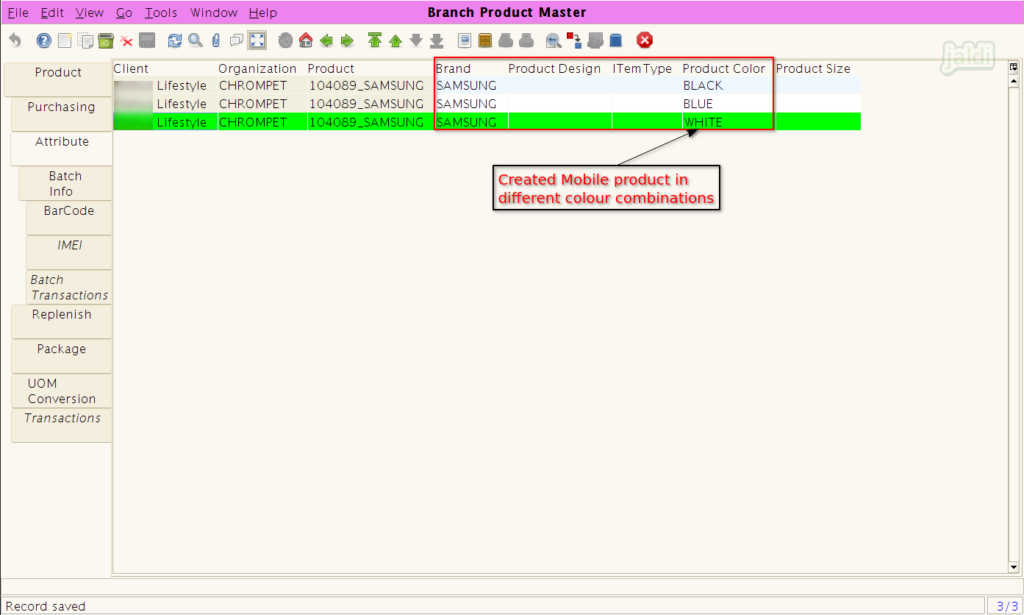
Lets imagine the real time scenario where a “Samsung” mobile is coming with 3 colour (Black, White, Blue) and all three has unique IMEI numbers. One piece will have maximum 2 unique IMEI numbers.
Follow the below steps to create GRN entry for IMEI products
The steps which is shown in above for the standard items will be same for IMEI products also. Only thing which is different between IMEI products and standard products is, for IMEI products we cannot complete GRN without entering the IMEI numbers for each quantity of received products.
How to update IMEI numbers ?
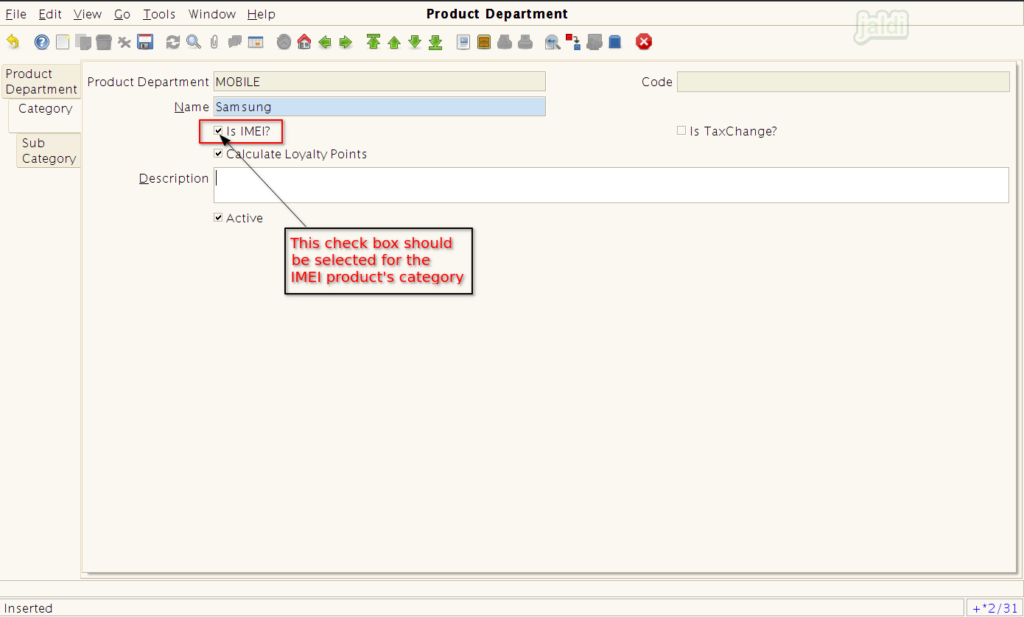
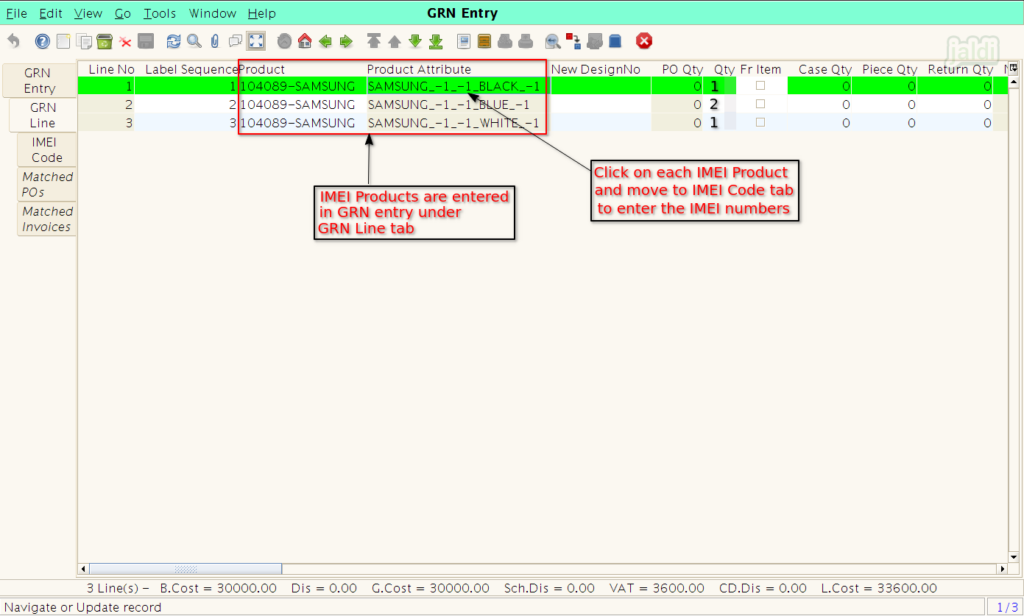
- As per given real time scenario, we have create the Samsung product under IMEI category which is shown in below 2 images.
- Once the IMEI products are created in branch product master, go to GRN entry screen.
- In GRN entry screen, enter the required details in “GRN entry” tab.
- Then in “GRN Line” tab screen, select the created IMEI products and enter the required details like received quantity, MRP, selling price, Purchase cost and other details and press save.
- Once the IMEI products received details are entered and saved, then move to “IMEI Code” tab.
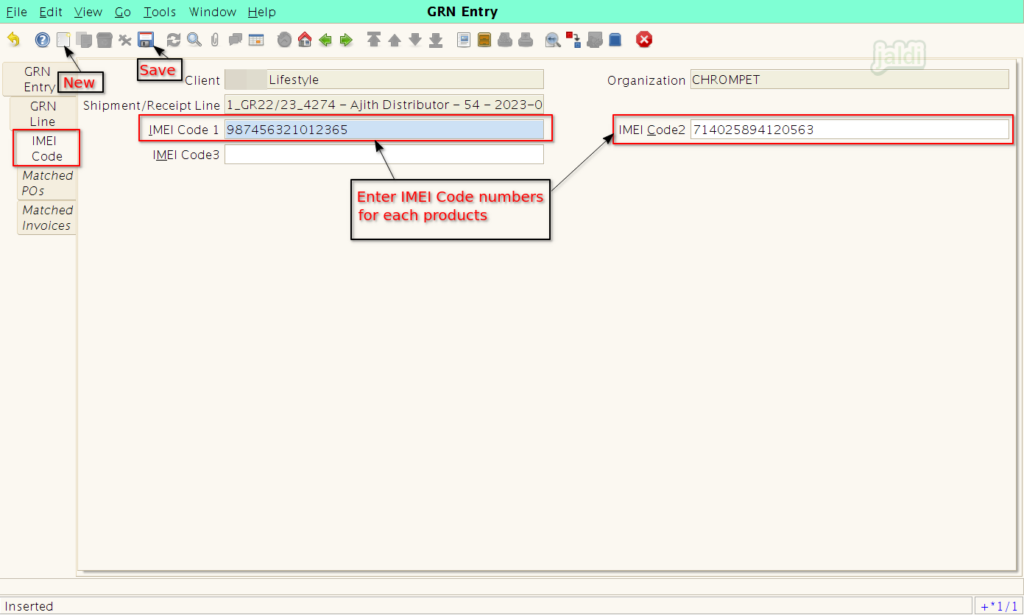
- In IMEI Code tab, press “new” function button and enter the IMEI Code 1, IMEI Code 2, IMEI Code 3 based on the number of IMEI code which is in the invoice or in above the products.
- Minimum 1 IMEI code should be entered for one unique product.
- Commonly, one mobile product will have two IMEI number on the product.
- In below image, we have updated an IMEI code for one unique Samsung mobile product.
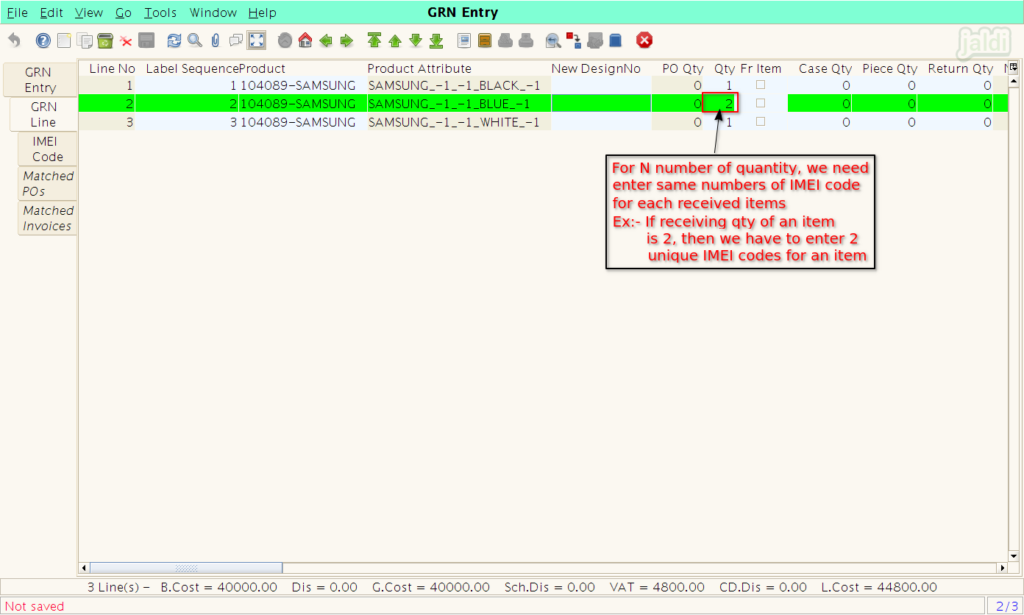
- If received qty is more than one for example two, then we have to enter the two unique IMEI codes for two received qty. check the below 2 images for more clarity.
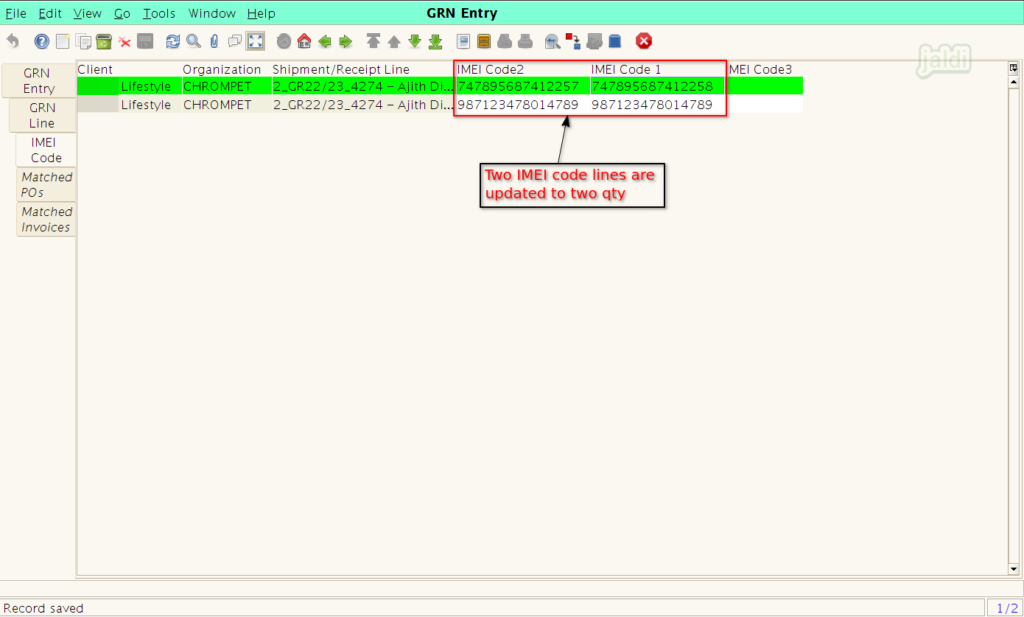
- There is should be 15 characters in each IMEI code. If not system will not allow to save the entered IMEI code.
- Also entered IMEI codes numbers are should be matched with each item’s received quantity.
How to enter the GRN products data in List view (Grid Toggle) ?
Not only in the detailed view, in list view (the screen which is showing in below image) also we can add new products to complete the GRN line.
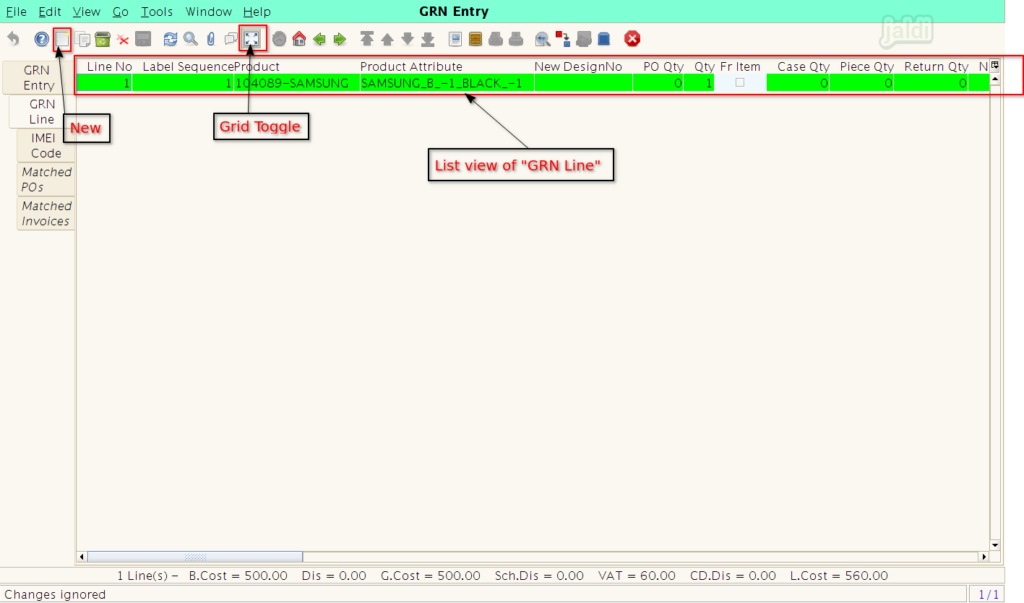
- Use “Grid Toggles” to switch the screens from detailed view to list view and also from list view to detailed view.
- Now press “new” option, so new row will be added next to last product, select the product in “Product” column and enter other details like qty, MRP and other required invoice details which are available in columns and press save after entering each row.
- In same way, we can add IMEI code also in list view.
Layout Management in GRN entry
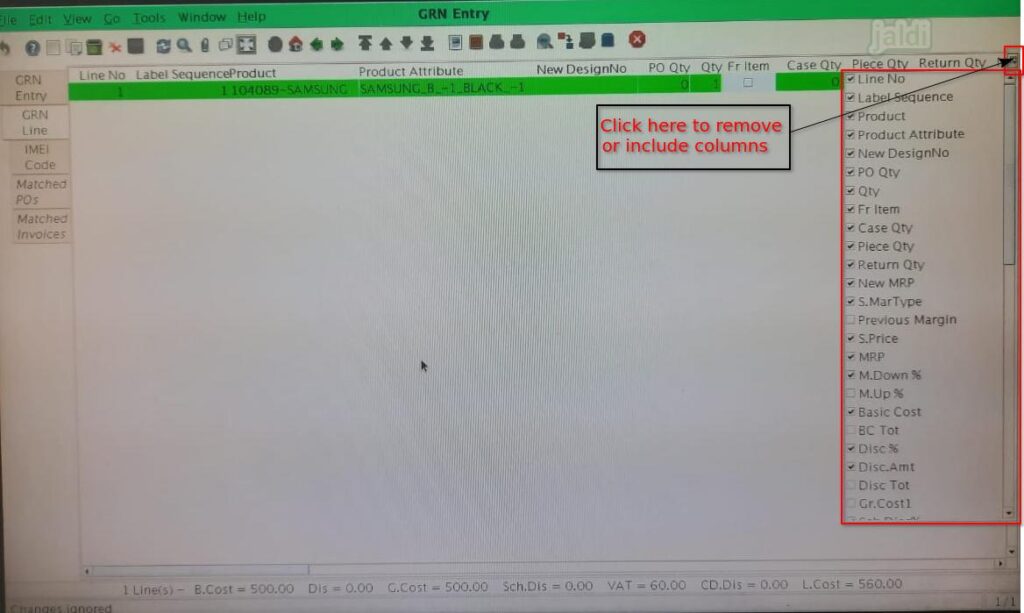
- As shown in below image, there is a option which is marked in image for user to Hide or include any columns in list view.
- Removing the unwanted columns will help you to complete GRN easily.
- Click on the marked option, unchecked the columns as per your need.
- We can include the removed columns anytime using the same option. but to include, we need to select the columns.
