Pay Only POS Terminal process in Jaldi Lifestyle POS
Pay Only is one type of “pos terminal mode” which can be selected during the pos terminal creation. Once the pos terminal mode is created with Pay Only mode and user is mapped with created pos terminal, then the mapped user can logged in to the POS screen.
In Pay Only POS terminal mode, user can only allowed to receive amount from the customer against the completed estimate bills and maintain other billing features. User cannot scan products or create estimate bills.
How to create a Pay Only POS terminal ?
- Go to application path POS management > POS terminal menu.
- Click on the “POS terminal” menu and open the screen.
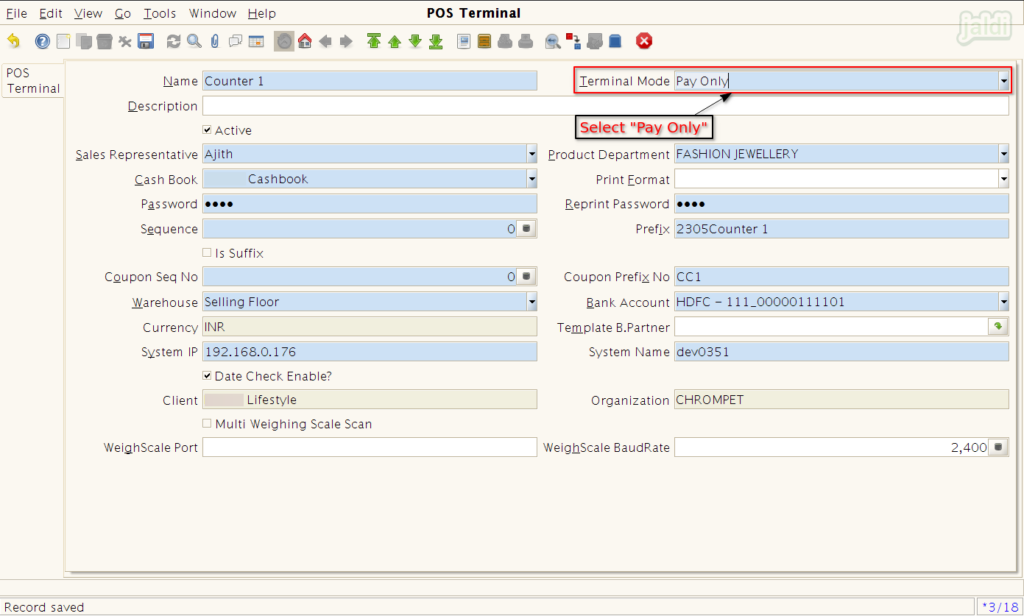
- Select “Pay Only” in terminal mode field which is marked in below image.
- Enter other required details and save the pos terminal.
- To know more about POS terminal creation, refer following link – https://jaldi.store/pos-terminal-in-jaldi-lifestyle-pos/
POS features in Pay Only POS terminal
The following process or features will be done in Bill Only POS Terminal,
- Payment against estimate bills (Bill creation)
- Credit bill creation
- Manual discount in bills
- Exchange bill creation
- Customer creation
- Tender Edit
- Bill reprint
- Denomination entry
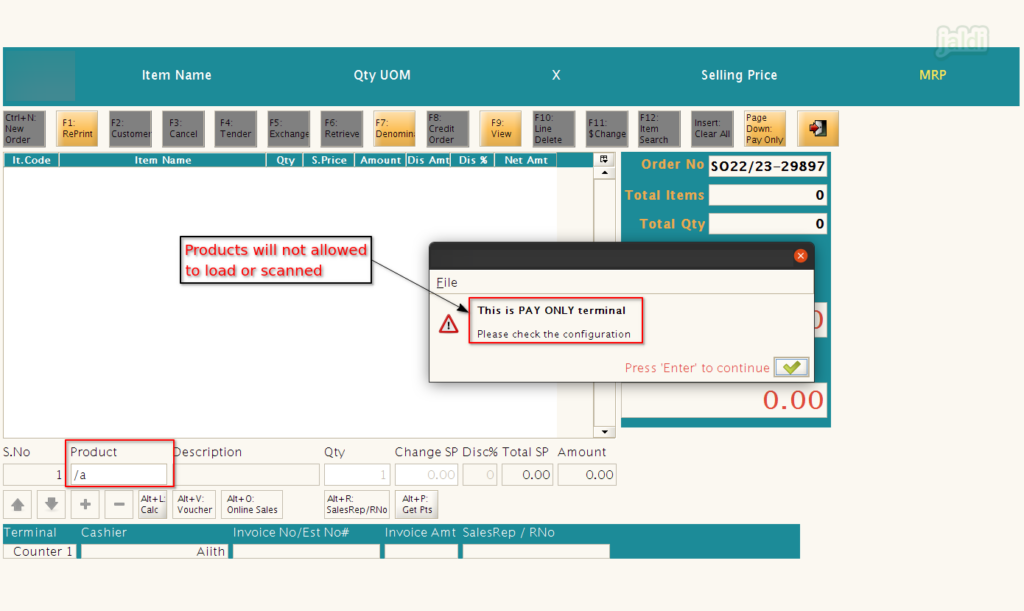
Note : In Pay Only terminal, user cannot load products, if they tried they will get the below error message.
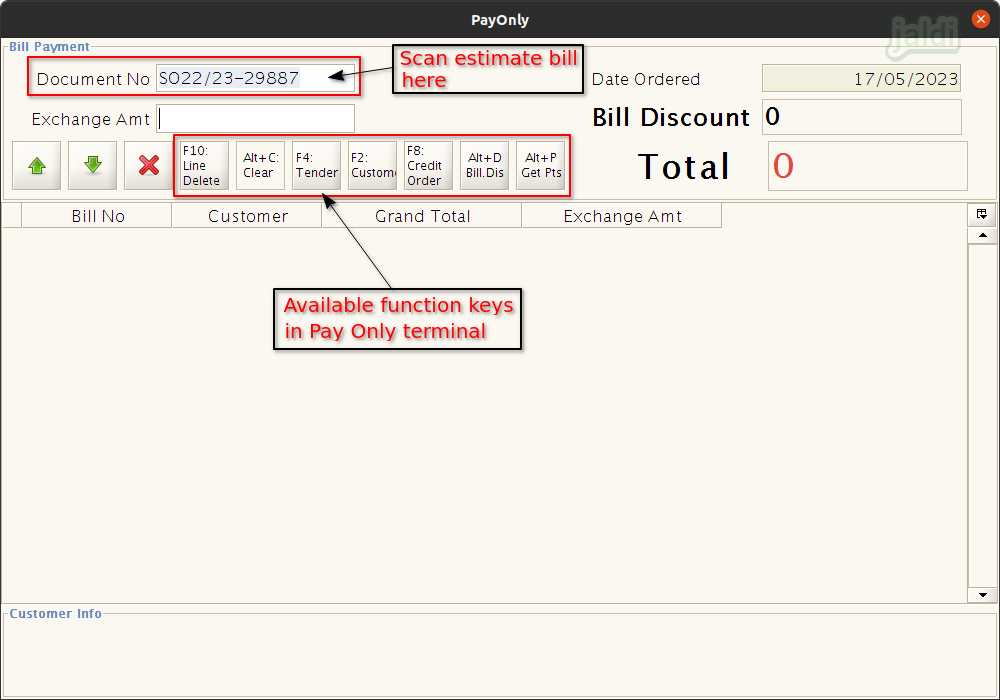
- Once POS opened, press “Page down : Pay Only” function key to get the below shown PayOnly screen.
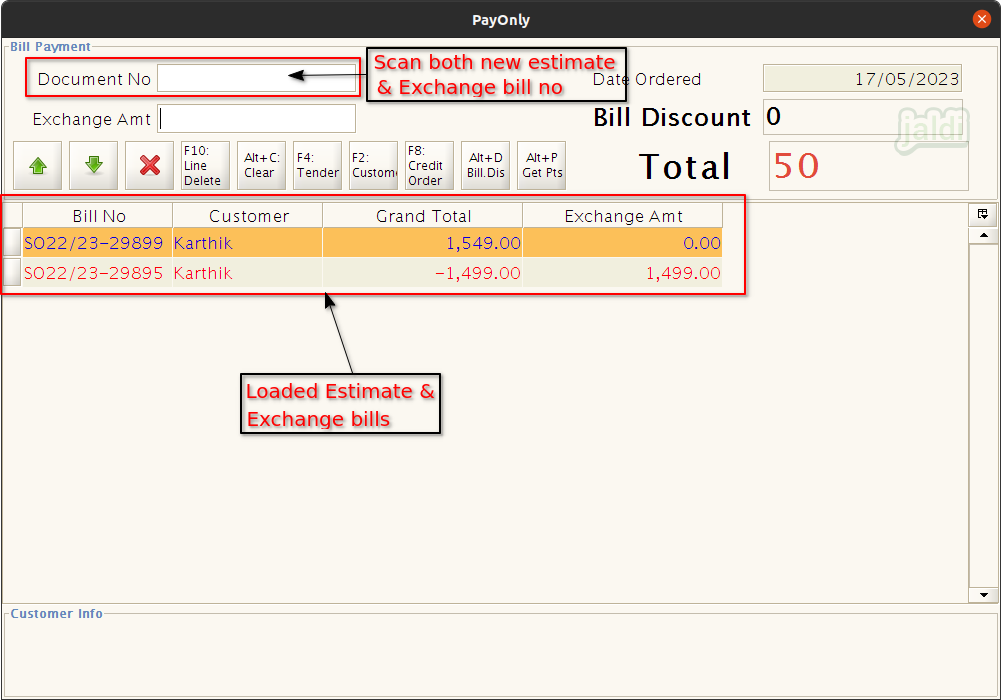
- In document no field, cashier can scan and load the estimate bills.
In this below screen, we can use the following function keys,
- F10 : Line delete – To remove specific loaded estimate bill
- Alt+C : Clear – Clear all loaded estimate bills
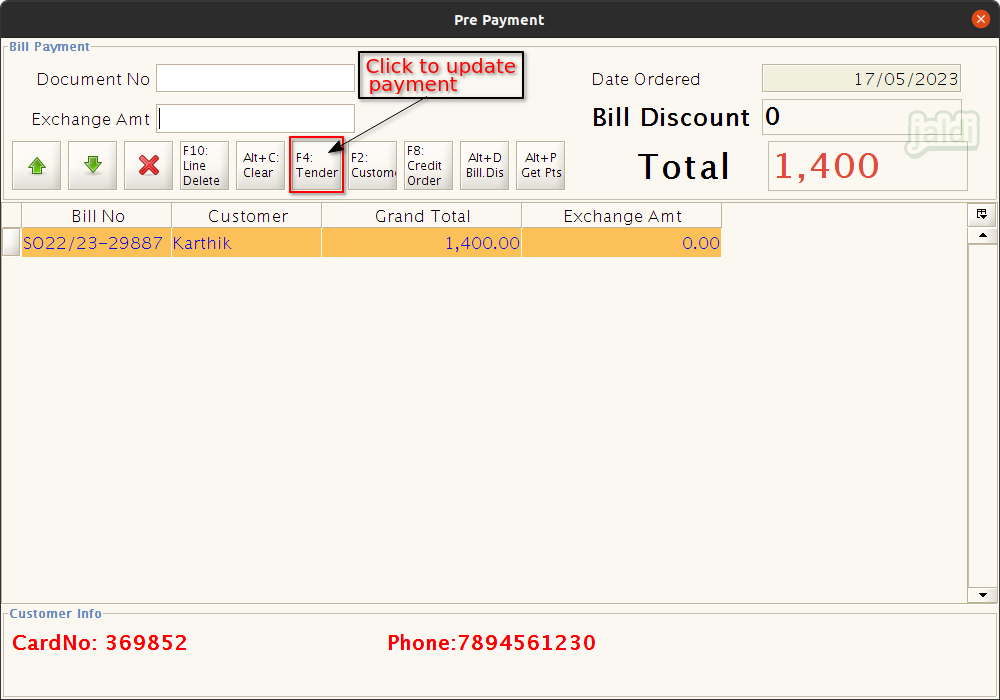
- F4 : Tender – To update payment
- F2 : Customer – To select or create customer
- F8 : Credit Order : To Create credit bill
- Alt+D : Bill disc. – To update manual bill disocunt
- Alt+P : Get points – To get to see customer current loyalty points
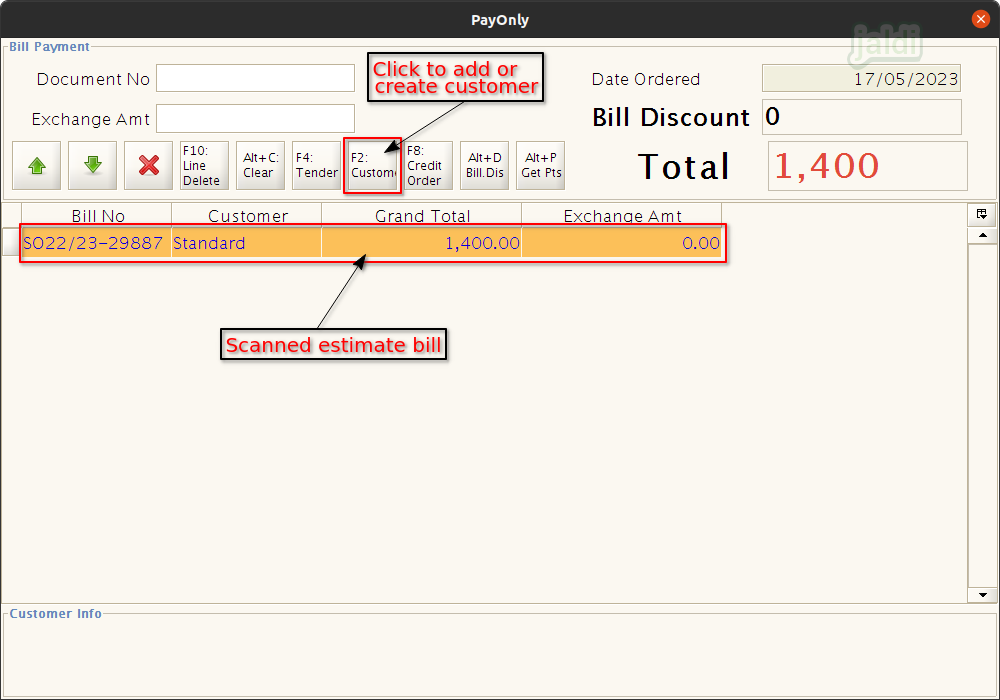
- When specific customer having multiple estimate bills, scan all the multiple estimate bill in Pay only screen, so that single customer can pay all the estimated bill in one shot.
How to create or select customer ?
- In Pay Only screen, there is a function key called “F2 : Customer”, click on that.
- Then in Query customer screen, you can find the search filters like Card No, phone, GSTin.No, Name, code and Email. Search existing customer using any one of the mentioned search filters.
- If the customer is not the existing customer, you can add customer using the “Ctrl+N New” function key.
- Note : Customer is mandatory in bill creation, if customer is not ready to share their details, we have default customer named “standard” load them to continue the bill.
- To create a new customer press “Ctrl+N” function key.
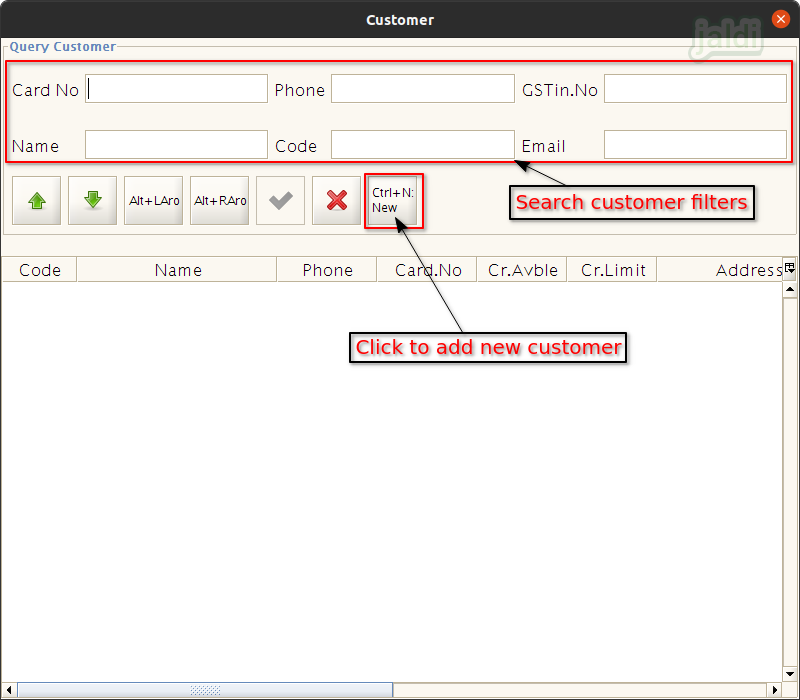
- In New customer creation screen, enter the required details like below image and click save.
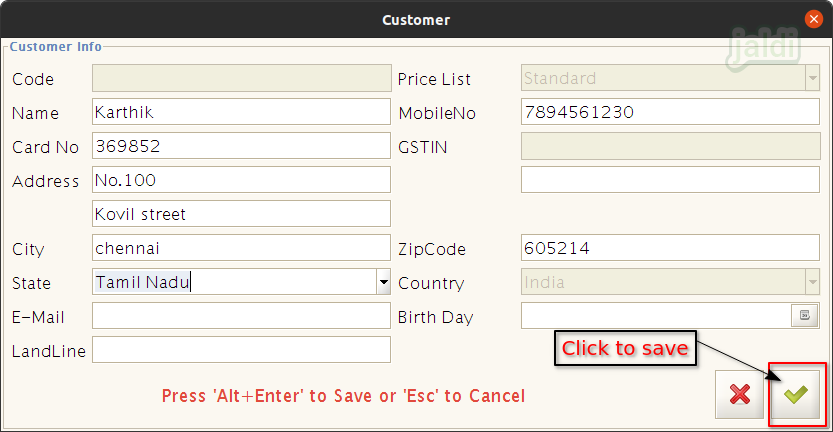
- Then in customer search screen, search the newly created customer.
- Press “Ctrl+E – Edit” to edit the customer details.
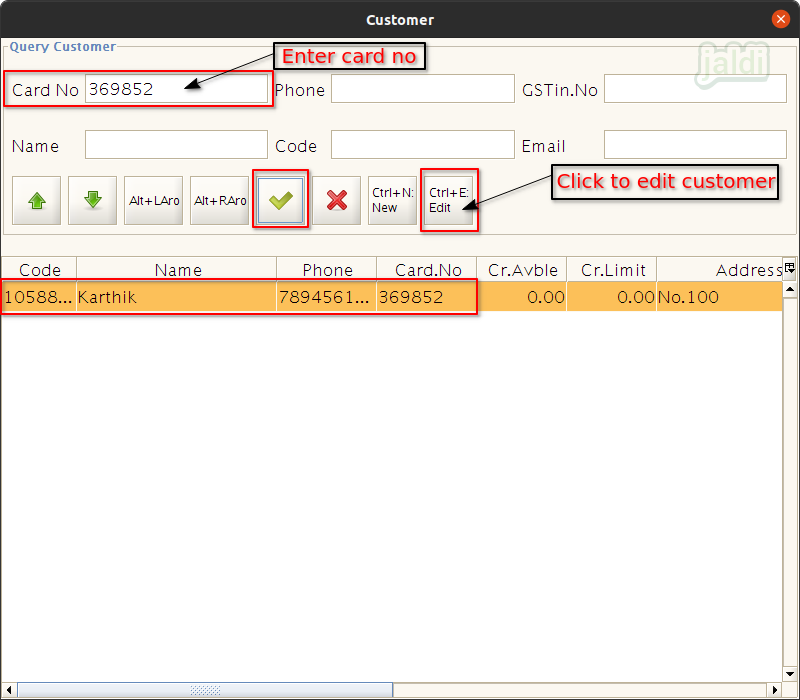
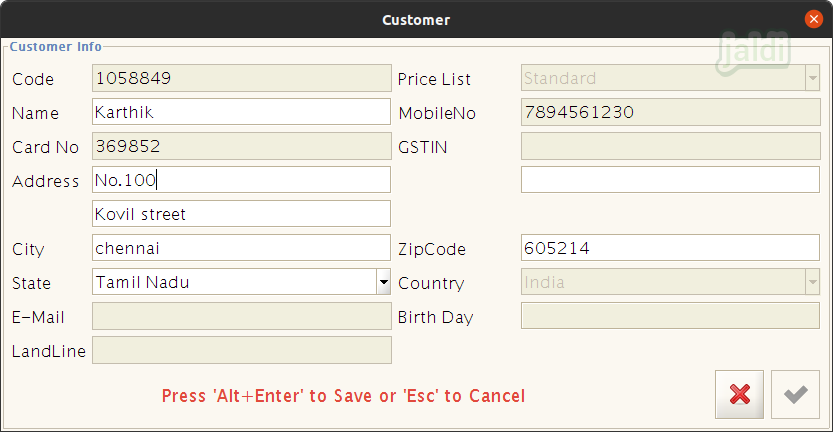
- In edit customer screen, we can only edit customer name, address details.
How to receive payment ?
- Once the customer has been added or selected, then click on the function key “F4 : Tender”.
- We can also load multiple estimate bills for single customer. Total amount of all the loaded estimated bills will be shown in “Total amount” field and then we can press function key “F4 : Tender” to update the payment details.
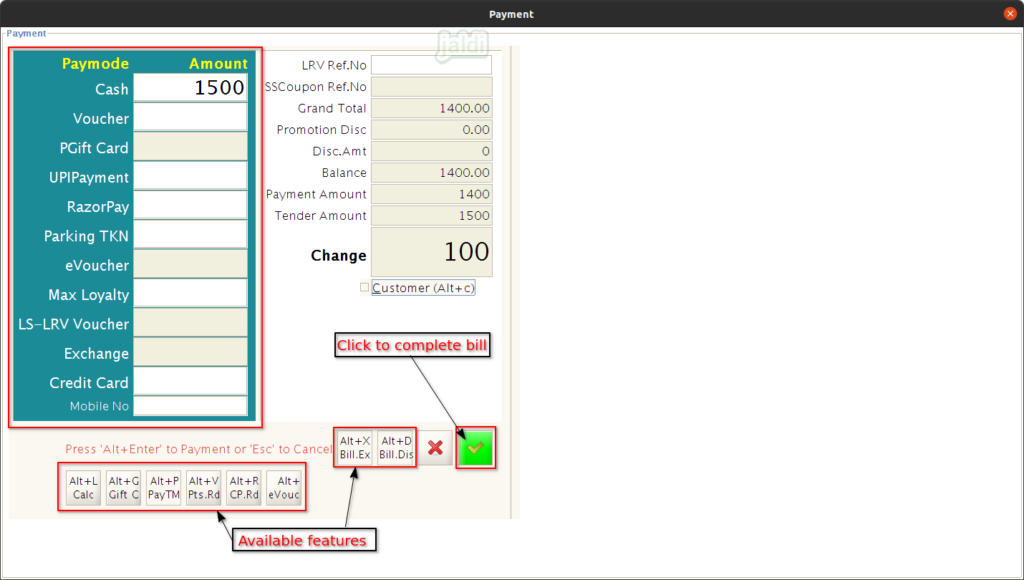
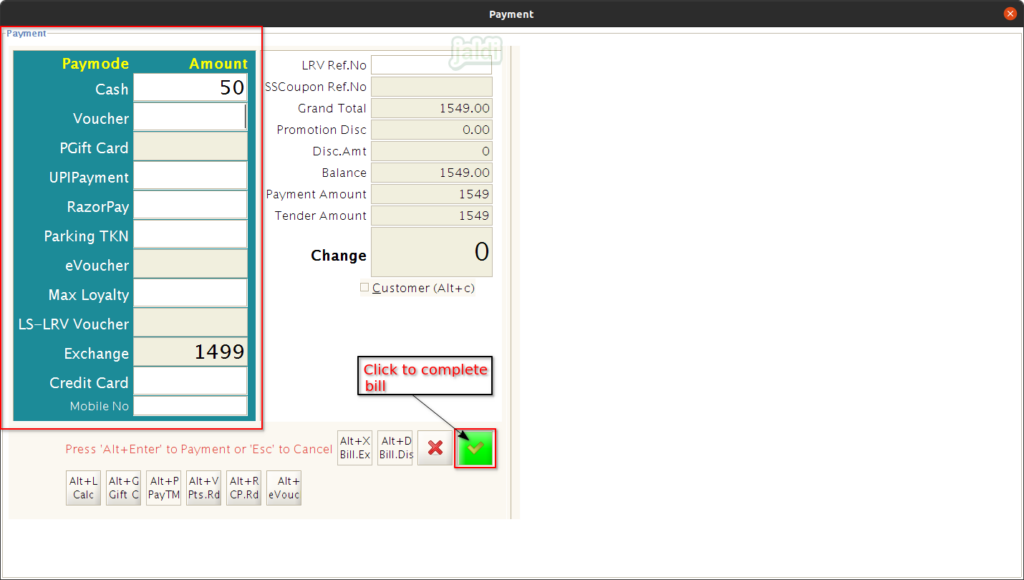
- In Payment screen, enter the received amount from the customer and update the details in respective pay mode input field.
- Once payment details are updated then click on save (green tick mark) to complete the bill.
In payment screen you can find and use the function keys like,
- Alt+D – Bill discount (Bill & Pay Only)
- Alt + X – Exchange process ( Bill & Pay only – https://jaldi.store/exchange-order-in-jaldi-lifestyle-pos/)
- Alt+L Cal – Denomination calculator.
- Alt+G gift card – Gift voucher payment
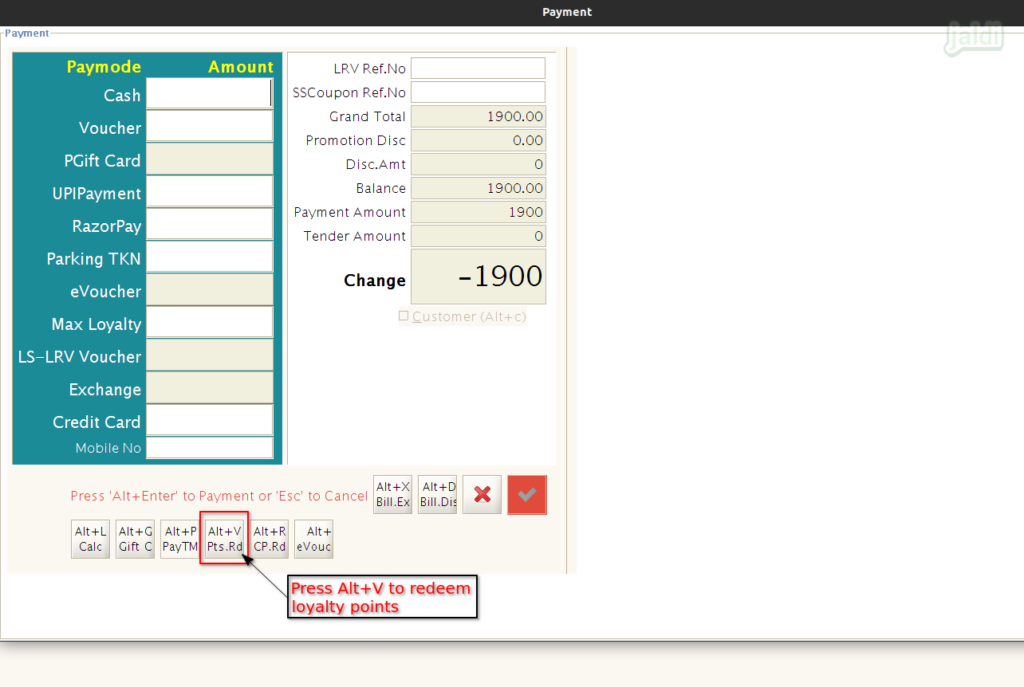
- Alt+V points redemption – Loyalty point redemption
- Alt + e (E voucher) – E voucher payment.
How to update manual bill discount
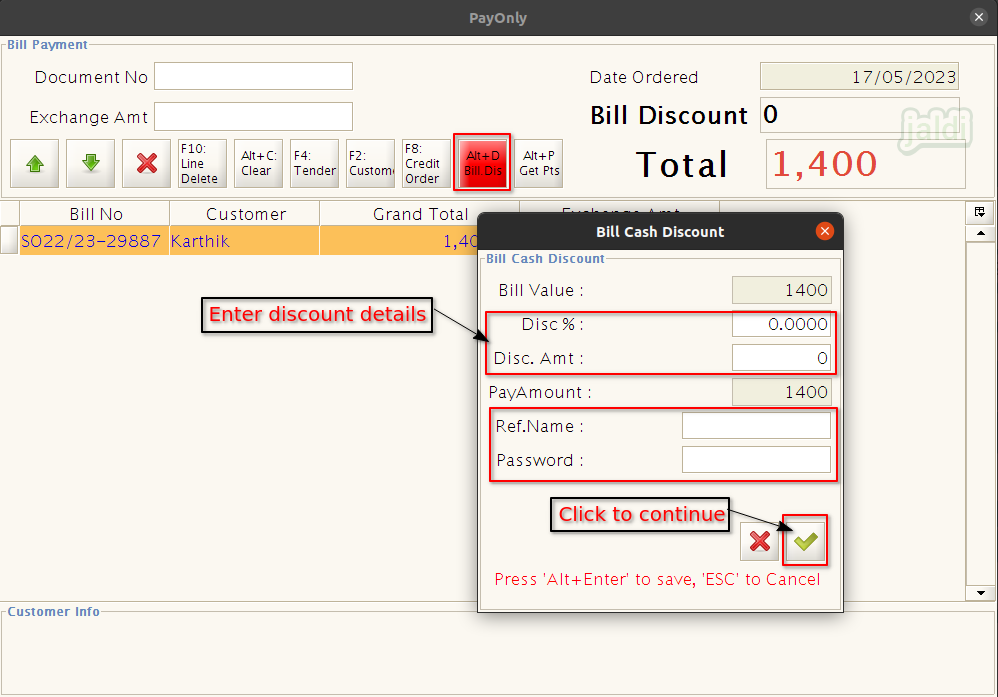
- In pay only screen, there should be the function key called “Alt+D” for bill discount.
- Click on that, then enter Disc % or Disc. Amt.
- Also user need to enter Ref. name and password (terminal password)
How to create a Credit Bill ?
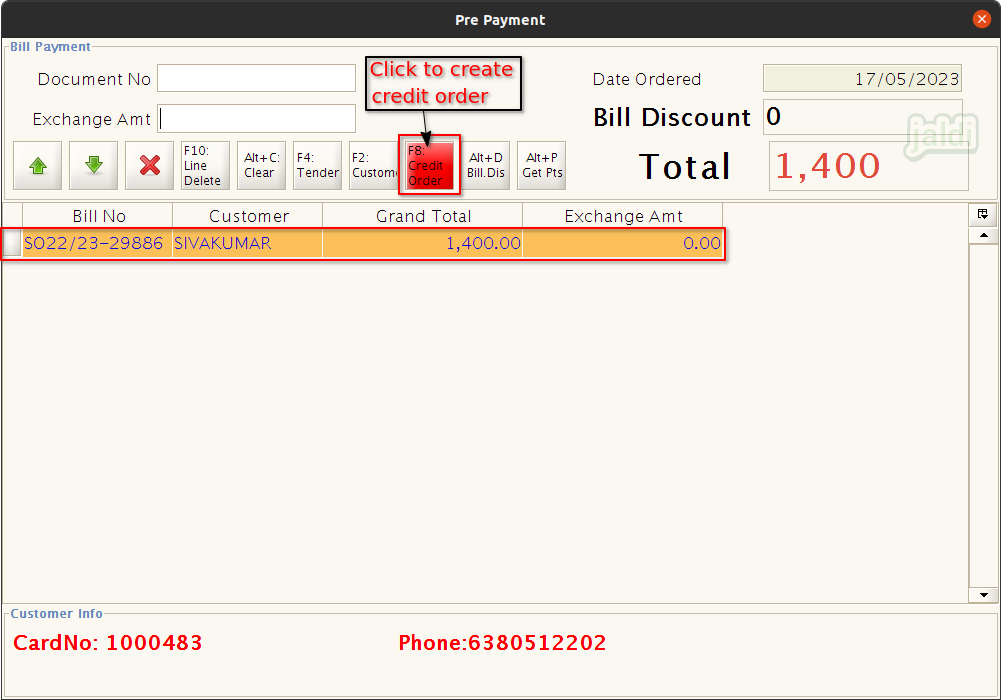
- There should be the function key named “F8 : Credit Order”, click on that.
- Enter password, then “F8 : Credit Order” turns in to red colour like below shown in image.
- Now scan the required estimate bill and complete bill using “F4 : Tender” function key.
- Created credit bill will be paid later in payment screen.
How to complete Exchange bill ?
Both returned item and new exchange item will be loaded and saved in Bill Only terminal. In Pay Only terminal both the bills will be matched and updated in payment. Check below steps to know how to complete the exchange bill.
- In Pay Only screen, scan the estimate bill of an exchange product.
- Then scan exchange bill of returned products like below shown image.
- Once both the bills are loaded, press “F4 – Tender” function key to open payment screen.
- Note : the newly purchased product’s price or amount should more than the returned amount. System will not allow negative or zero value bill.
- In payment screen, enter the respective paid amount in respective pay mode and click “Alt+Enter” to save the bill.
How to Redeem Loyalty points in Bill ?
- Create customer with card number in POS billing screen or in customer master.
- Create bills for created customer in POS billing screen, so the loyalty points will be added to the customer.
- For Rs. 100, 10 points will be added to customer (for 10 rs, 1 point will be added).
- For each bills, the loyalty points will be accumulated to specific billed customer based on their purchases in the shop.
- So when you want to redeem the customer points, in payment popup screen (F4), click on “Alt+V” which is marked in below image to open point redemption popup.
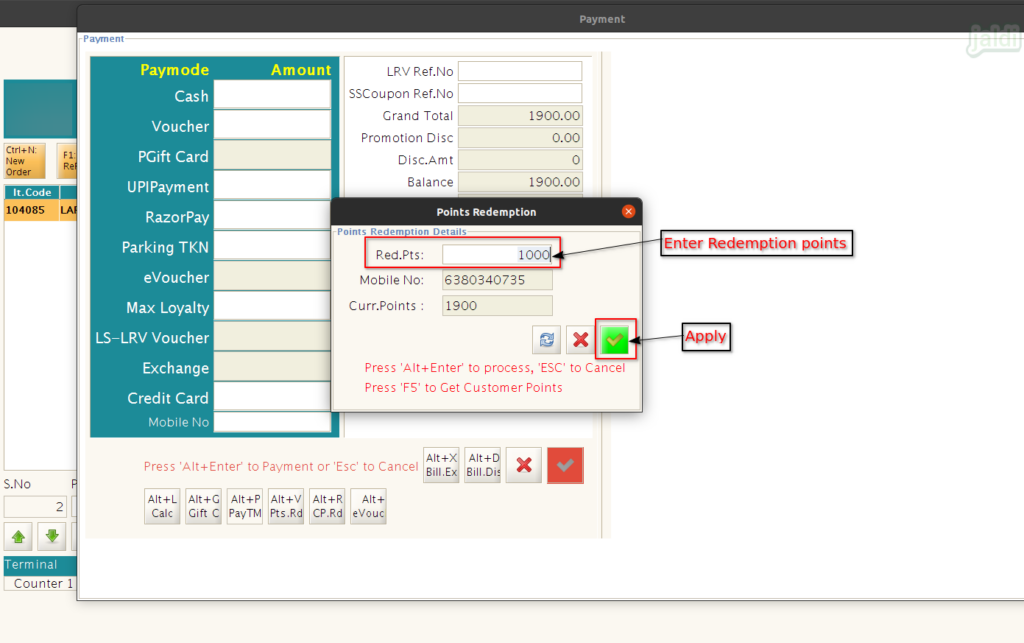
- In points redemption popup screen, enter points to redeem in the field “Red.Pts”.
- Press F5 to get a customer points.
- Then click on “Apply (green tick mark)” to send OTP to customer mobile number.
- Once OTP sent, system will show the OTP send Successfully message like below shown image.
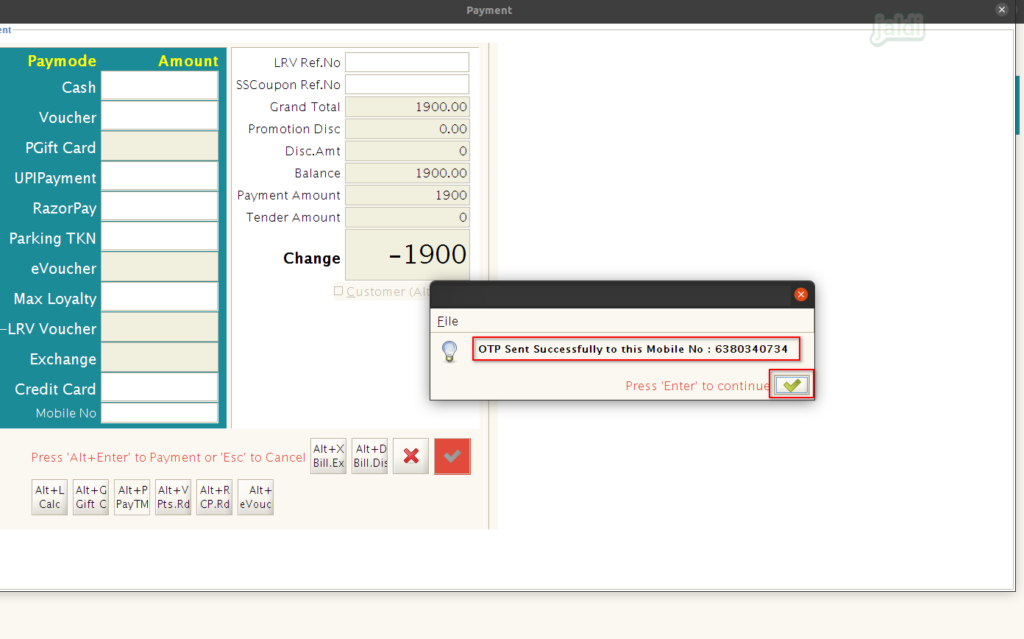
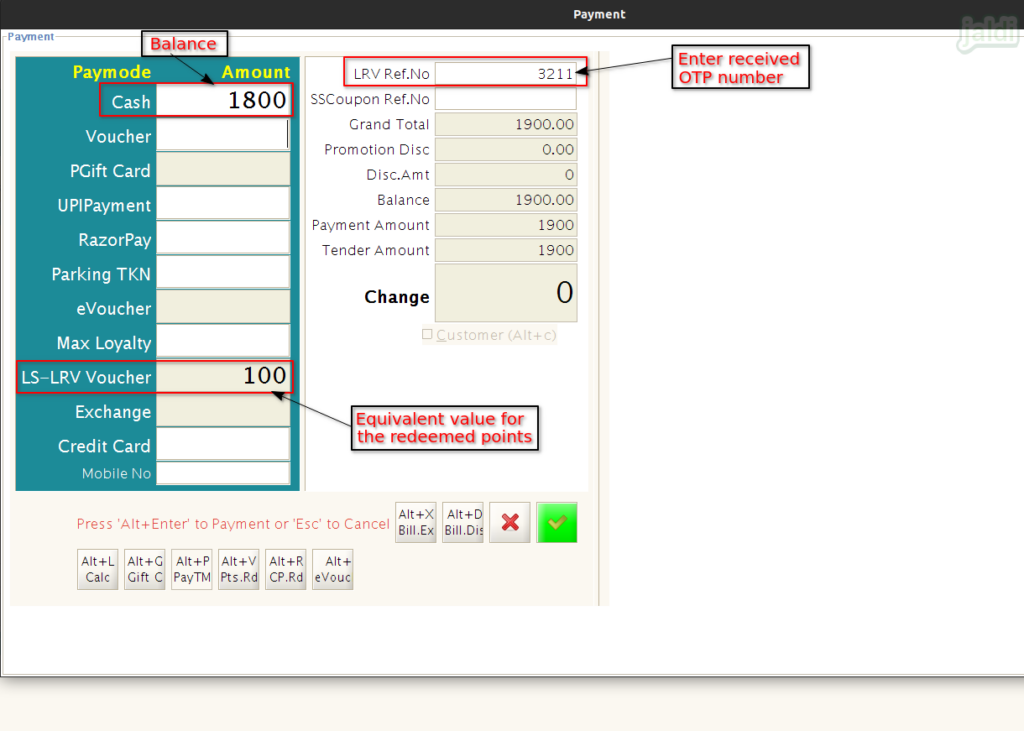
- Then enter the received OTP in “LRv Ref.No” field, then click on “Enter”.
- Now the equivalent amount value for the entered loyalty redeem points will be loaded in “LS-LRV Voucher”.
- For 100 points customer will get discount for 10 Rs ( for 10 points, customer will get rs 1 as discount from the bill).
- If there is any balance amount, collect the required amounts from the customer and update those details in a respective tender.
- Once the redeem points and balance amounts are updated in payment screen, click on Apply to complete the bill.
How to edit the tender of the completed bill ?
Since the payment is completed in Pay Only terminal, Tender edit will be done only in Pay Only terminal not in Bill Only terminal.
To know more about the tender edit, click on the following link – https://jaldi.store/tender-edit-in-jaldi-lifestyle-pos/