Point of Sales(POS) in Jaldi Superstore POS
Point of Sales (POS) is the feature menu screen where user can do sales of their inventory products to the customer. Using the Point of Sale module, you can take sales orders, manage bills, capture output taxes, manage customers, manage multi-pay modes to receive payment against sales bill, apply promotions, do day end settlement and view different reports to understand daily sales and take quick and effective decision to improve profit.
Check the following steps to know more about features which are all involved in a POS transaction.
How to Open Point of Sales(POS) ?
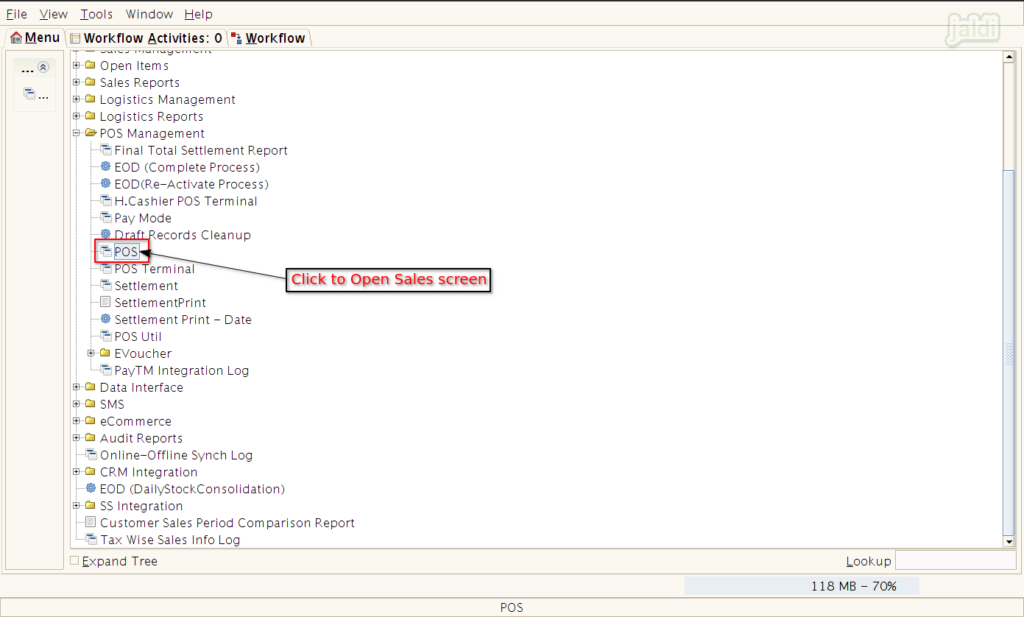
- Go to application path POS Management > POS.
- Open POS screen by clicking on the menu name “POS”.
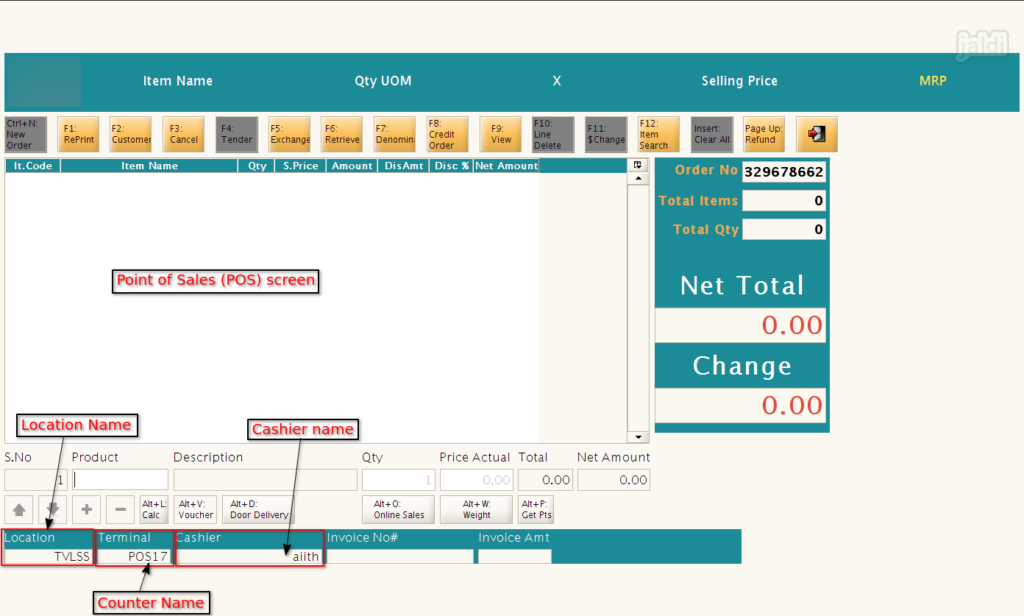
- The below shown screen is the POS screen where user can do billing.
- You can find the Logged in location, terminal and Cashier in POS screen which are all marked in below image.
How to search and Load product to sale ?
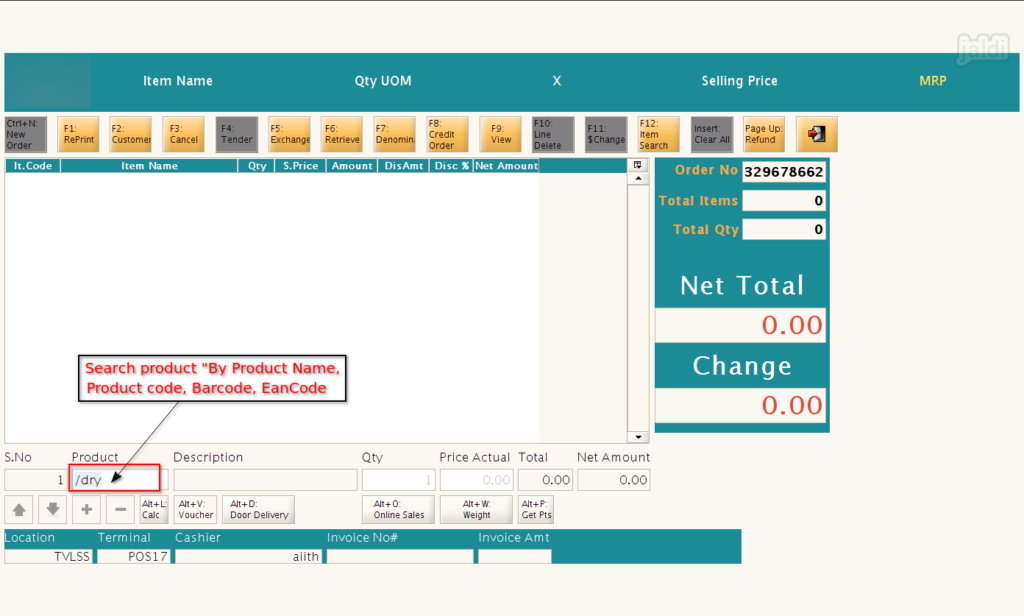
- In POS screen, there is input field called “Product” which is marked in below image.
- In that product input box, scan item’s EANcode, scan barcode, enter product code or enter product name (with / in prefix for product name).
- Then system will search and load the required product based on your search value.
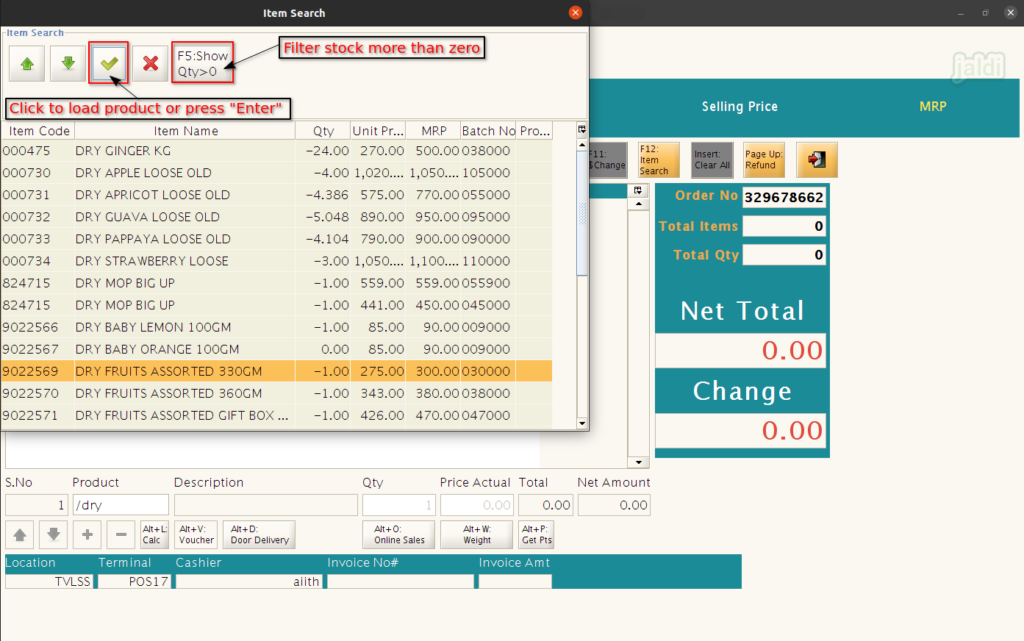
- Once product is searched with partial name, then the product list which are all matched with the searched value will list out in screen like below shown screen.
- Select specific customer purchased products and press “Enter” or click “green tick” mark to load selected product in POS screen.
- There is a function key called “F5: Show Qty>0” which will help you to filter only the product which stock is more than zero.
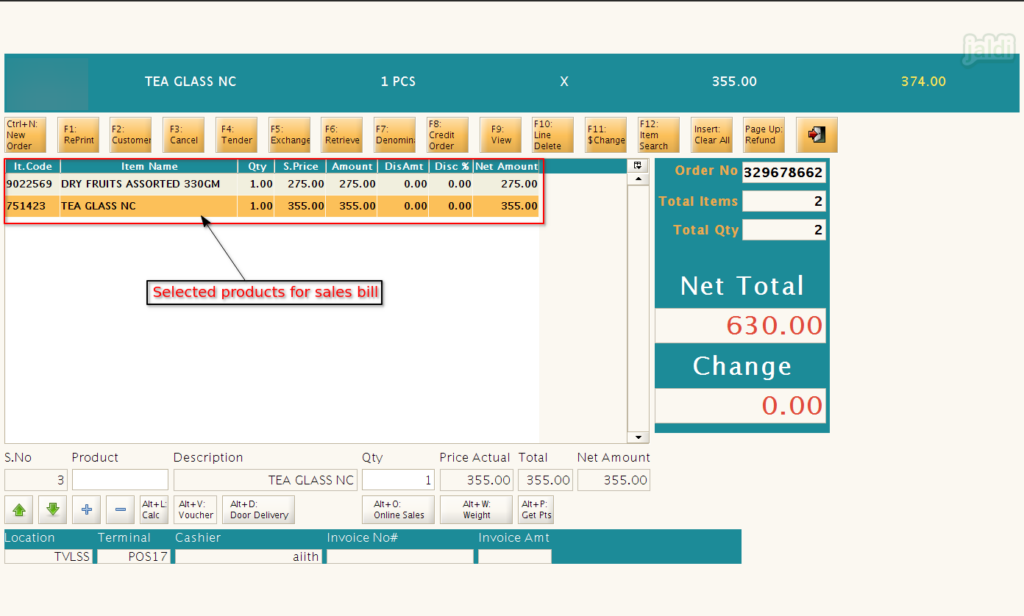
- Using the same process, search or scan all the products which are all purchased by specific customer to load in POS screen.
- When the weighing product is loaded in screen, press “Alt+W” then system will load the weight of the product in Qty field.
- For weighing product we cannot edit the loaded weight, if you want to increase or decrease the loaded weight, then remove the weighing product in the list and load the same product again in POS screen.
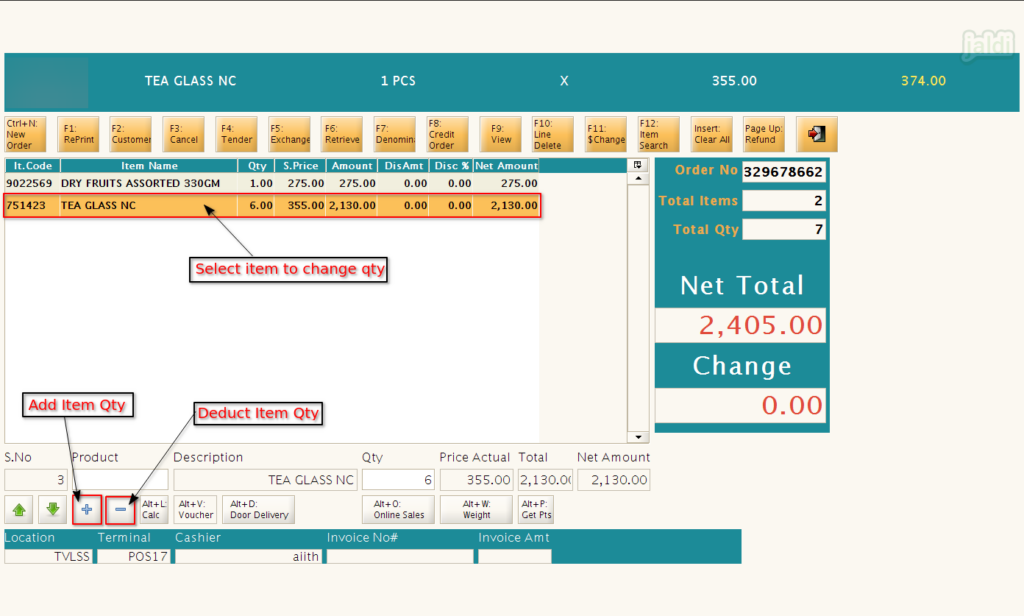
- To increase(+) or decrease(-) the item’s Qty, select the specific product and press the function keys “+” and “-” which is marked in below image. Or press “Shift +” and “Shift -” to increase and decrease qty of an items respectively.
How to search and view the product details in POS ?
- There is a function key called “F12: Item Search” Click on that or press “F12” function key to open Item search screen.
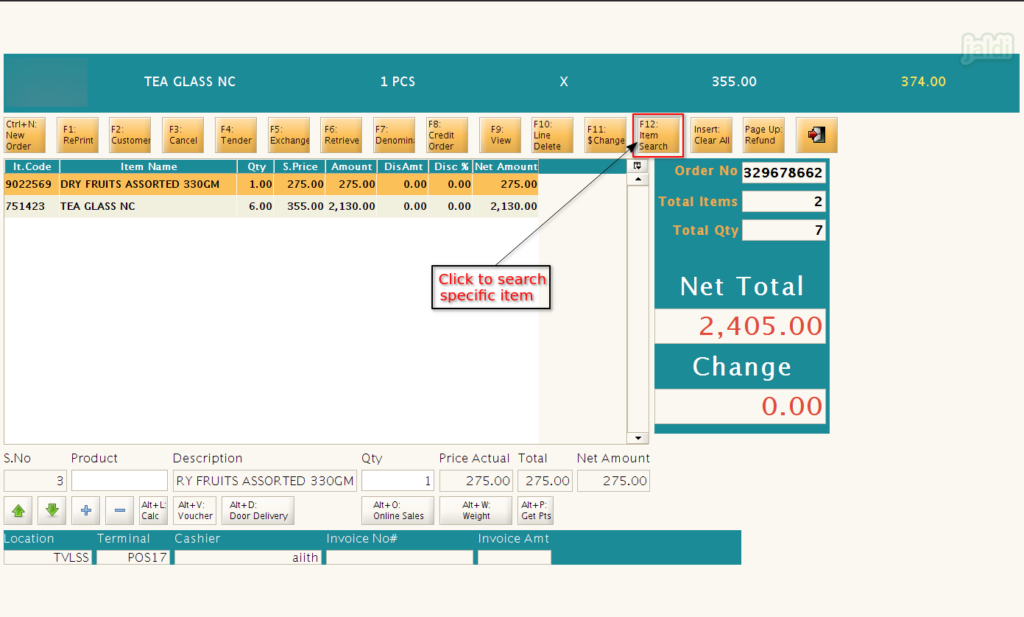
- As shown in below image, you can search the products using UPC/EAN code, Product code and name.
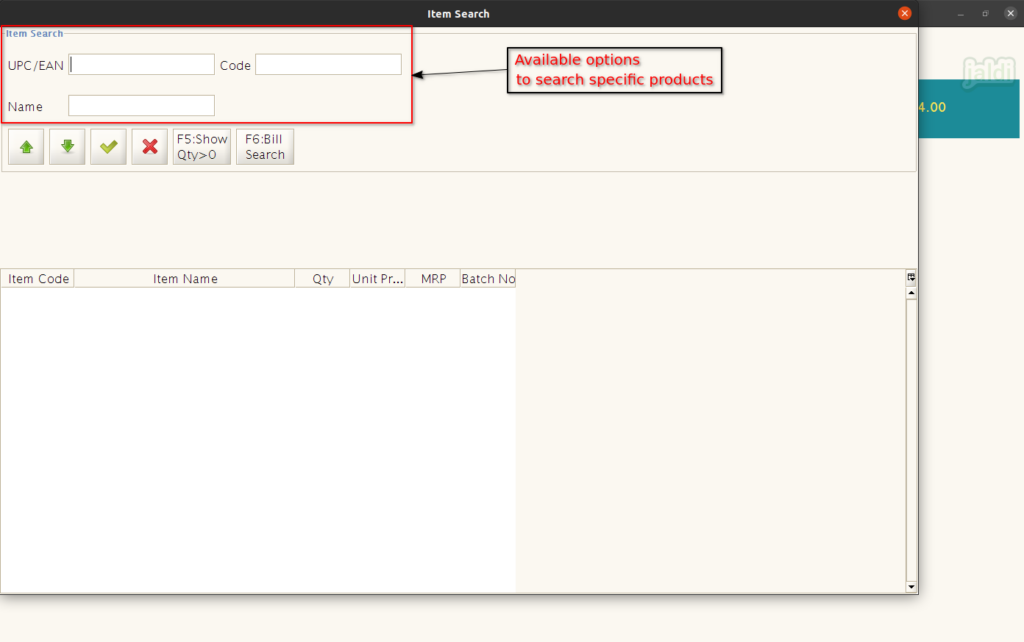
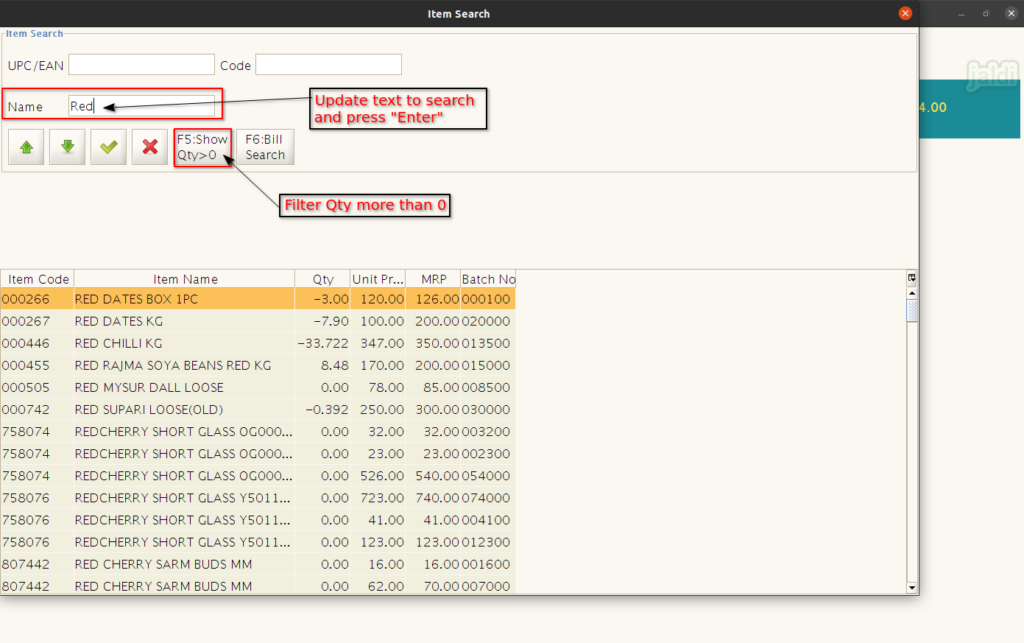
- Enter the required data on the respective search input field and press on “Enter”.
- Then system will show you the available products, So you can check their stock and price details.
- There is a function key called “F5: Show Qty>0” which will help you to filter only the product which stock is more than zero.
How to delete line products from POS screen ?
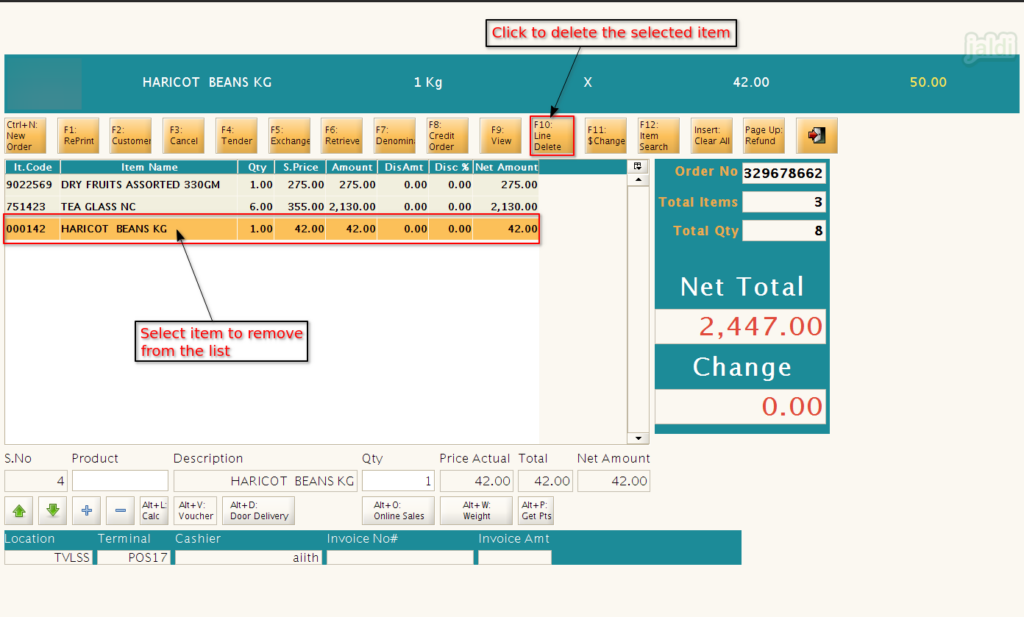
- There is a function key called “F10: Line delete” in POS screen, click on that after selecting the specific product to delete from POS screen.
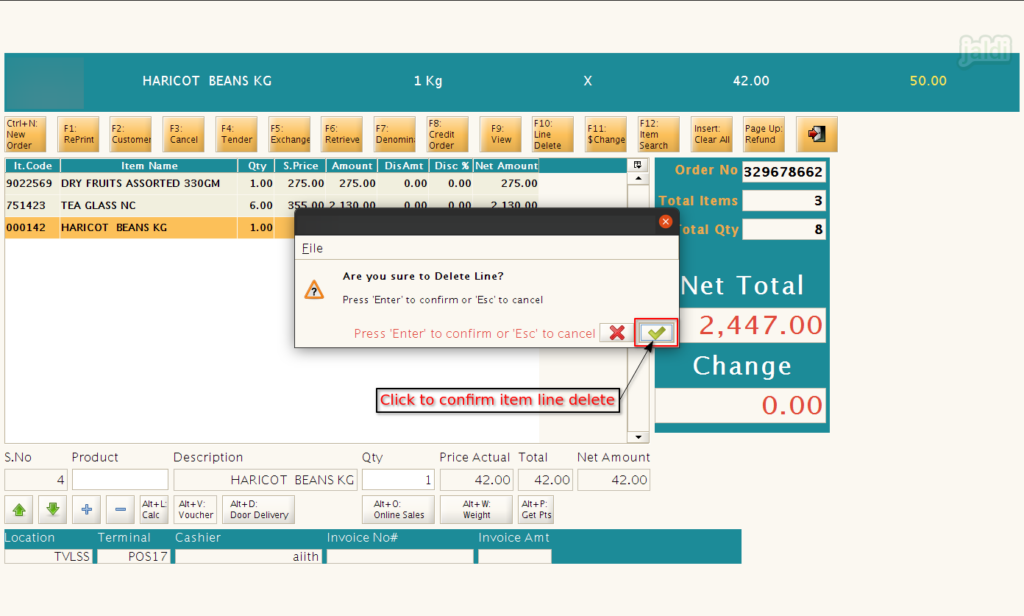
- System will show you the confirmation notification like below shown image, To confirm the process press “Enter” or click on the “Green tick mark” or press “Esc” to cancel.
How to clear all the loaded products in sales screen ?
- There should be the function key called “Insert: Clear All” which is marked in below image, click on that to clear the POS screen.
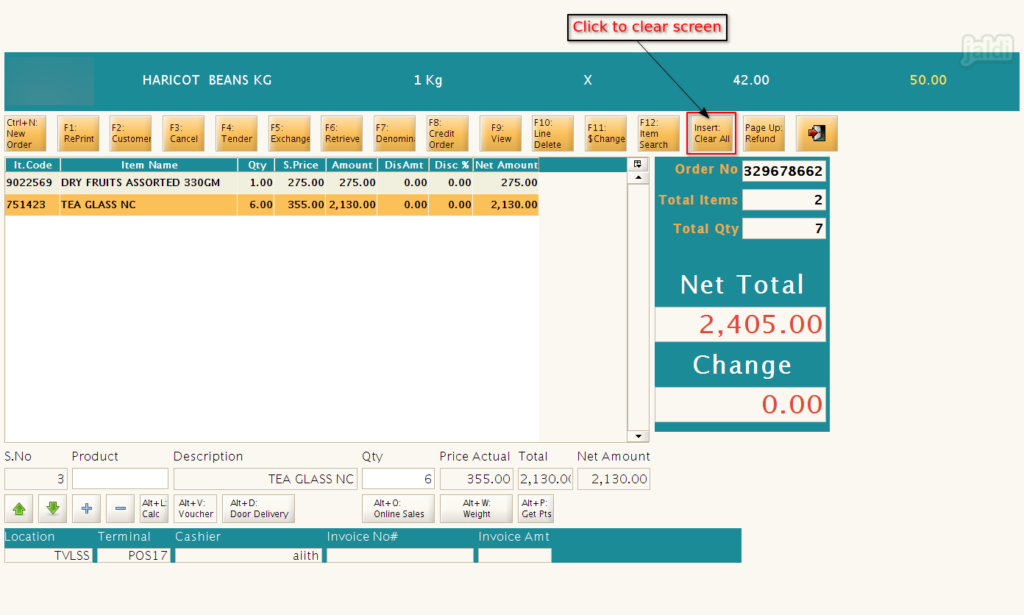
- Once “Insert” function key is pressed, system will ask for the password, Enter the “POS terminal password” which is updated during the respective POS terminal creation.
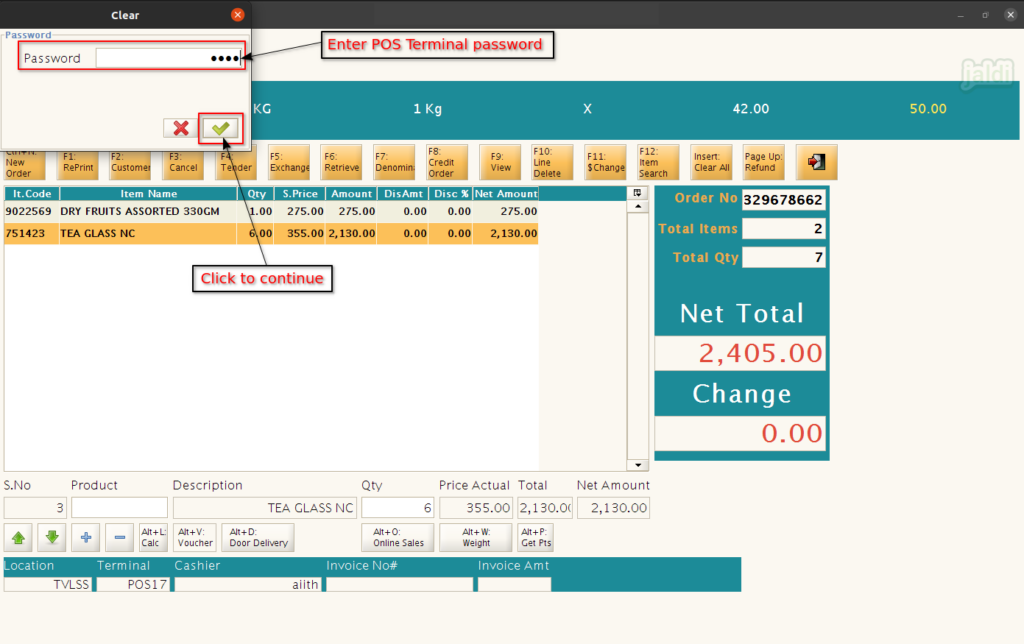
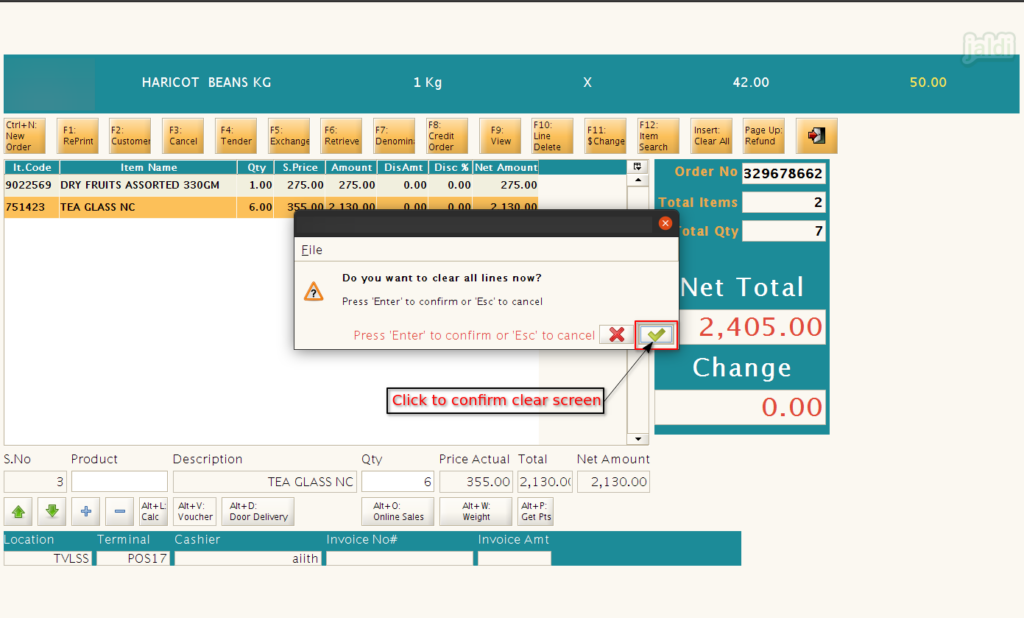
- Then system will show you the confirmation notification, click Enter or press green tick mark to confirm the process or press “Esc” to close.
How to Hold bill and Retrieve hold bill ?
When there is a crowd at bill terminal and current customer wants to buy more products after loading few products in POS screen, then cashier have to hold the current bill with loaded items, so they can proceed other customer’s bill. The hold bill will be loaded again to proceed further when the old customer is returned to terminal again.
- Load the products which is purchased by current customer in POS Sales screen.
- To hold the current bill, press “Ctrl+N – New Order” which is marked in below image.
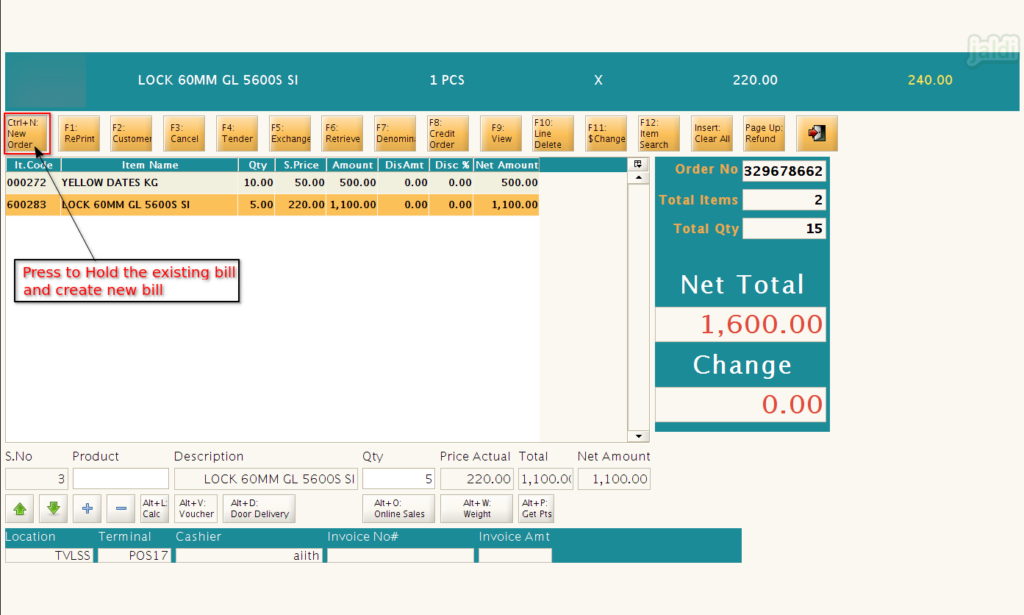
- Then system will hold the current bill and clear the screen, so cashier can proceed other bills.
- To retrieve or recall held bills, click on “F6 – Retrieve”.
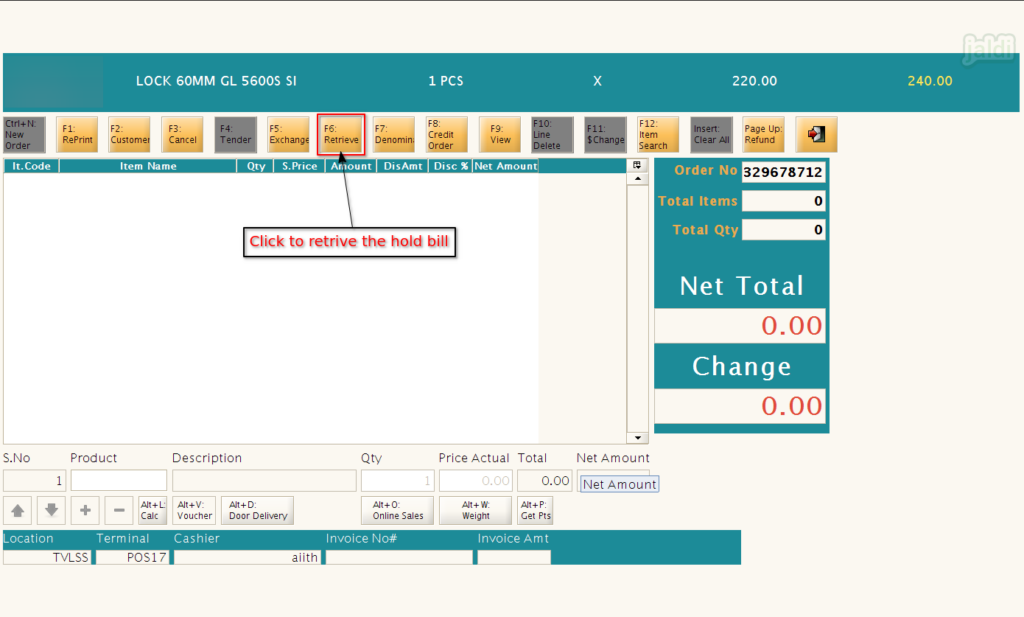
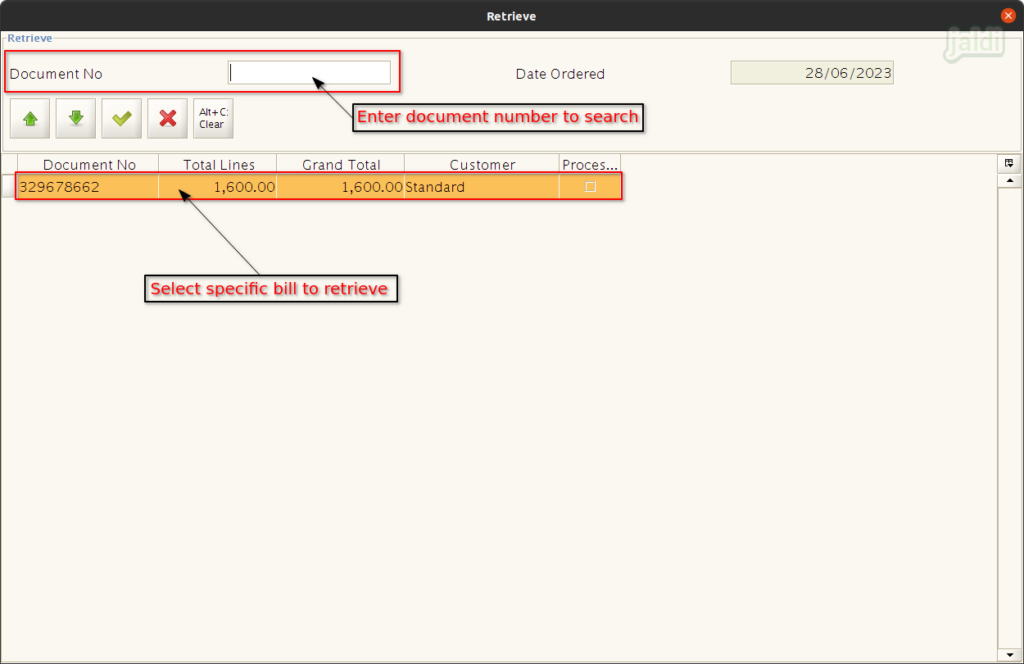
- In Retrieve screen, we can search the specific bill using the document number.
- Select the specific bill to retrieve and press “Enter”.
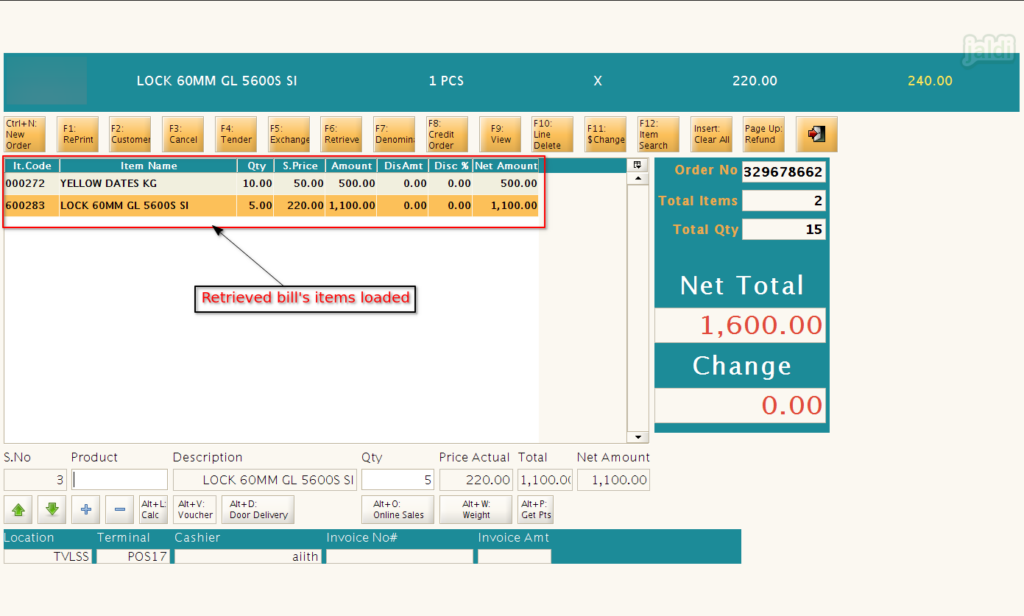
- Once the specific bill is retrieved, then the held bill’s products will loaded again in POS screen to proceed sales further.
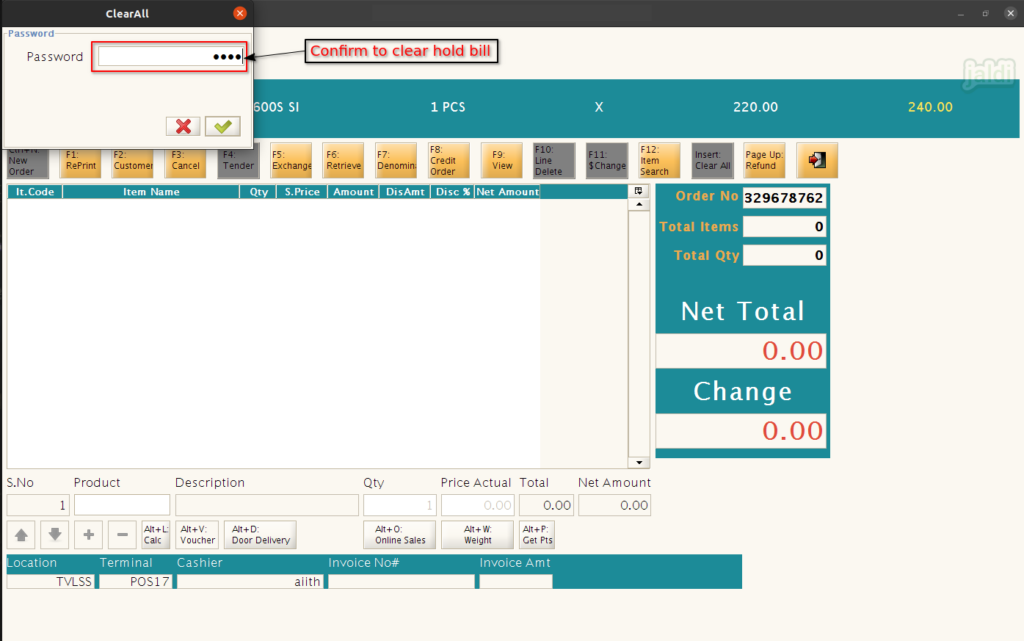
- To clear all the Hold bills, Open retrieve screen and there should be the function key called “Alt+C: Clear” click on that.
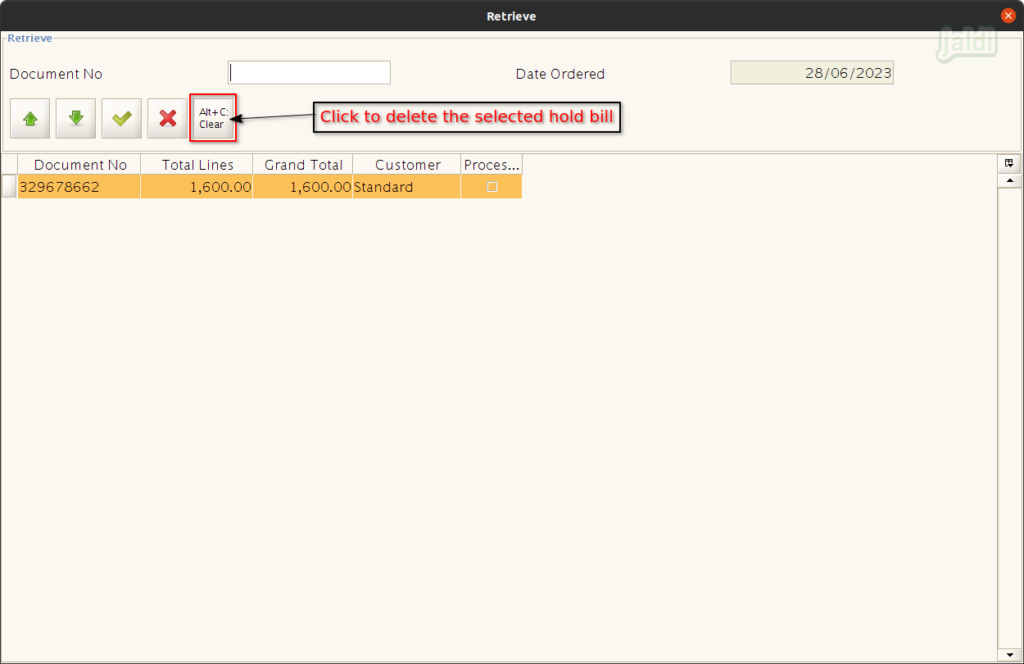
- Then system will ask for the password, Enter the “POS terminal password” which is updated during the respective POS terminal creation.
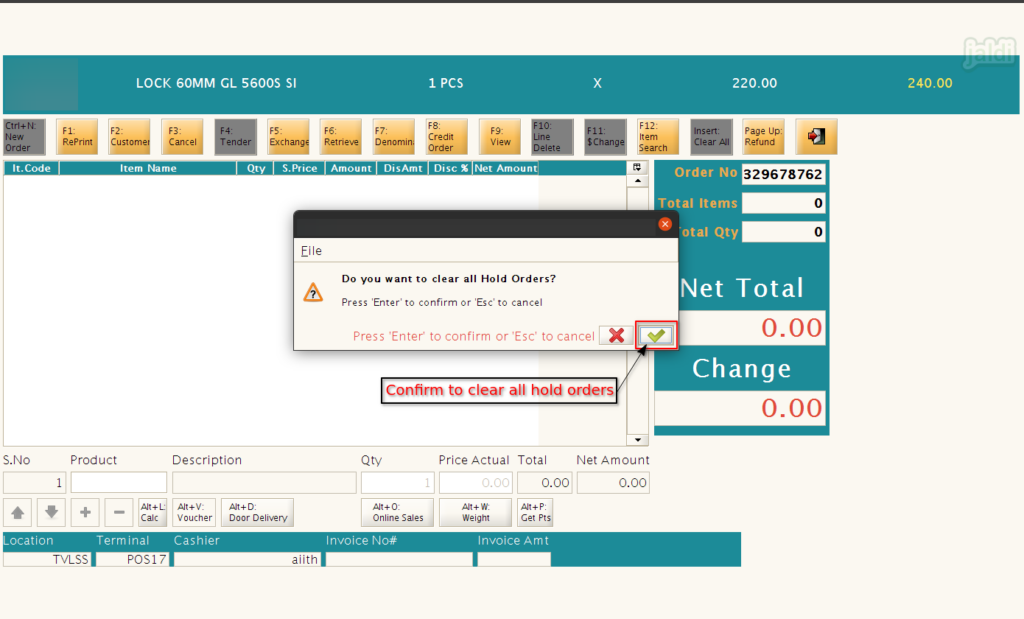
- Then system will show you the confirmation notification, click “Enter” or press “green tick mark” to confirm the process or press “Esc” to close.
How to Manage Customer data at POS ?
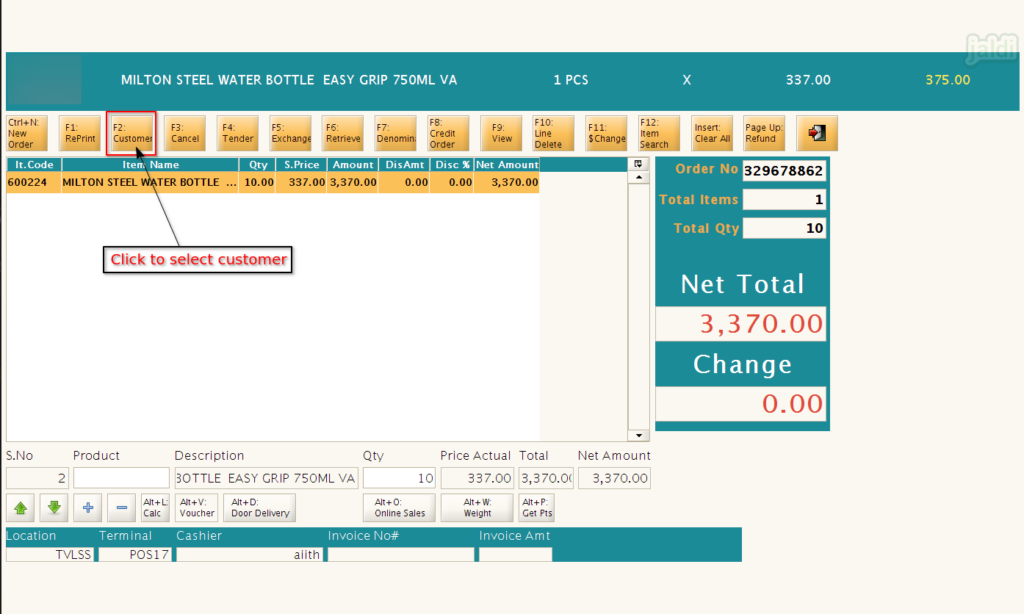
- There is a function key called “F2 – Customer”, click on that like below shown image.
- Then system will show you the Customer popup screen. In customer screen, you can do following process,
- Select existing customer
- Create a new customer
How to search and select customer from existing customer list ?
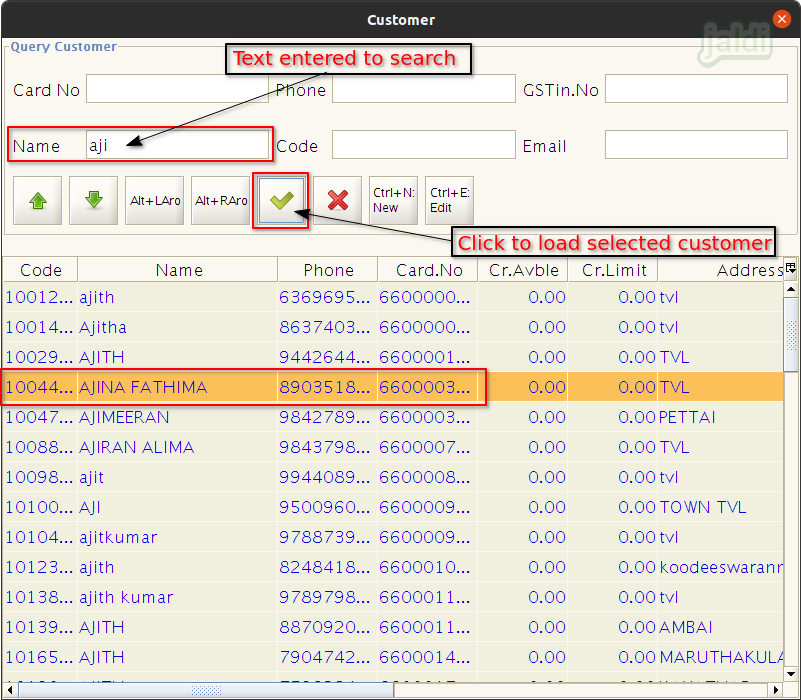
- In Customer screen, There should be the options like Card No, Phone, GSTin.No, Name, Code and Email fields to search specific customer.
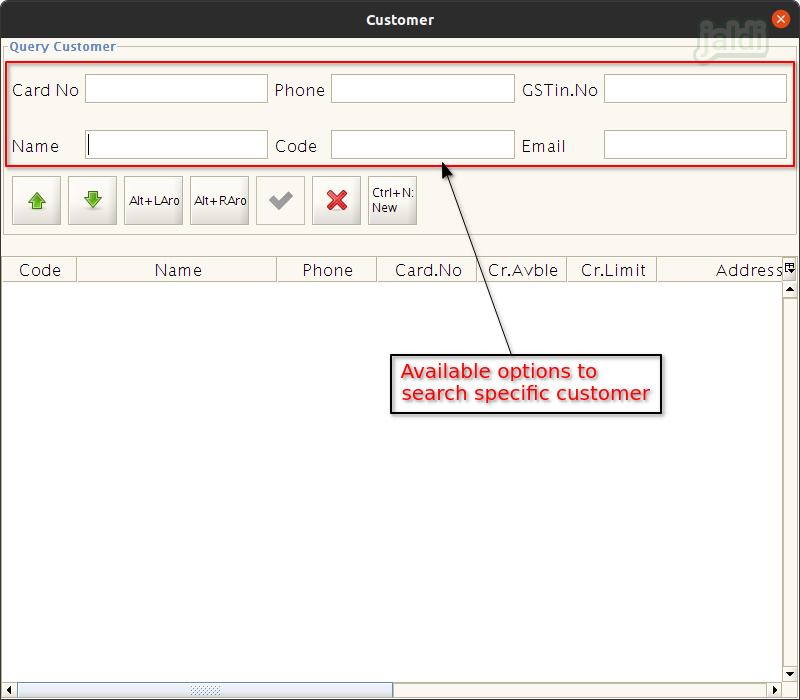
- Enter specific text to search in respective search field and press Enter.
- Then system will show you the list of customer which is matched with searched text, select required customer to proceed the bill.
- To select the customer, press “Enter” or press “green tick” mark after selecting the specific customer.
How to Add a new customer at POS ?
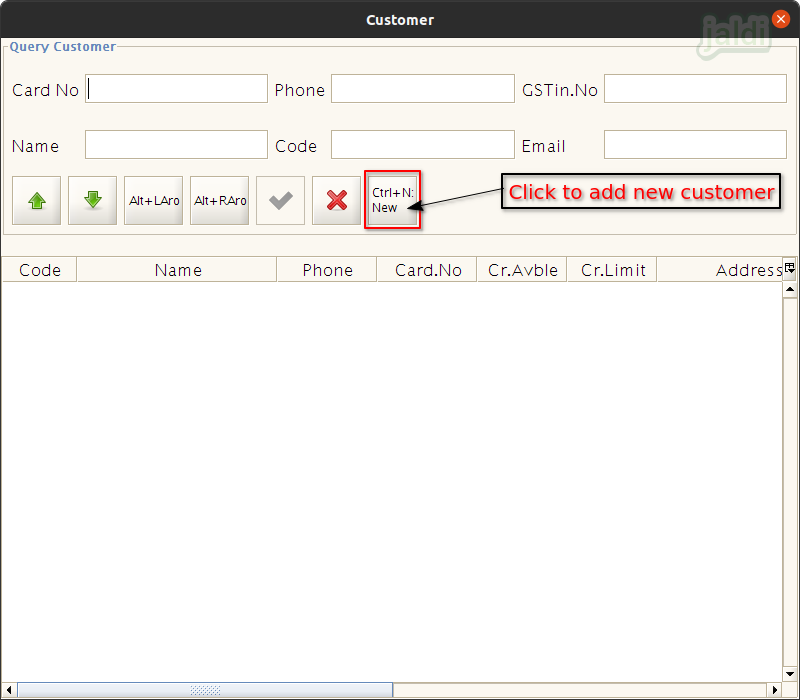
- In customer screen, there should be a function key called “Ctrl+N: New” which is marked in below image.
- The below shown screen is the screen where user can create a new customer.
- The fields which is highlighted in red colour is the mandatory fields.
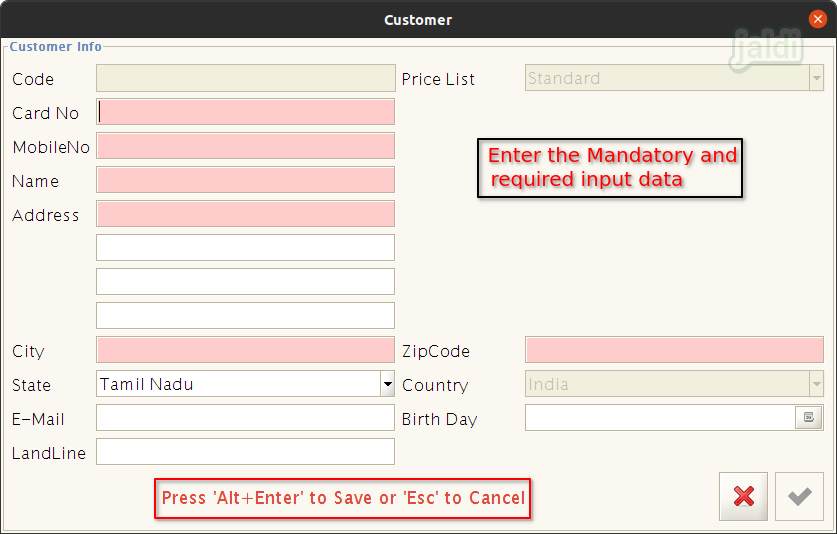
- To add new customer, Enter the following details,
- Card No
- Mobile No
- Name
- Address
- City
- State
- ZipCode
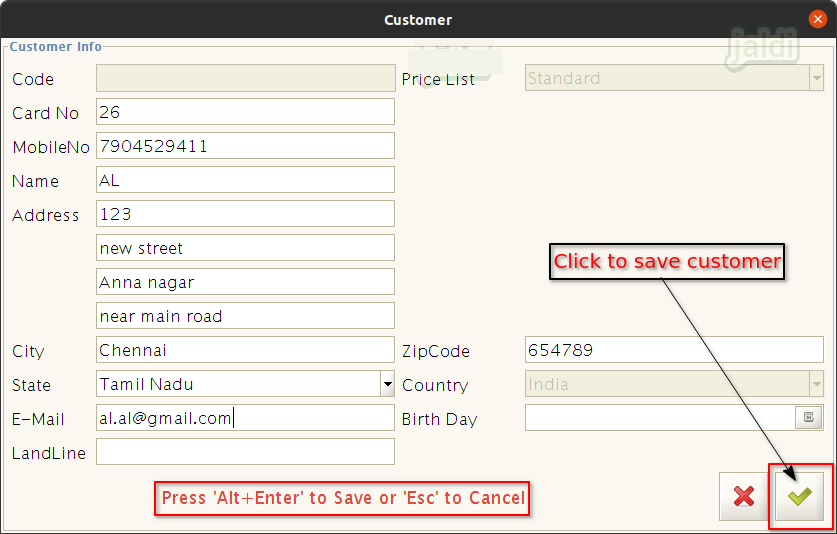
- Once entering all the details, click on “apply(green tick mark)” which is marked in below image or press “Alt+Enter” to save.
- Once customer is saved system will show you the below marked message (Customer saved).
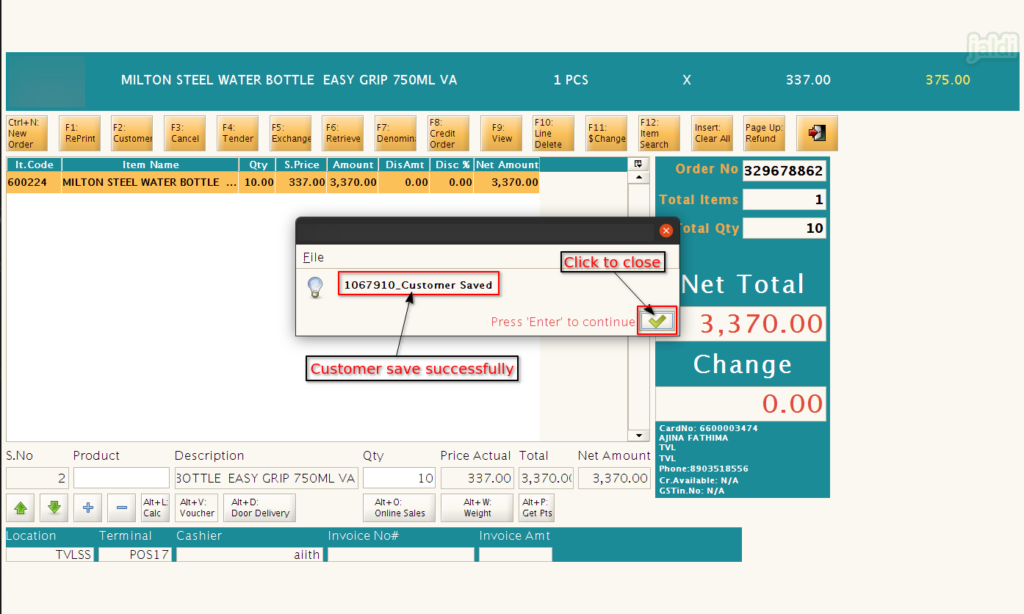
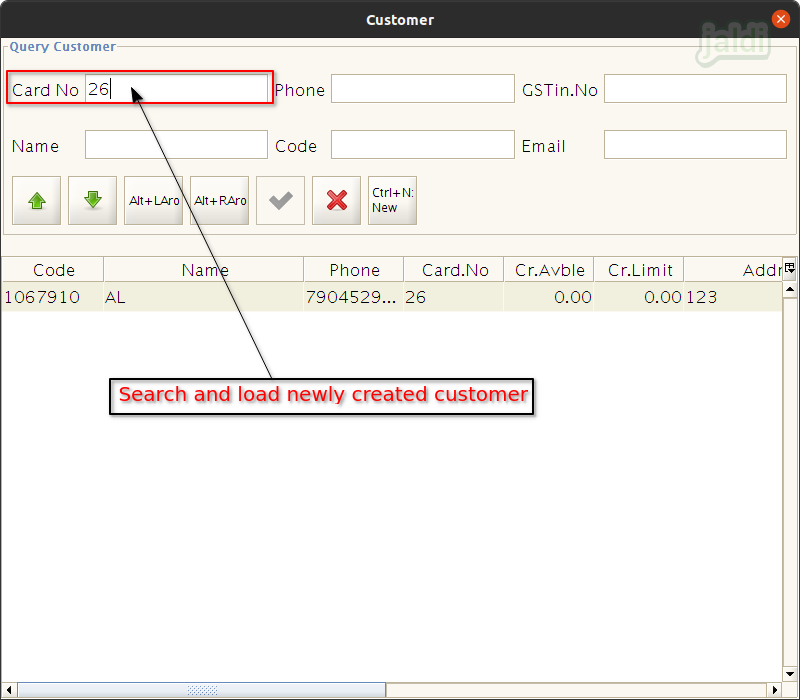
- Right after saving customer, system will show the customer screen.
- Now search and load the newly created customer to proceed sales.
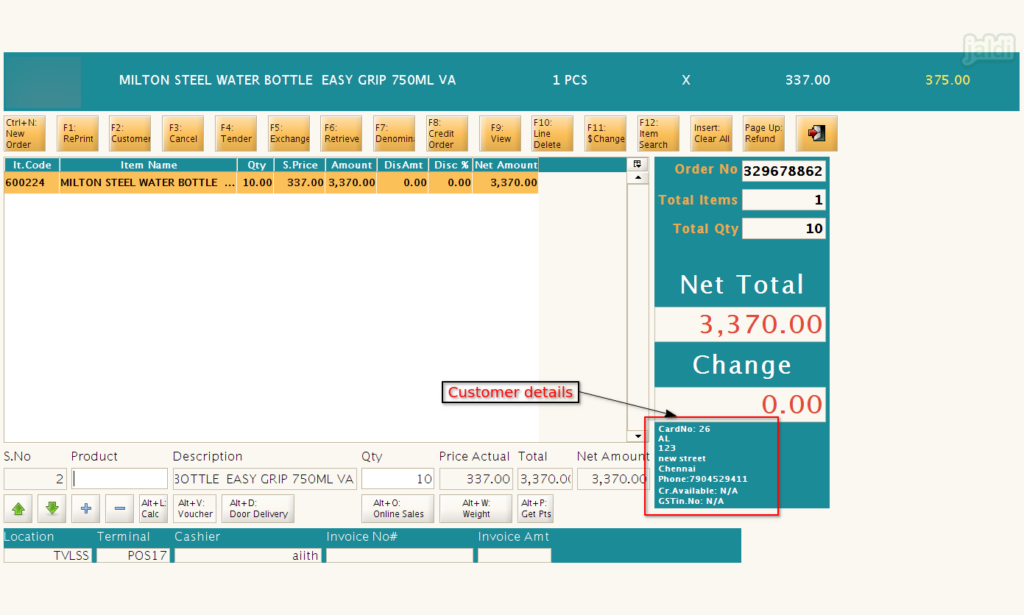
- Once the customer is selected, you can see the customer details in POS screen like below shown image.
How to take Delivery Order Bill ?
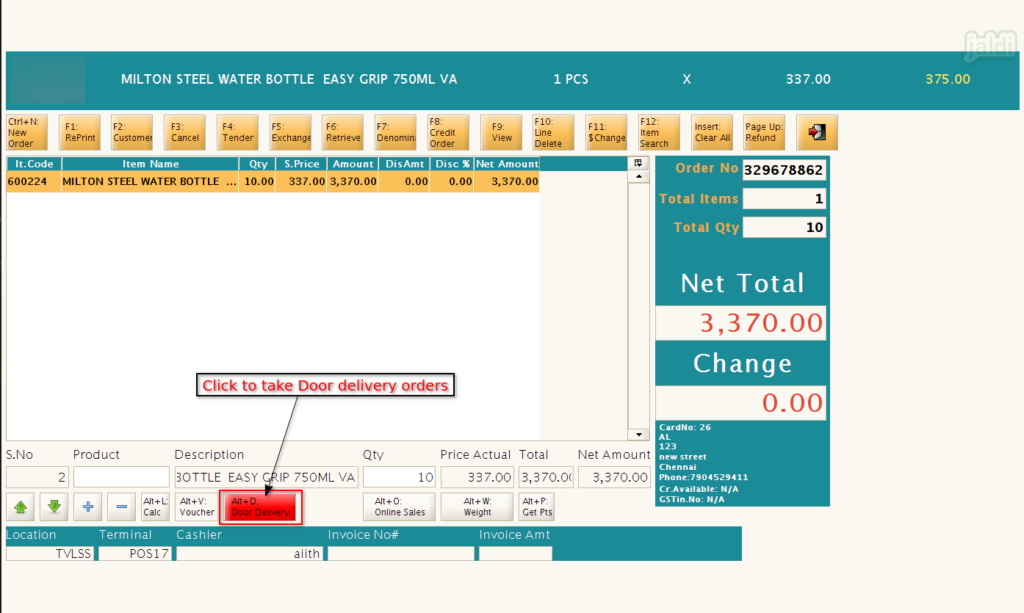
- Open POS screen, There should be the function key called “Alt+D: Door delivery” click on that to take door delivery orders.
- Once that “Alt+D: Door delivery” function key is highlighted like below screen, load the products and complete the bill.
- The printed bill will have the text called “Delivery bill”. This will help user to differentiate this delivery bill from other normal walk-in customer’s bill.
How to receive Payment for the bill ?
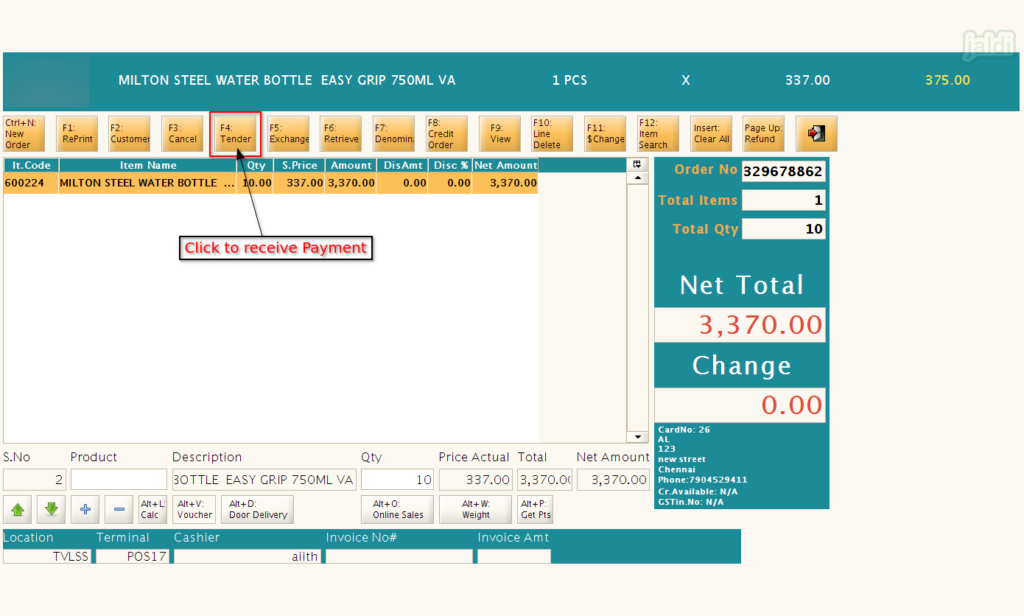
- Once the products and customer details were updated in the POS screen, click on the function key called “F4: Tender” which is marked in below image to open payment screen.
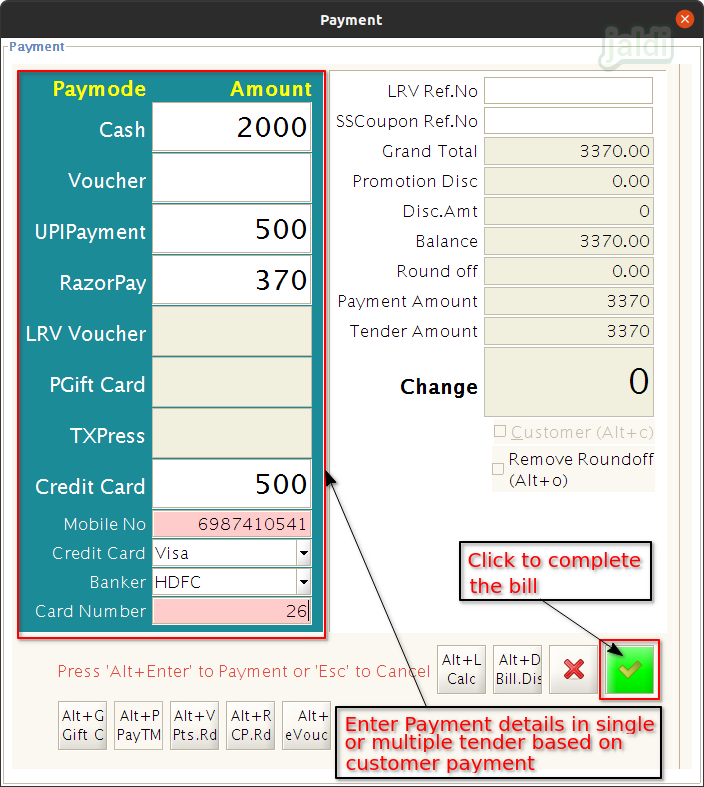
- In Payment screen, we can find different pay modes.
- Update payment details of current bill in payment screen. Payment can be received through single and multiple pay mode, it based on how customer is paying for their bill.
- Once the payment details are updated, press “Alt+Enter” or click on “Green tick” mark to complete the bill and take sales bill print.
- If customer paid more money than bill amount, then system will show the balance amount in “Change” field, that will be returned to customer.
How to Redeem Loyalty points in Bill ?
- Create customer with card number in POS billing screen or in customer master.
- Create bills for created customer in POS billing screen, so the loyalty points will be added to the customer.
- For Rs. 100, 10 points will be added to customer (for 10 rs, 1 point will be added).
- For each bills, the loyalty points will be accumulated to specific billed customer based on their purchases in the shop.
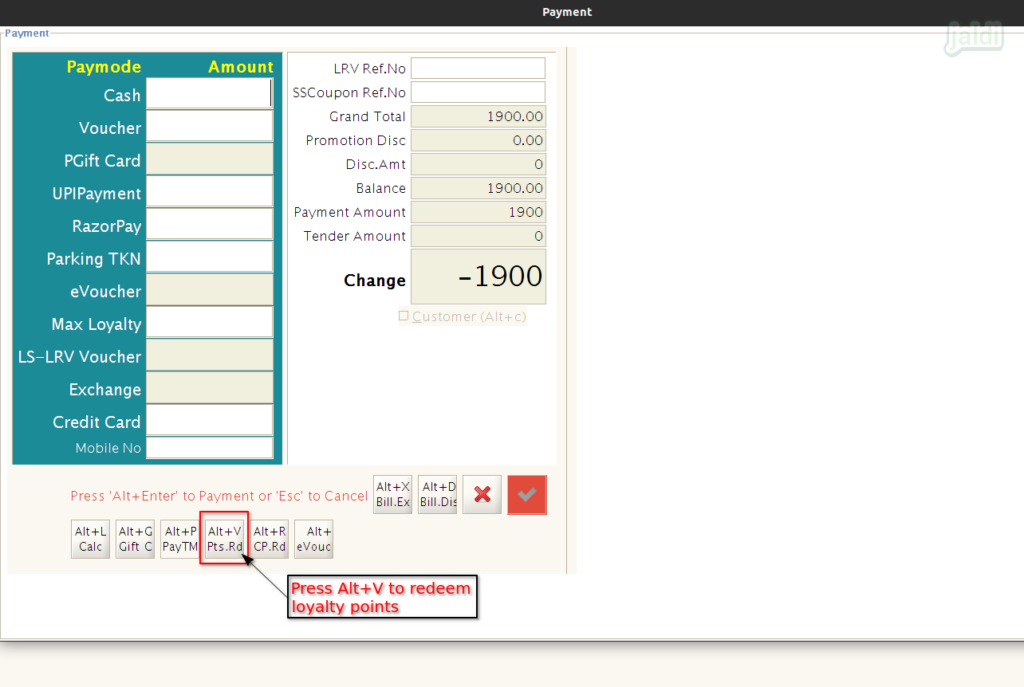
- So when you want to redeem the customer points, in payment popup screen (F4), click on “Alt+V” which is marked in below image to open point redemption popup.
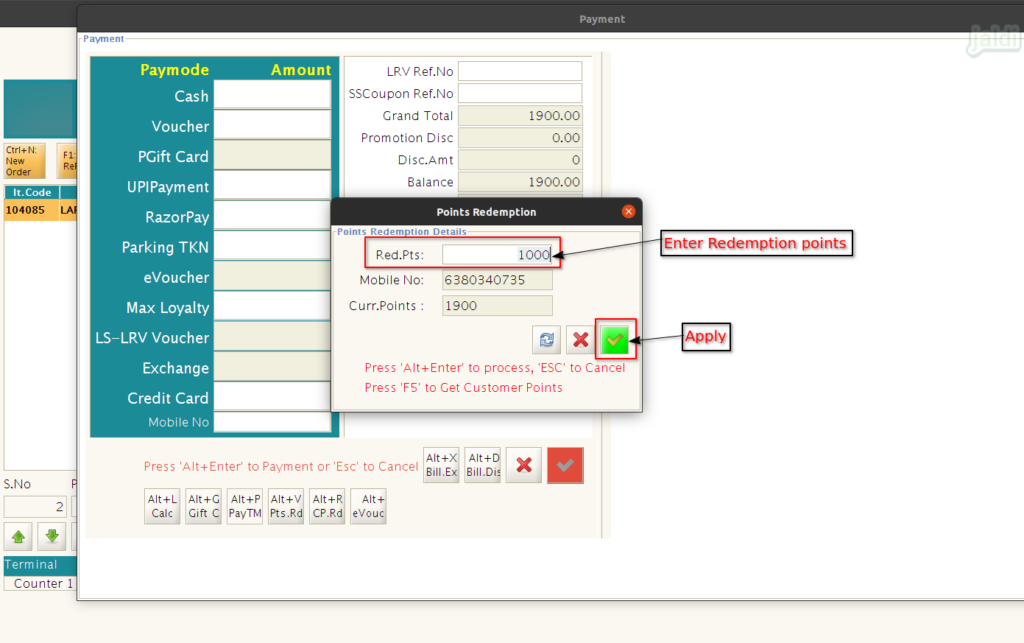
- In Point redemption popup, press “F5” function key to load current points of selected customer.
- Then enter the points to be redeemed in the input field “Red. Pts” which is marked in below image.
- Then press apply (click on green tick mark).
- Now system will send the OTP to customer mobile number, press “Enter” to continue the process.
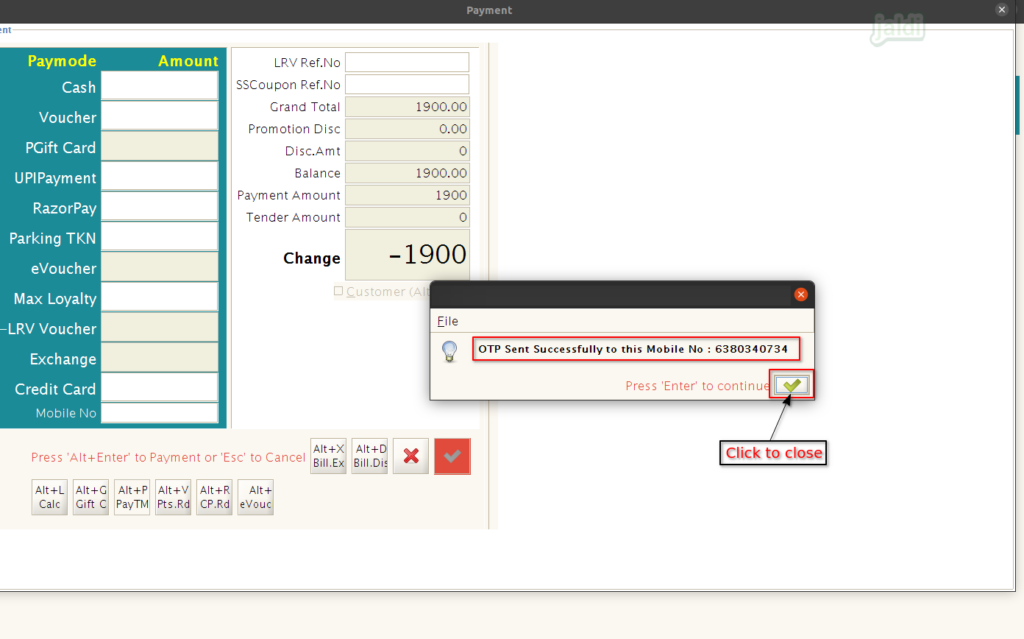
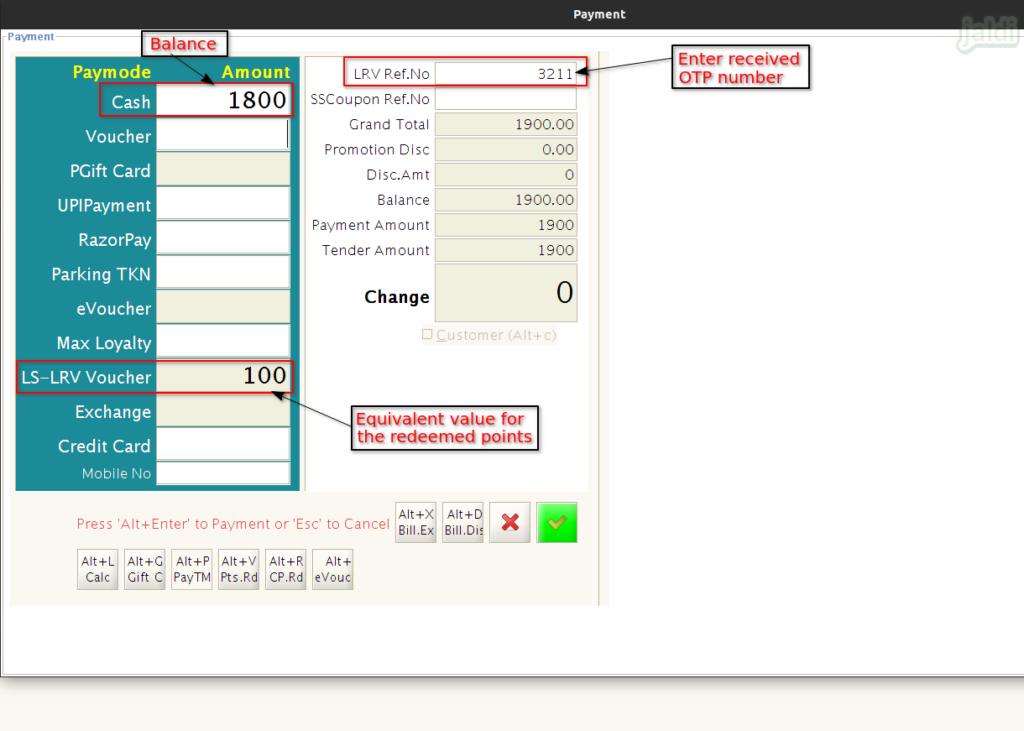
- Then enter the received OTP in “LRv Ref.No” field, then click on “Enter”.
- Now the equivalent amount value for the entered loyalty redeem points will be loaded in “LS-LRV Voucher”.
- For 100 points customer will get discount for 10 Rs ( for 10 points, customer will get rs 1 as discount from the bill).
- If there is any balance amount, collect the required amounts from the customer and update those details in a respective tender.
- Once the redeem points and balance amounts are updated in payment screen, click on Apply to complete the bill.
How to view completed Bill ?
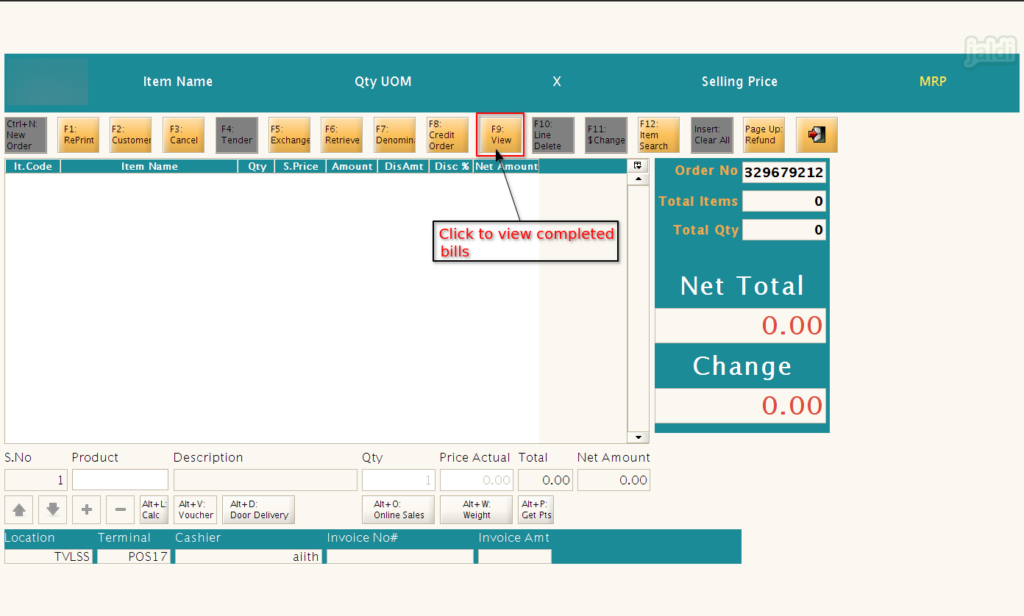
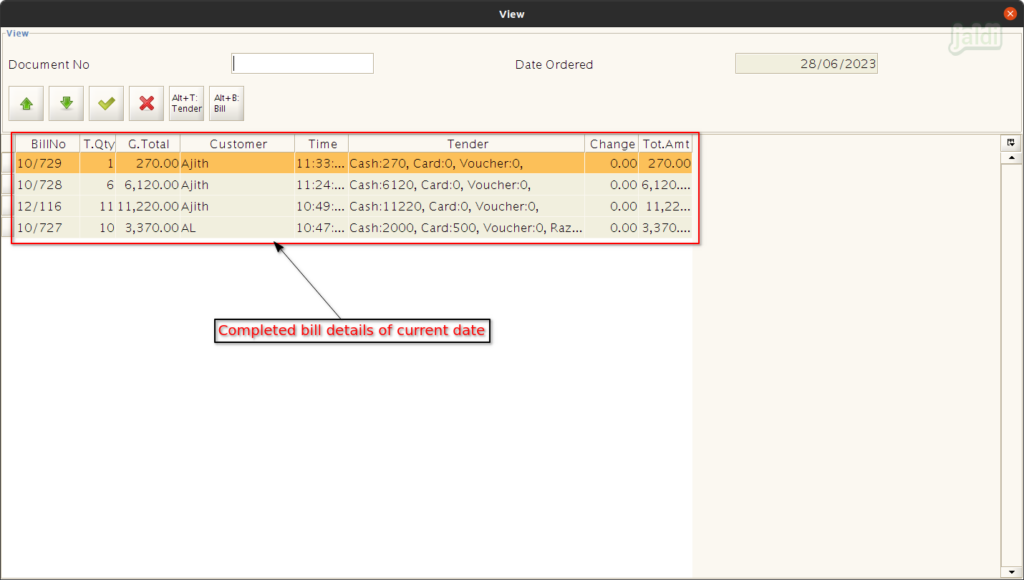
- There should be a function key called “F9: view”, click on that to view the completed bills at POS.
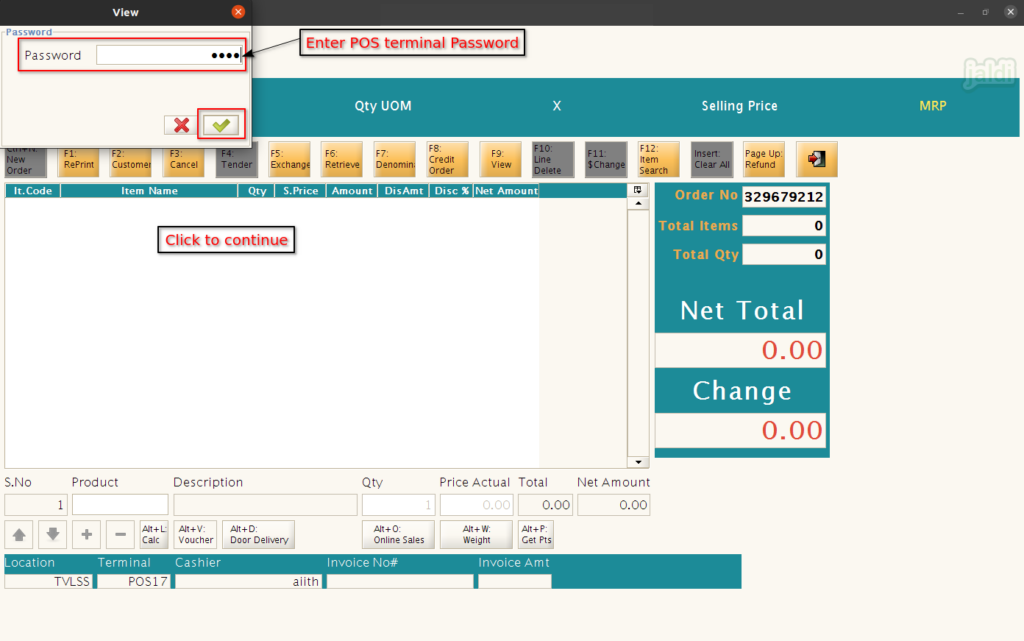
- Once “F9: View” function key is pressed, system will ask for the password, Enter the “POS terminal password” which is updated during the respective POS terminal creation.
- After entering the POS terminal password, system will show all the current date bills like below shown image.
How to take Reprint of the completed bill ?
- There should be a function key called “F1: Reprint”, click on that to take reprint the specific completed bill.
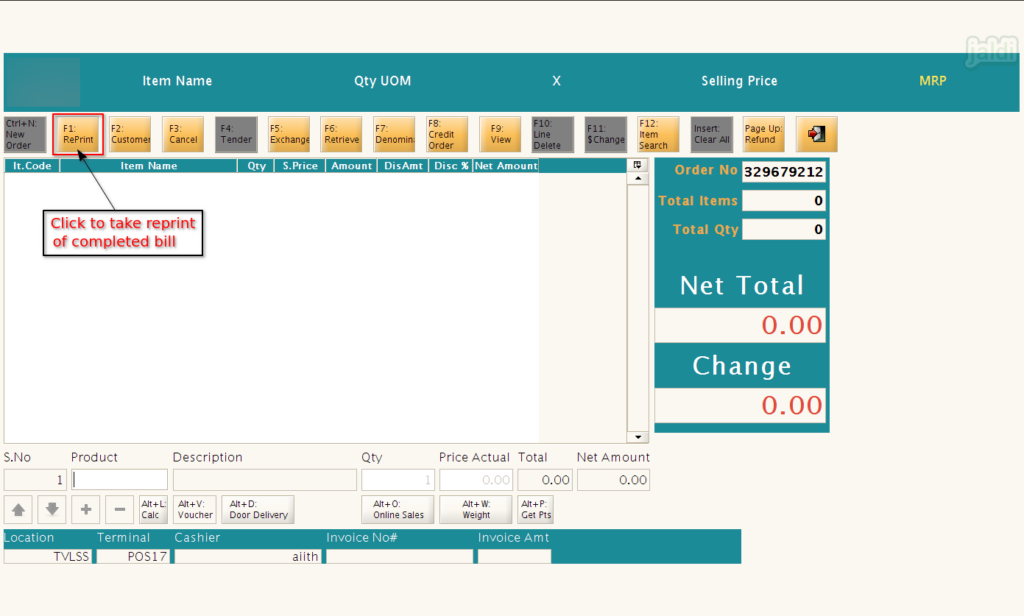
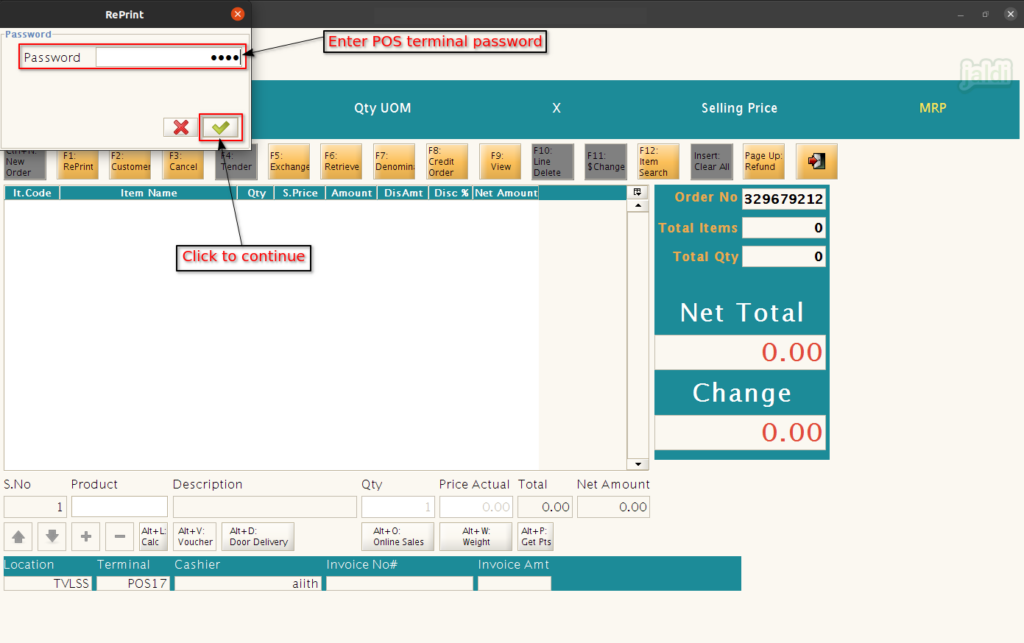
- Once “F1: Reprint” function key is pressed, system will ask for the password, Enter the “POS terminal password” which is updated during the respective POS terminal creation.
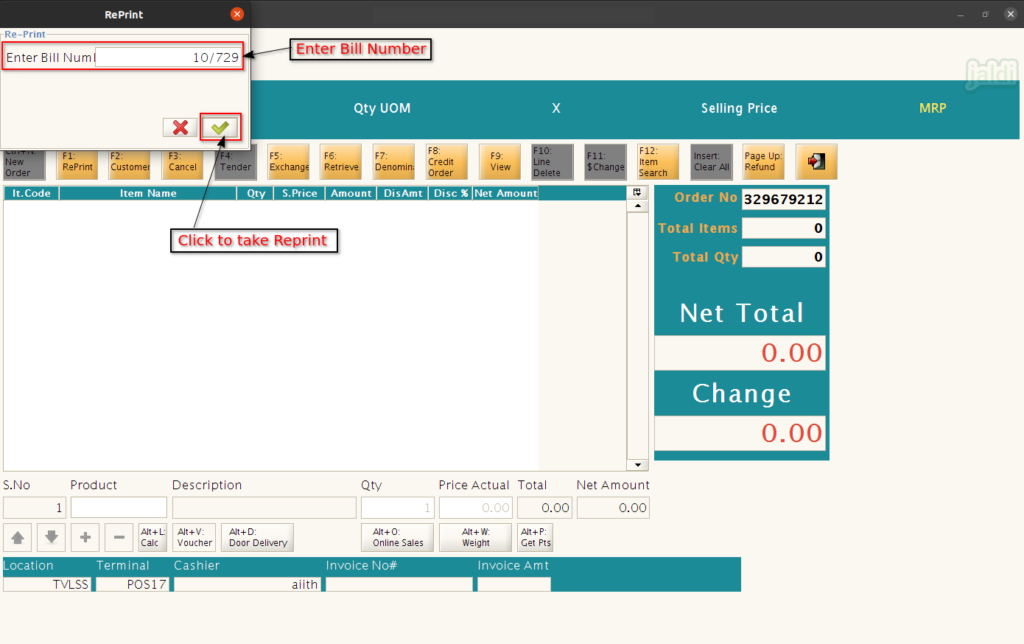
- In Next, enter the “Sales Bill number” in the input field “Enter Bill Num” like below shown image.
- Then press “Enter” or click on “Green tick mark” to take the sales bill’s reprint.
How to cancel the completed bill ?
- When there is a human error in completed sales bill, we can cancel the completed bill.
- We could not edit the completed bill, only we can do bill cancel.
- To cancel the bill we must enter POS terminal password.
- In POS screen, there is a function key called “F3: Cancel” which is marked in below image.
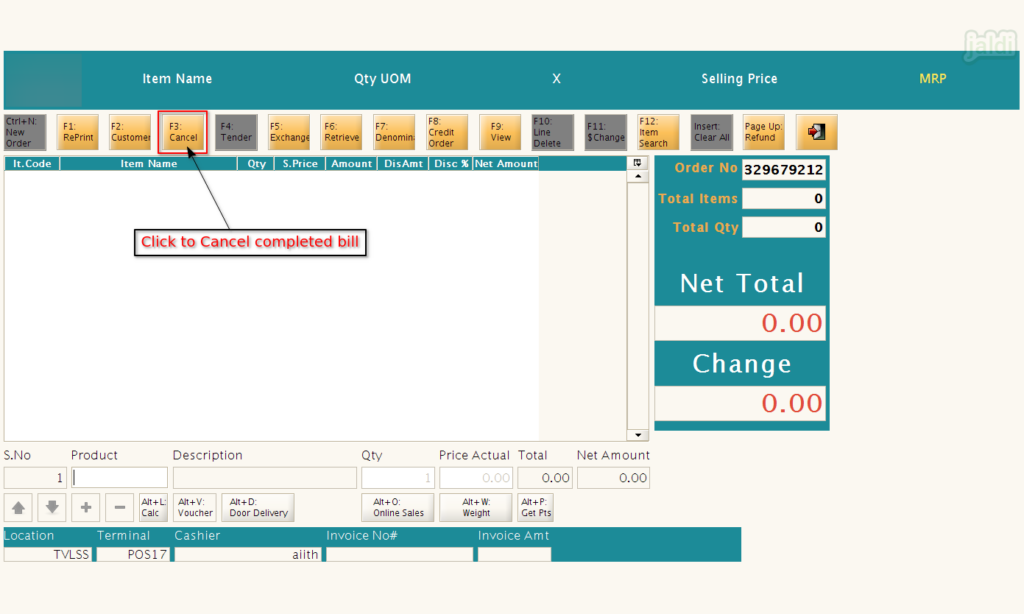
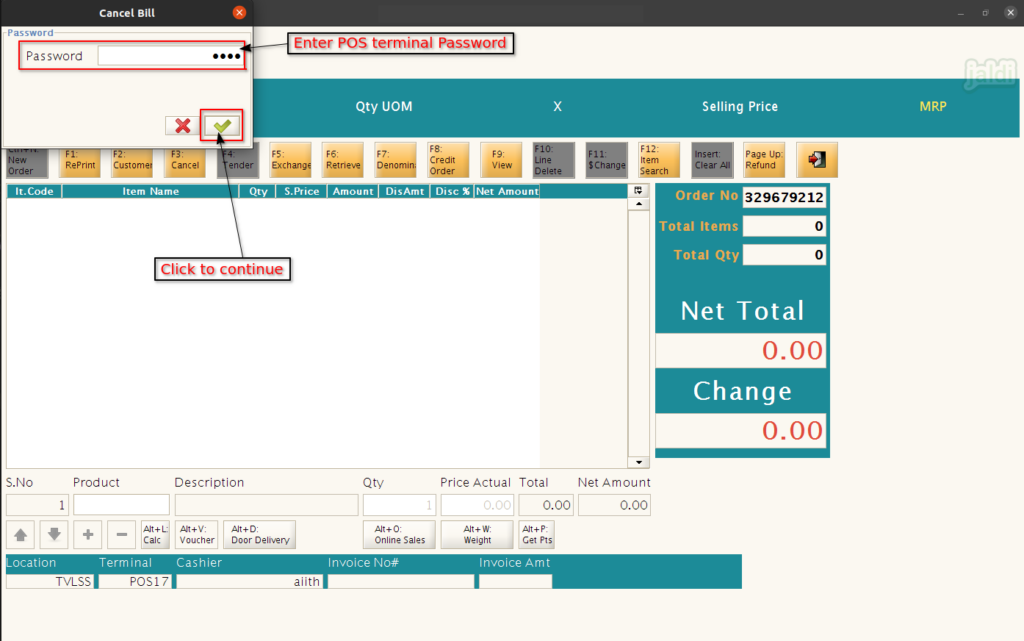
- Once “F3: Cancel” function key is pressed, system will ask for the password, Enter the “POS terminal password” which is updated during the respective POS terminal creation.
- After entering password, now enter the bill number to cancel the bills in input field called “Enter Bill Num” like below shown image.
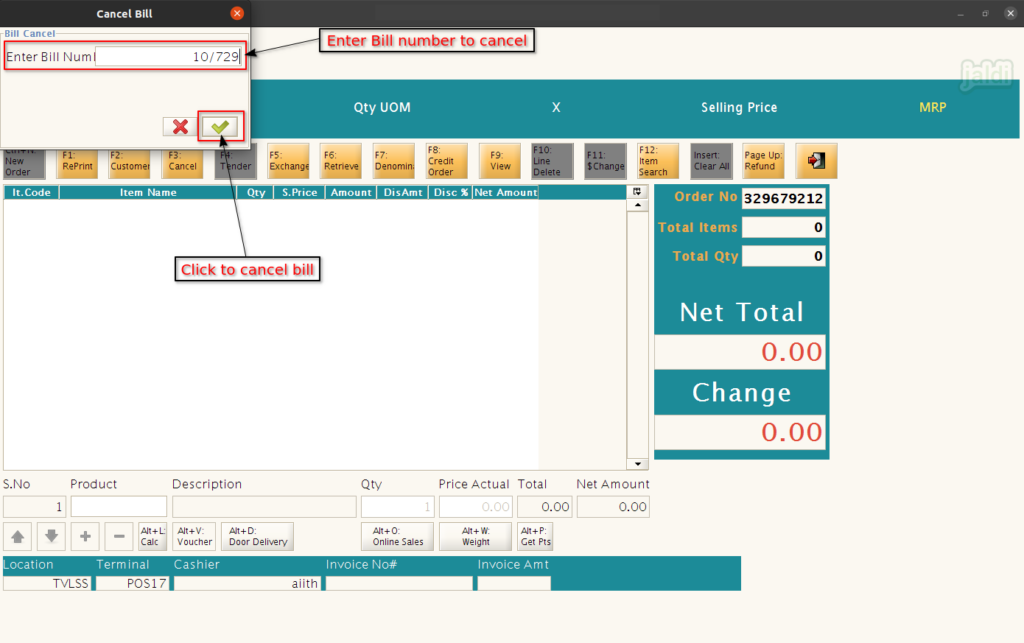
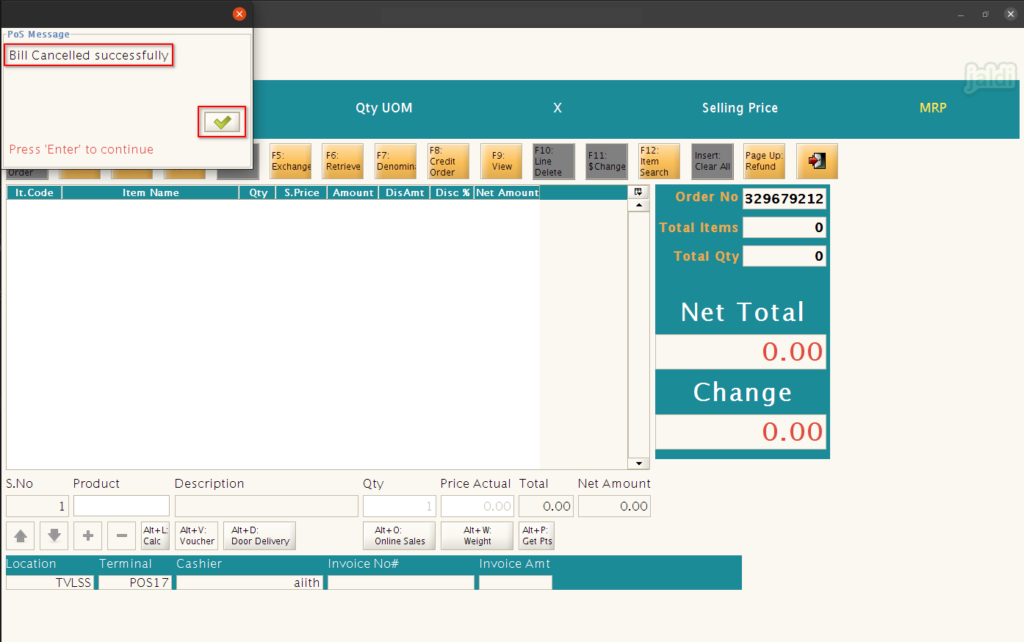
- Once the specific bill number is updated and clicked on “Apply”, then system will cancel the mentioned bill number from the sales.
- Cancelled bill number will not be reused. It will remain as cancelled bill and next bills are continued in bill number sequence.
