Security management in QSR POS
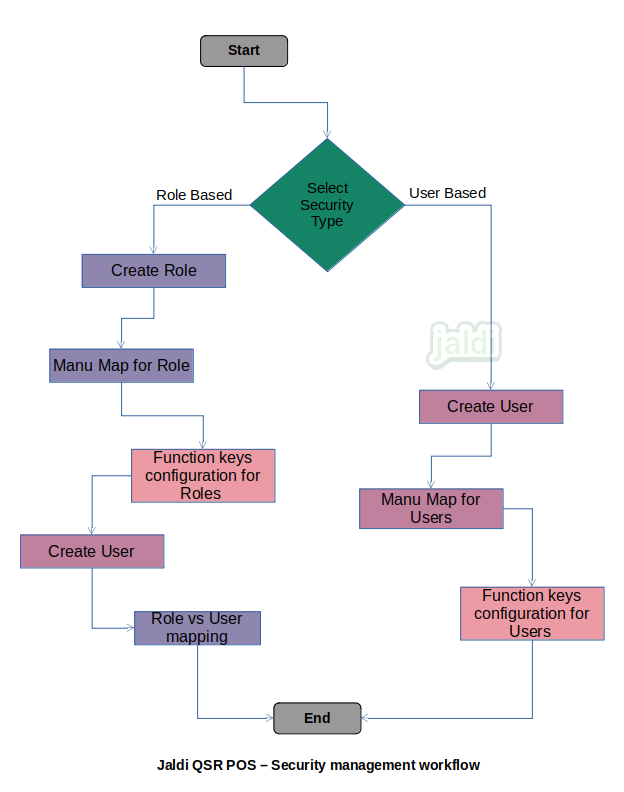
Security management is the feature where the roles or users created and mapped with menus for better user management.
Business rules
- There is a security management screen to create a multiple required users.
- Admin user first need to select the security type from the following option
- Role based – Creating the role and mapping the menu and giving the permission to the roles and then creating the users for each roles.
- User based – Directly creating the users and mapping menus and giving the permissions.
Add User Role
- Admin user should go to the security management screen and click “Add role”.
- To add new role, enter role name in “role name” field and then enter “description” for the user role. For Ex:- owner, manager, cashier, waiter, steward, etc.
- Then select the menu to show for the roles, Ex: select sales, reports for manager.
- Once the menu selected admin can give the permission to POS activities and function keys, i.e user can hide the function keys to users if needed and also the POS activities like bill edit, bill cancel, hold and recall bills can be restricted to user roles.
- Once menu and permission mapping is done, click on “save” option to save the details.
- Role can be edited using the “edit” option at anytime.
Add User
- Then there should be the option called “add user” to create a new user.
- Click on add user and enter the details like user name, mobile number, email id and then select the required location and branch for the user.
- Then enter the login username and password for the creating user.
- Once all the required fields is filled then press “save” data to save the details.
- User’s data should be unique for each users.
- Created users can be edited using the “edit” function key at any time. Created users should not be deleted, but users can be inactivated using the “status” option.
Role vs User mapping
- There is option called “user mapping” in role master list for role wise.
- Click on the user mapping option and then system will display the active user name list with check box.
- Select the required users for the existing role and click “update” to save the details.
- Each users can be mapped under one single role only.
- Admin can edit the user mapping at any time.
Security management in QSR POS workflow
