Jaldi Lifestyle POS – Stock transfer (Send) and Stock transfer (Receive) – between locations
Stock transfer process involves with following three master & Transaction screen,
- Warehouse & Location master
- Stock Transfer (Send)
- Stock Transfer (Receive)
How to create a Location ?
Lets imagine a real time scenario, where a single store having three locations like Godown, Selling floor and ground floor. So we have to create required locations first. follow the below steps to know how to create location in Jaldi Lifestyle POS application.
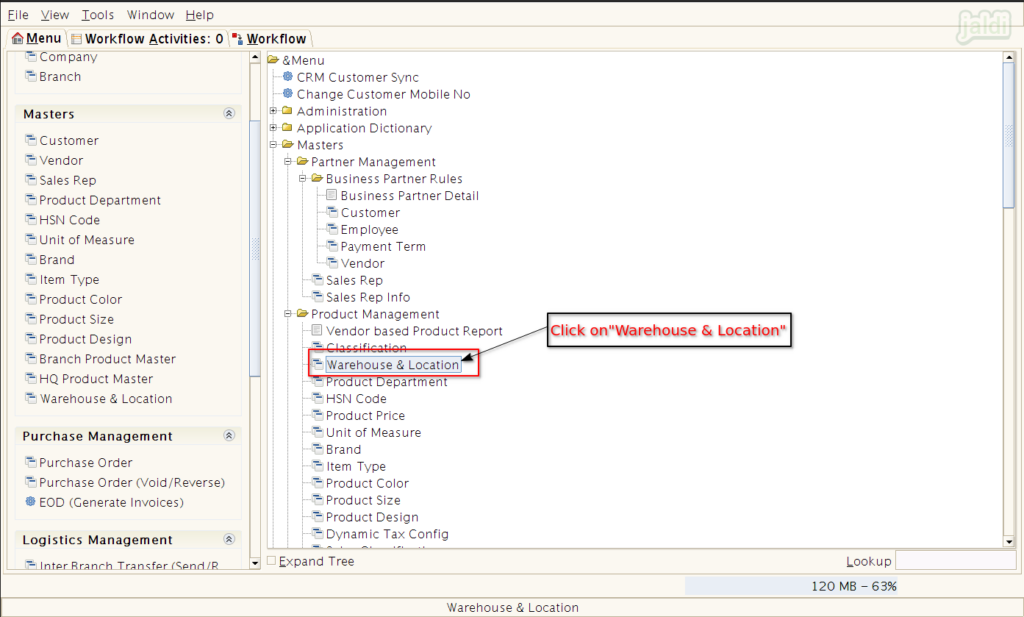
- Go to application path, Masters > Product Management > Warehouse & Location.
- Then click on the menu “Warehouse & Location” to go to the screen where we can create multiple required locations.
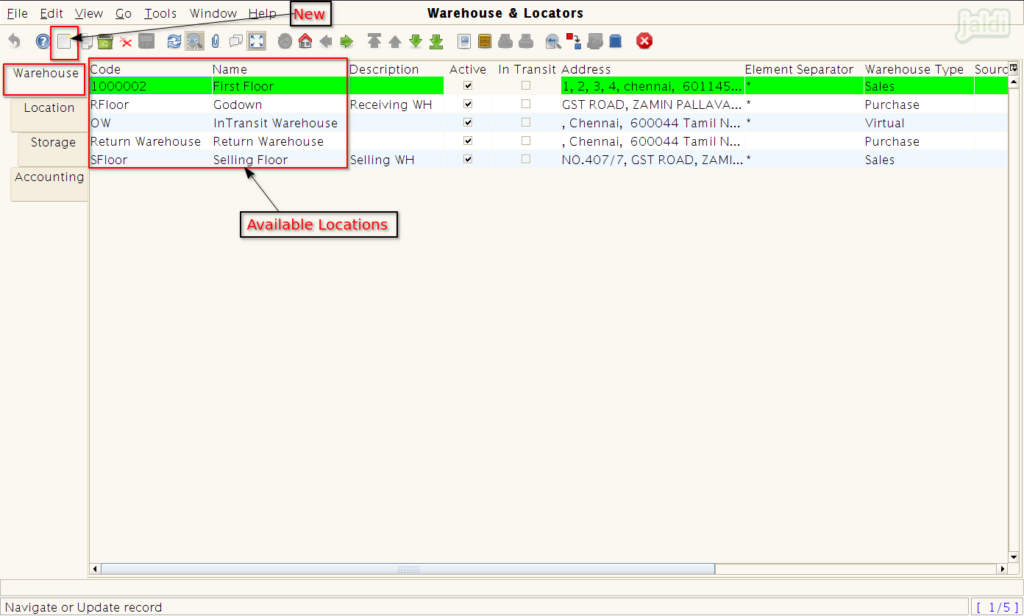
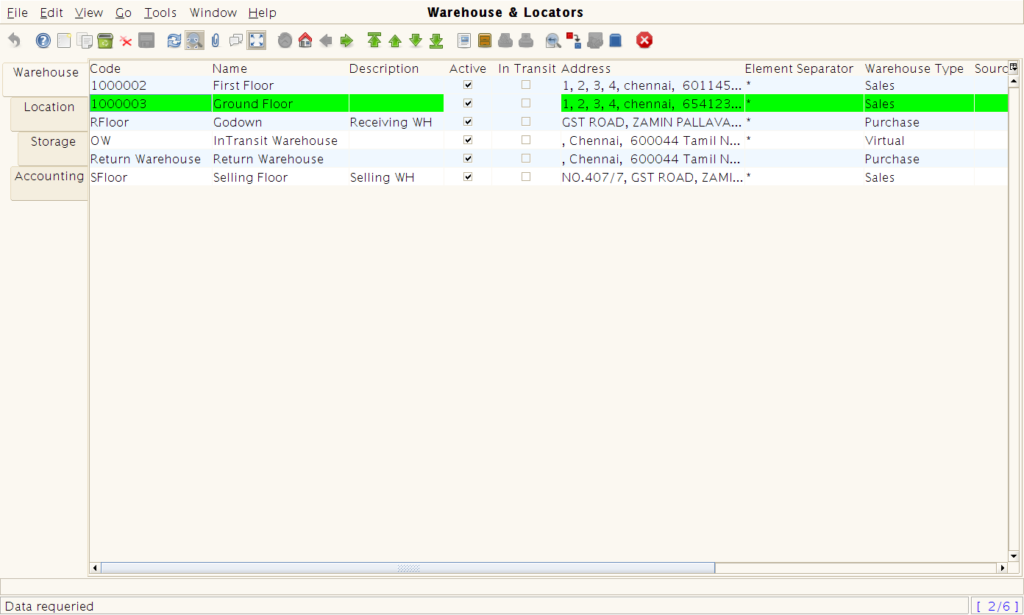
- In Warehouse & Location screen, we can find the available location which created by default.
- To create a new one, click on “New” function key which is marked in below image.
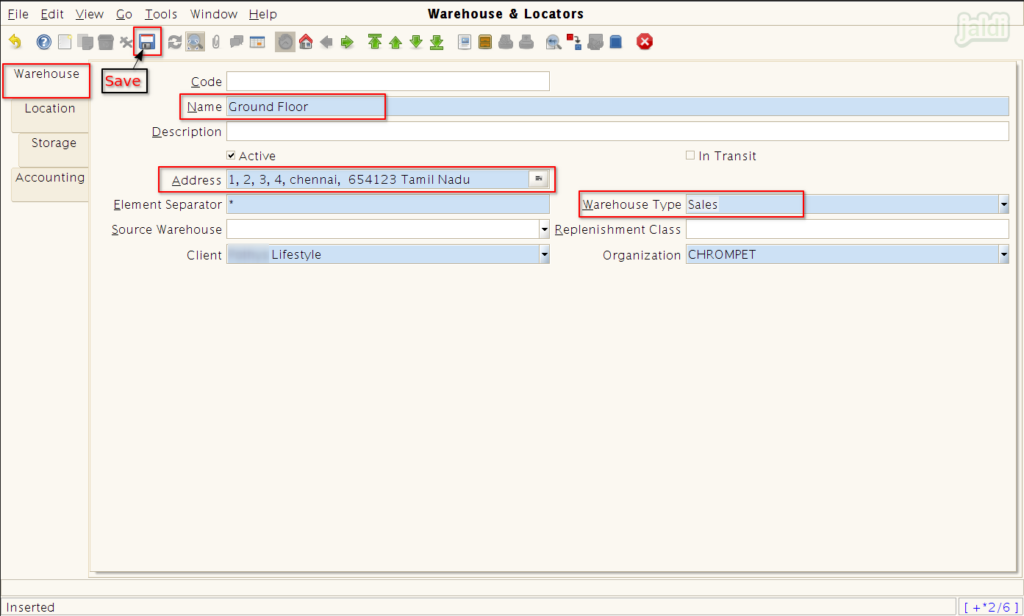
- Then Enter the required details in following fields,
- Name – Location name
- Address – Enter full address of location
- Warehouse type – Select anyone of the option from the drop down (Sales, Purchase or Virtual).
- Code – If you have manual code enter that code or system will generate auto code.
- Once the details were filled click on “Save” function key.
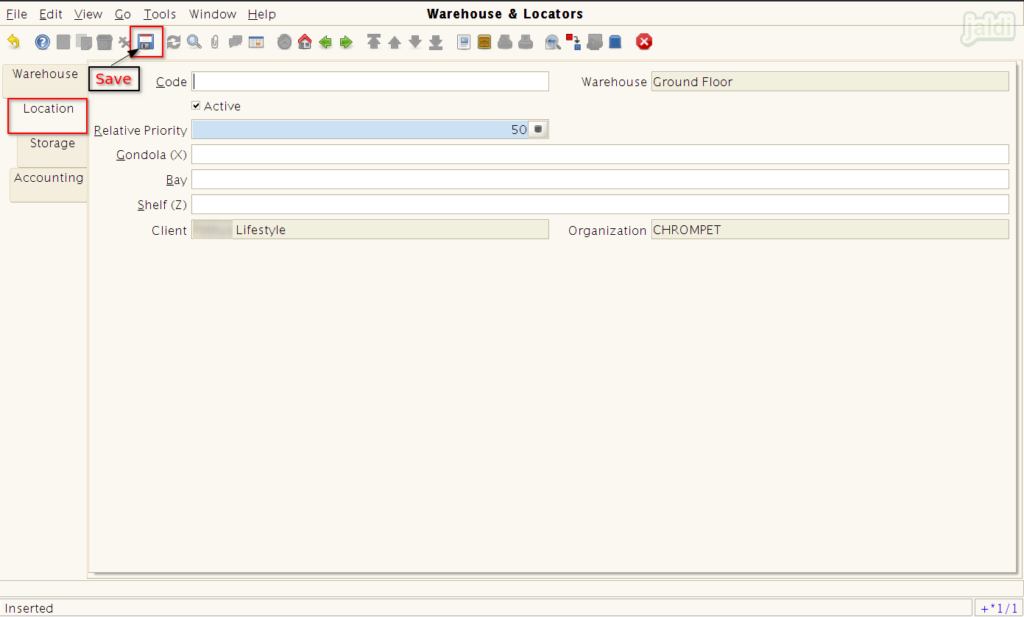
- Then move to “Location” tab and press “New” and then press “Save”.
- Now we can find the newly created location “Ground floor” in location list like below shown image.
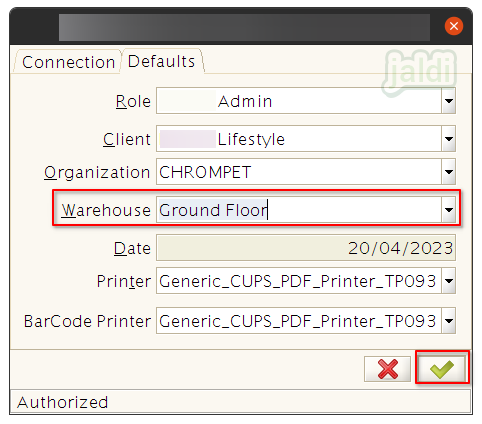
- So whenever the user is logged in to the application he can find all the available “locations” in Warehouse drop down field.
- User can select their respective location and log in to the application.
How to Send stock transfer from one location to another (godown to selling floor)
Lets imagine the real time scenario where inventory management team, sending the 30 quantity of shoes from Godown to selling floor due to stock excess in Godown. Follow the below steps to complete the stock transfer send and receive process between locations.
Stock Transfer (Send)
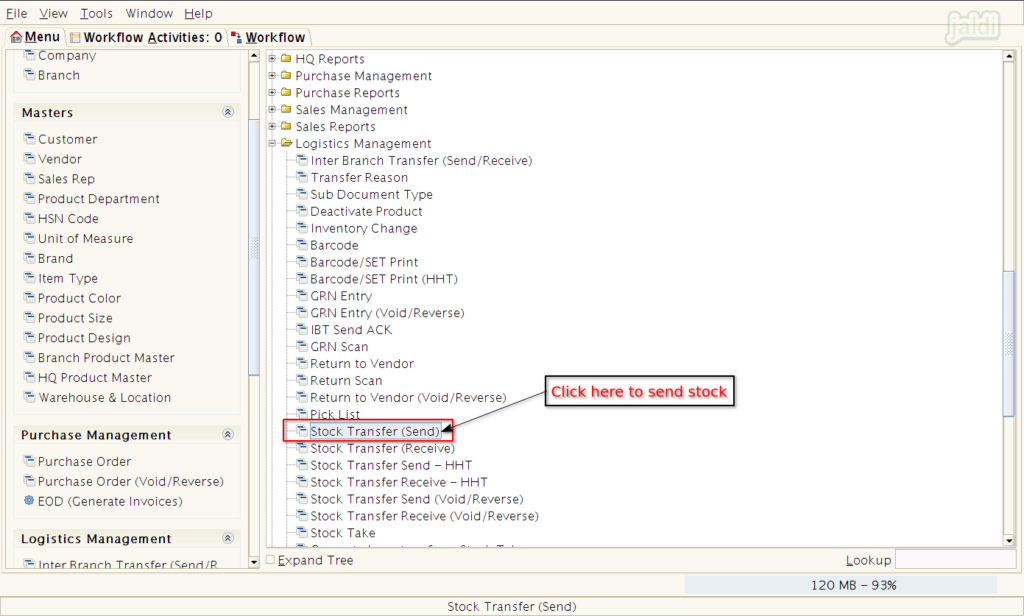
- In godown system, go to application path Logistics Management > Stock Transfer (Send).
- Click on the Stock Transfer (Send) menu.
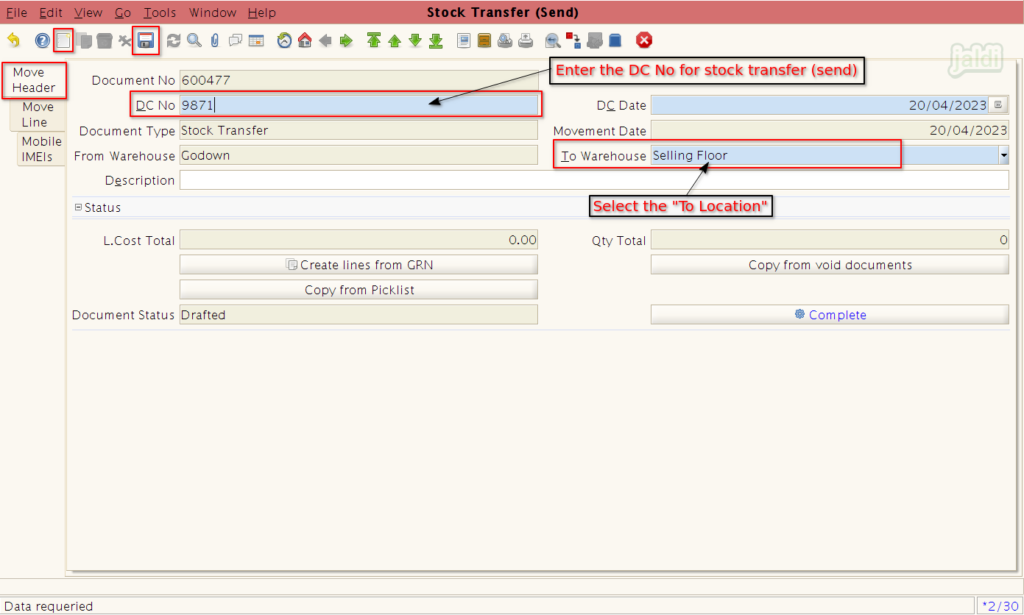
- In stock transfer (send) screen, Enter the required details in following fields,
- DC No – Enter delivery challan number.
- To Warehouse – Select the To location where you want to send stock.
- Then click on “save” to save the entered data in “Move Header”
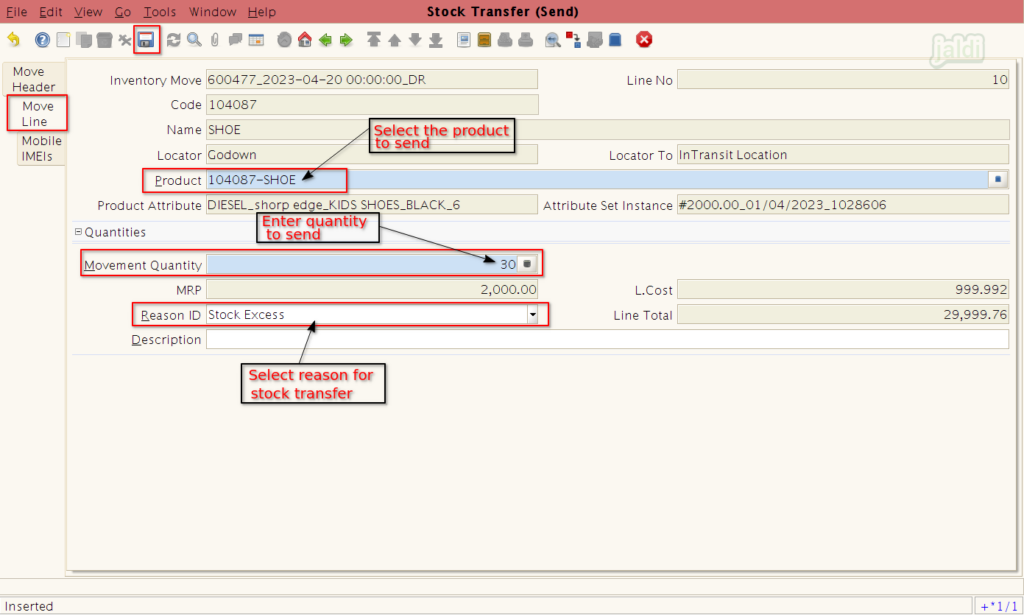
- Then move to “Move Line” tab and enter the details in following fields,
- Product – Select the product to send.
- Movement Quantity – Enter the quantity to send.
- Reason ID – Select the reason to send the stock
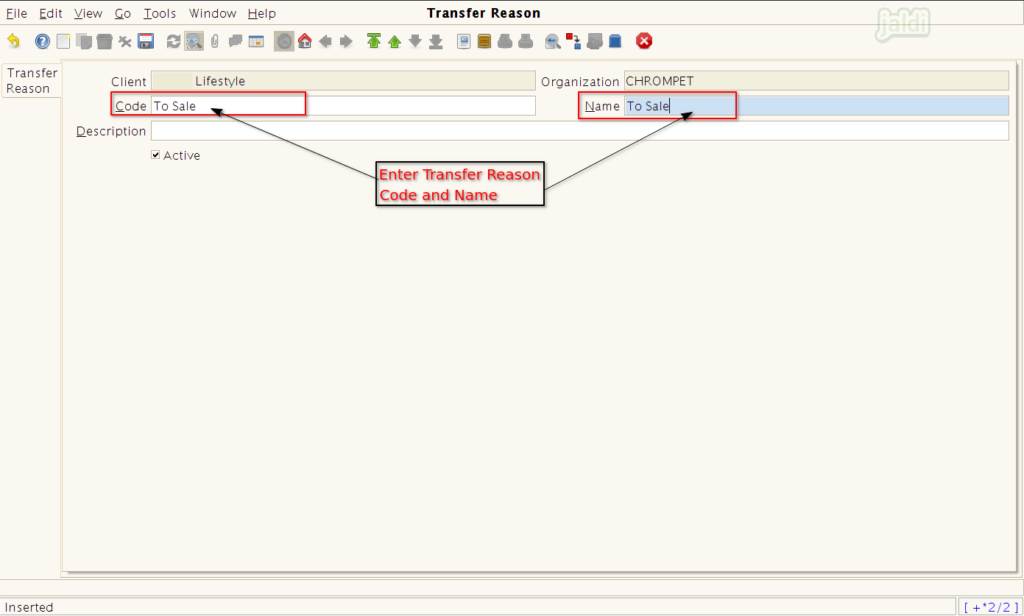
- To create a new reason, right click on reason id and go to “Transfer reason” screen (path-Logistics Management > Transfer reason.
- In Transfer reason screen enter Code and Name and save the data.
- Then save the “Move Line” tab.
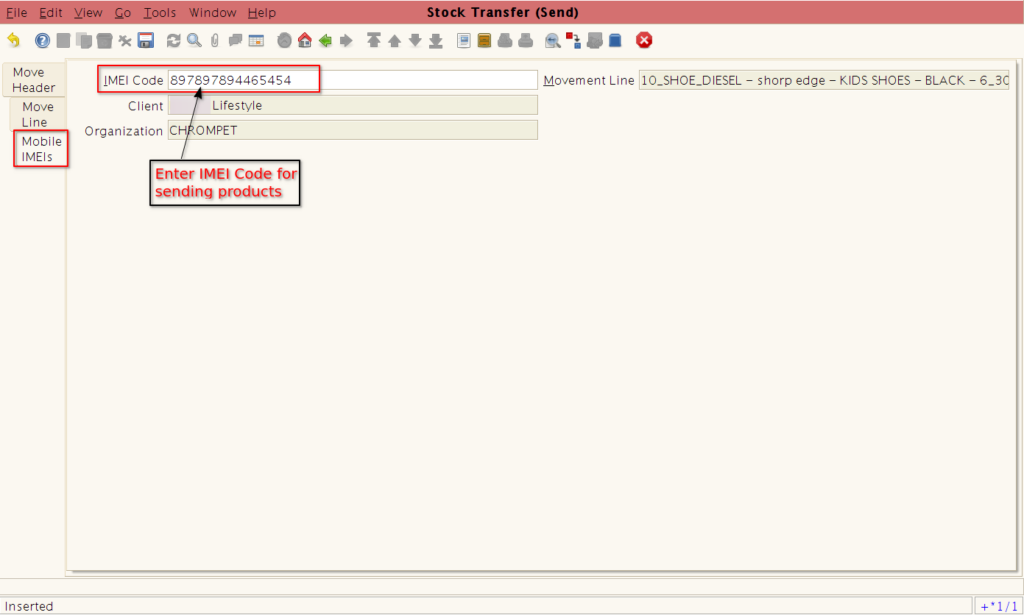
- Then move to “Mobile IMEIs” tab if the transferring product is mobile product.
- In Mobile IMEIs screen enter the IMEI code of transferring products.
- Then press “Save” option to save the data.
- If the transferring product is not IMEI product, then skip this tab.
- Once required tabs are filled with required details, then move back to “Move Header” screen.
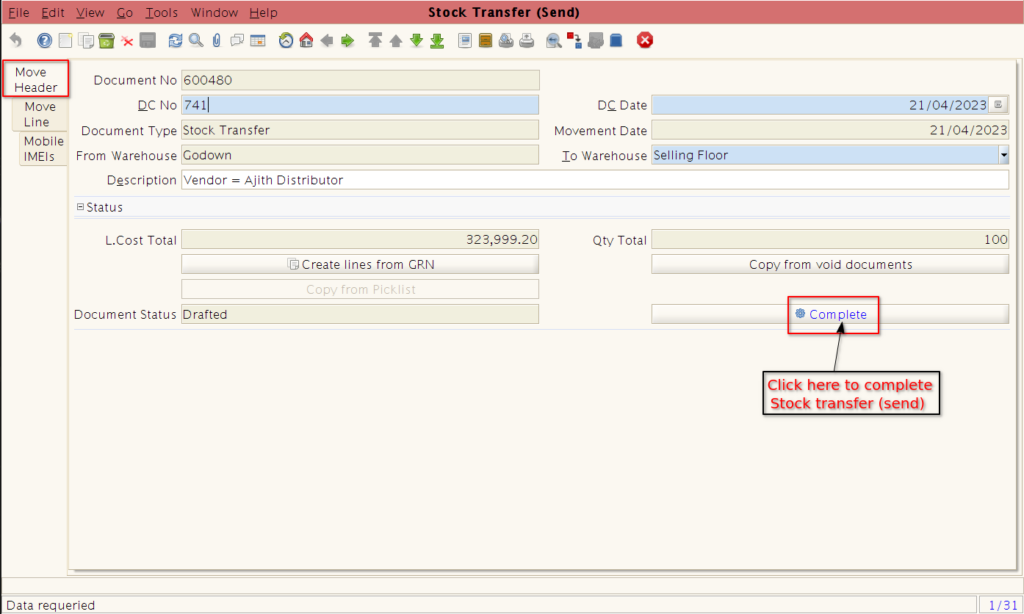
- There we can find the option called “Complete”. Click on “complete” to complete the stock transfer (send) process.
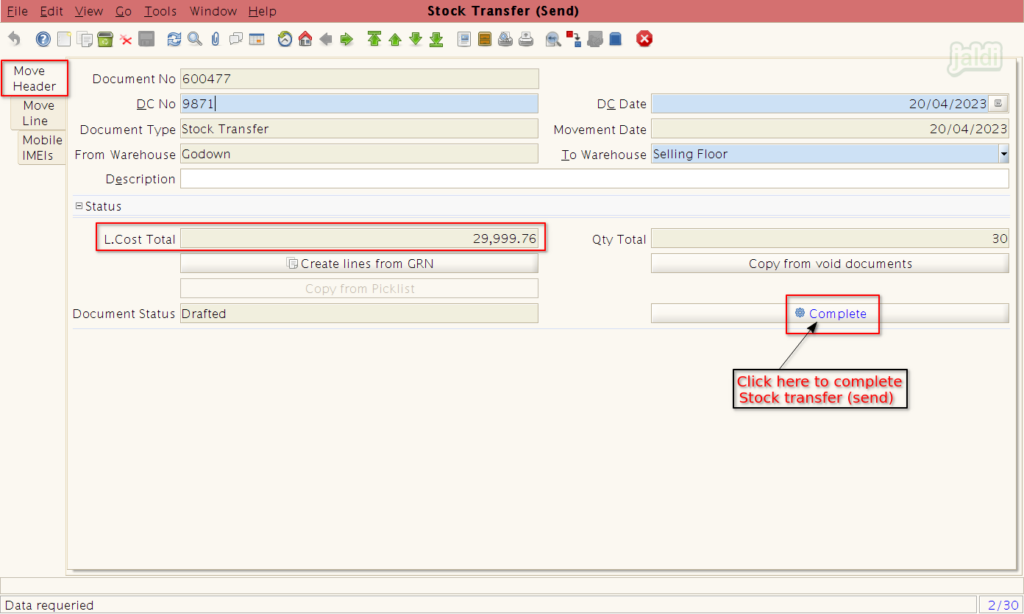
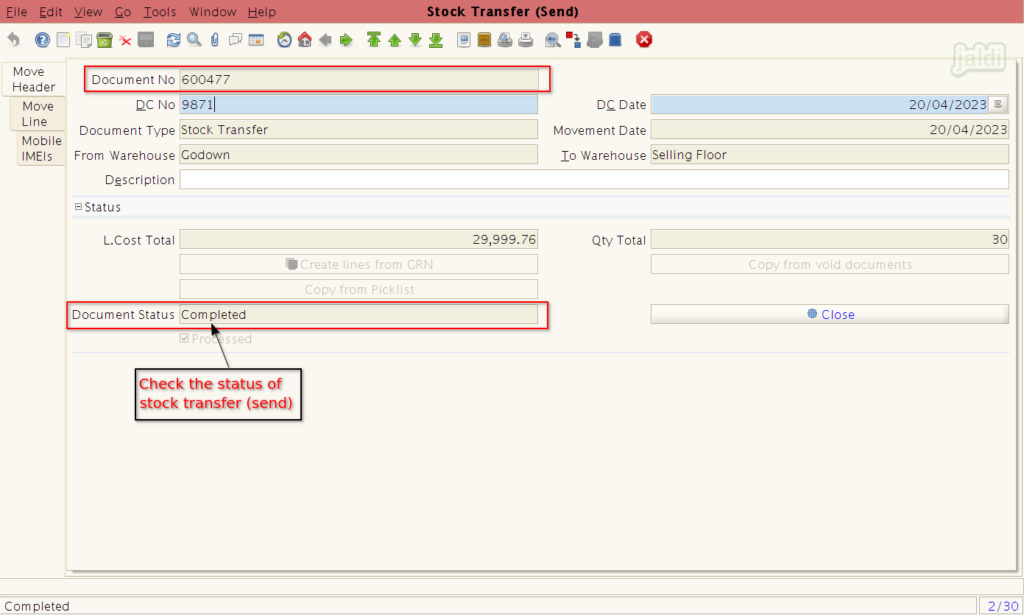
- Once the process is completed, we can find the Document status as “Completed” as shown in below image.
Stock Transfer (Receive)
- Once the stock transfer (send) process is completed. The “To location (Selling floor)” user will login to their system.
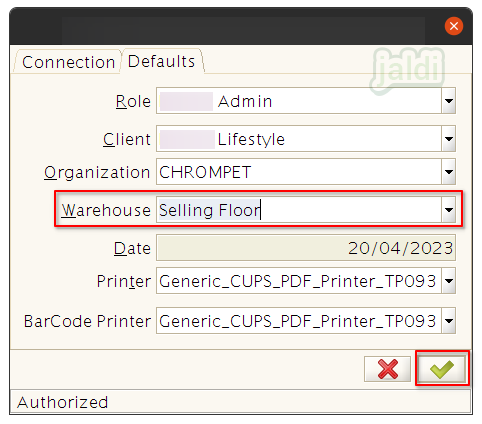
- Make sure the you have selected the “Selling floor” as your warehouse while log in to the application.
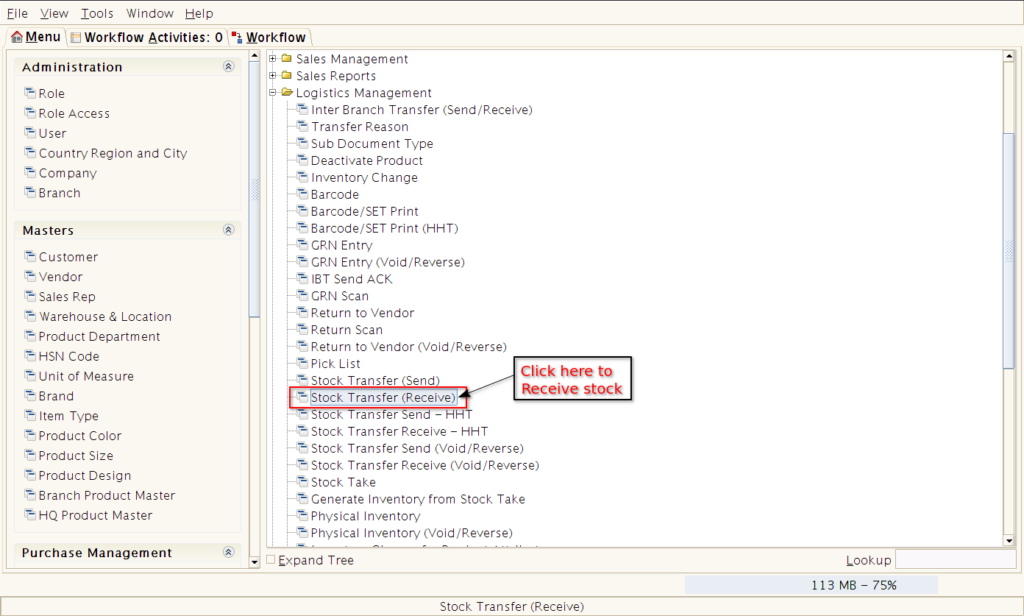
- Then go to the application path, Logistics Management > Stock Transfer (Receive).
- Click on the “Stock Transfer (Receive)” to receive the sent stock.
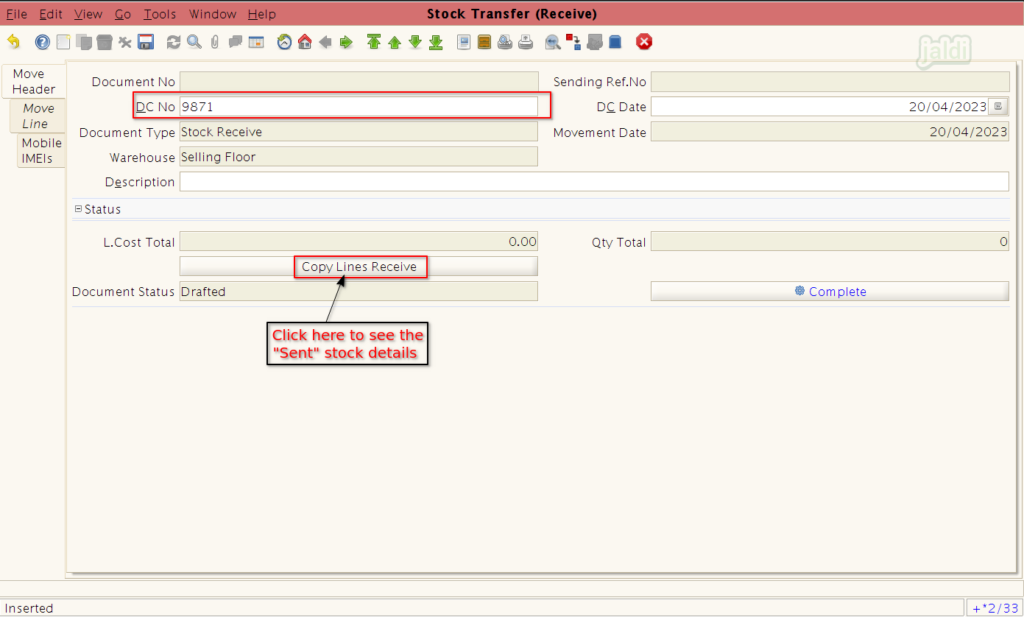
- In Move Header tab press “New” and then enter the required details in following fields,
- DC No – Enter DC no
- DC – Date – Enter delivered date.
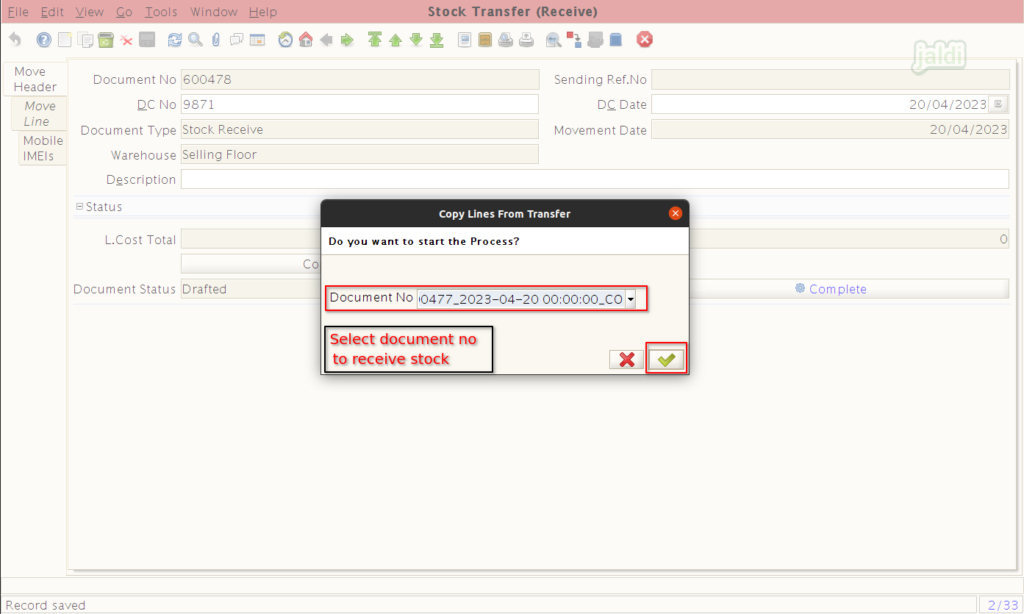
- Then click on “Copy Lines Receive” function key to check the stock transfer (send) documents.
- Then system will show the Popup where we can see all the stock transfer (send) entries which is send to current location.
- Select specific document number and click on “green tick” to receive the line items.
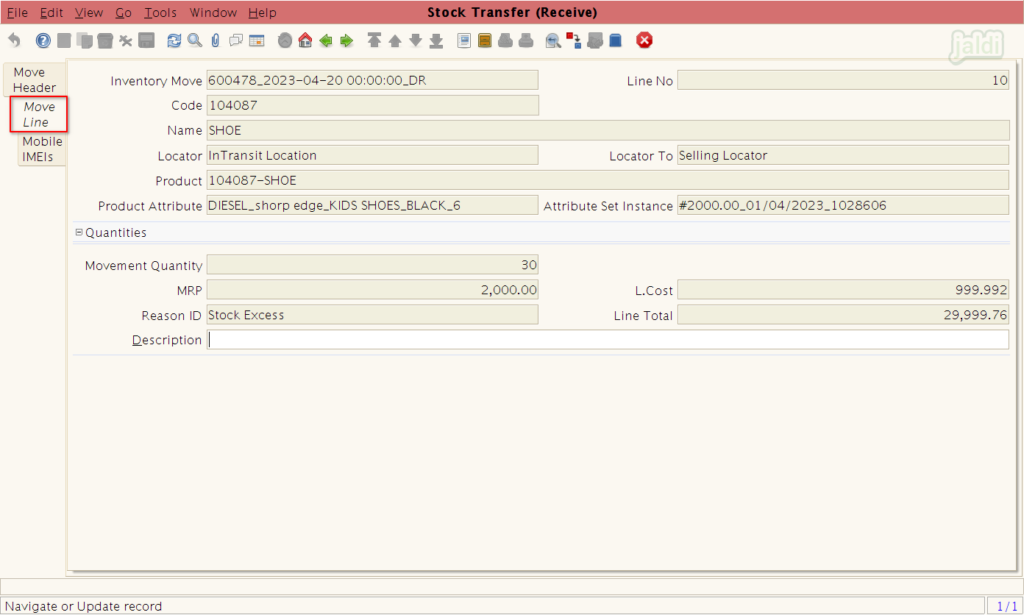
- Once the document is received, move to “Move line” tab, where you can see all the received products with respective quantity.
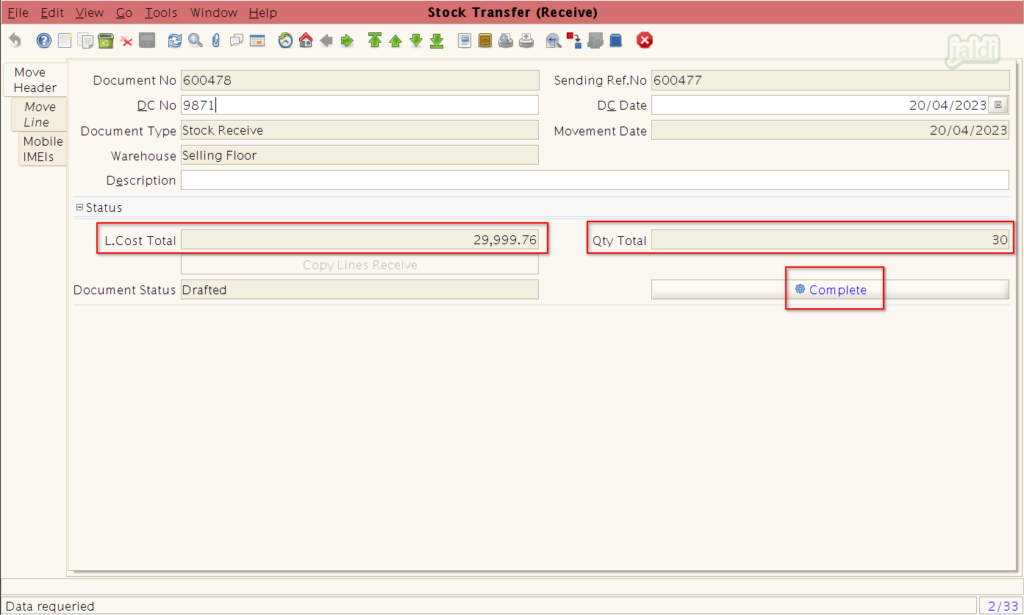
- After checking the received data, move back to “Move header”.
- There we can find “complete” option, click on that to complete the receiving process.
How to do stock transfer (send) process using Pick List ?
Imagine where your inventory manager wants to send many items to another location, but don’t want to load items one by one since he wants to send many items. Now Inventory team can use the pick list feature to bulk load items, so they can complete the stock transfer (send) process quickly. follow the below steps to create a pick list and using those pick list in stock transfer (send) process.
How to create pick list ?
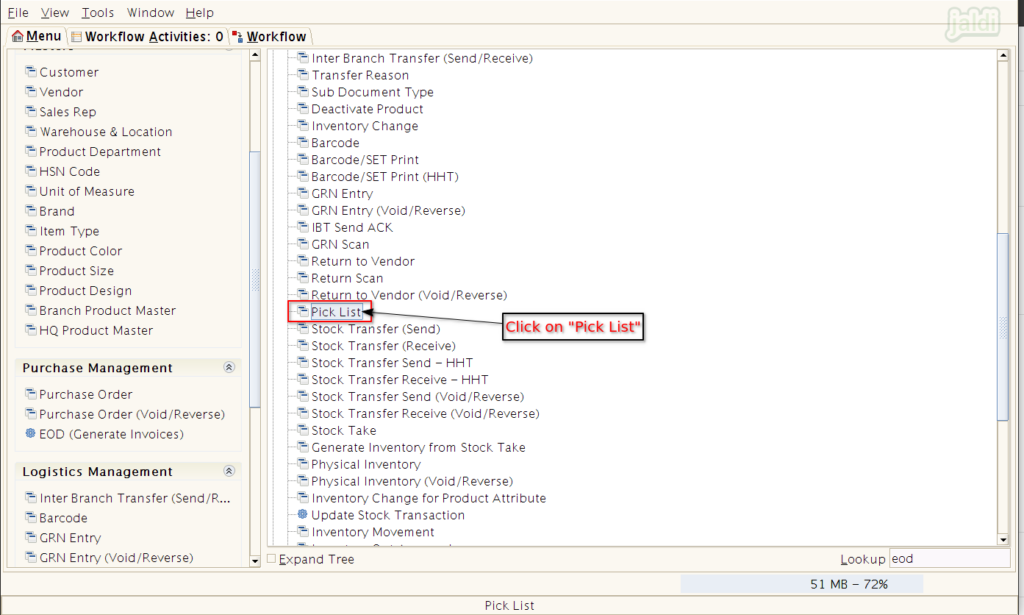
- Go to application path Logistics Management > Pick List.
- Click on “Pick List” menu.
- Under Pick list tab “Pick List” and then press “save”.
- We can create a pick list by two following ways,
- Manually selecting each products one by one
- Pick Bulk Products – Click on “Pick Products” option which is marked in below image.
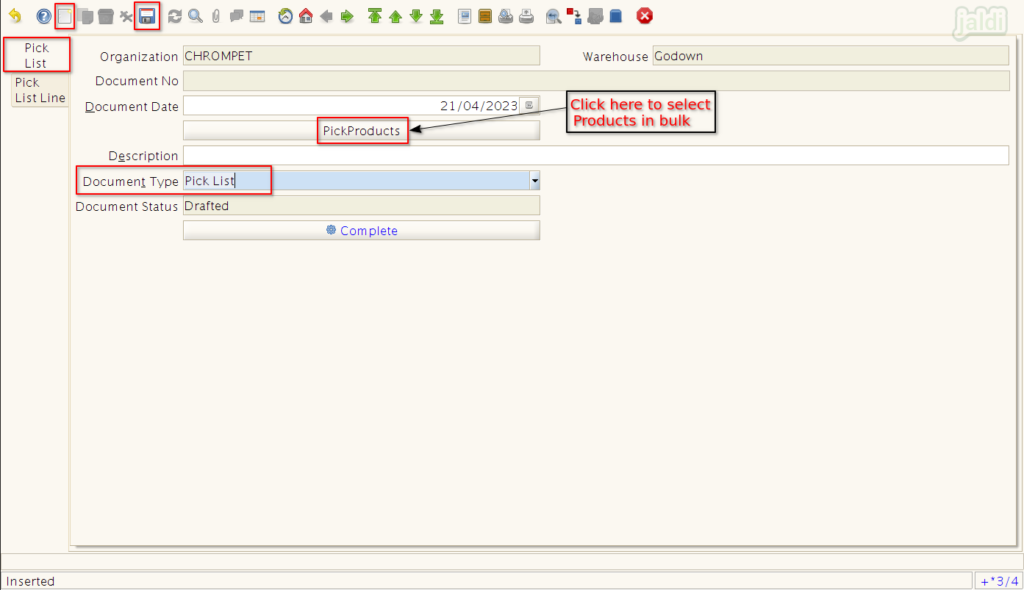
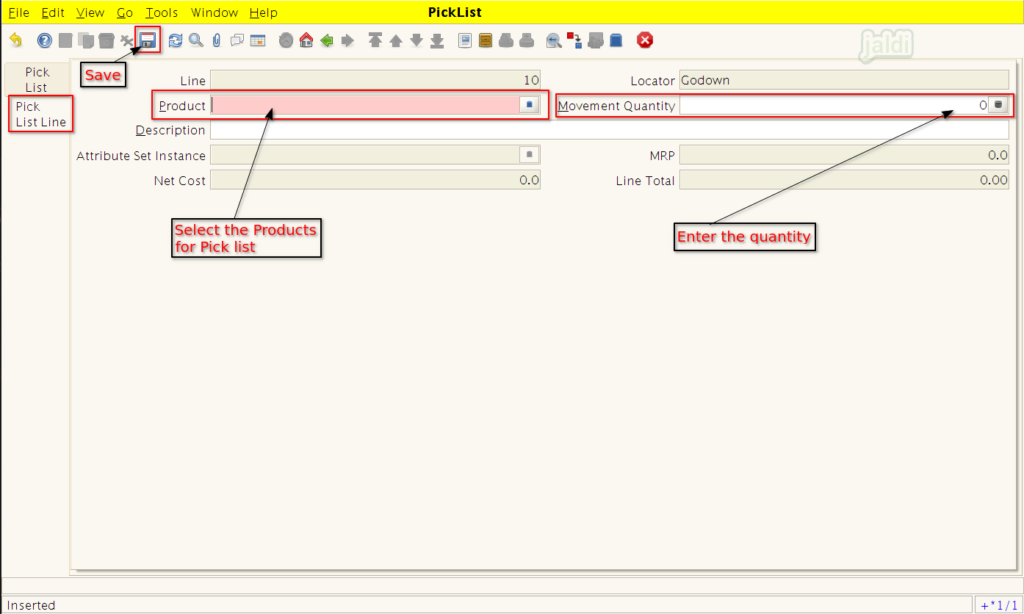
- To select products manually, go to “Pick List Line” tab and enter the details in following fields and save,
- Product – Select product for pick list
- Movement qty – Enter qty of products.
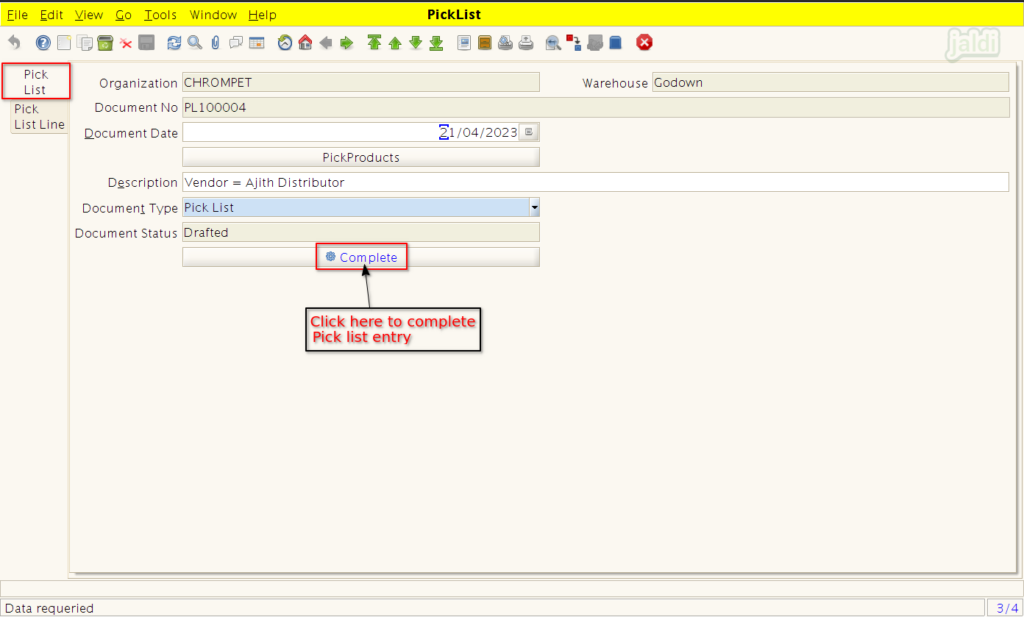
- Once all products are filled in pick list line, then move back to “Pick List” tab to complete Pick List entry.
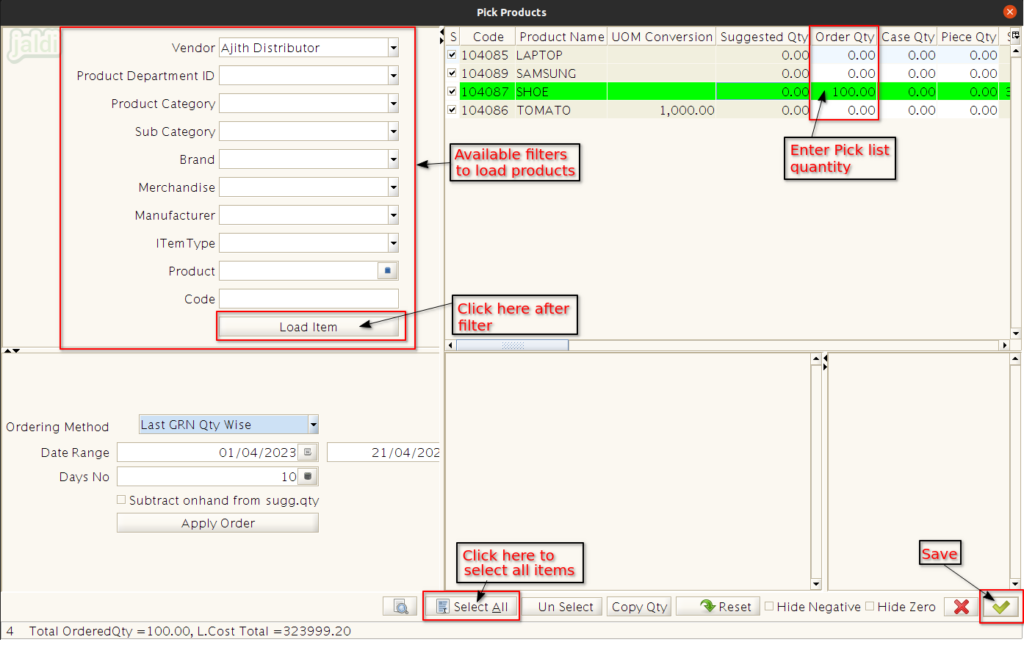
- If inventory team clicked on “Pick Products” option to bulk load the products, then the below shown screen (Pick Products screen) will displayed.
- In Pick Products screen, enter the required filters to filter the products and then press “Load items”.
- Once the items loaded in right side, we can select the required items or select all the items using the respective options.
- Then in Order quantity, enter the pick list line qty and then press “green tick mark’ which is shown in below image.
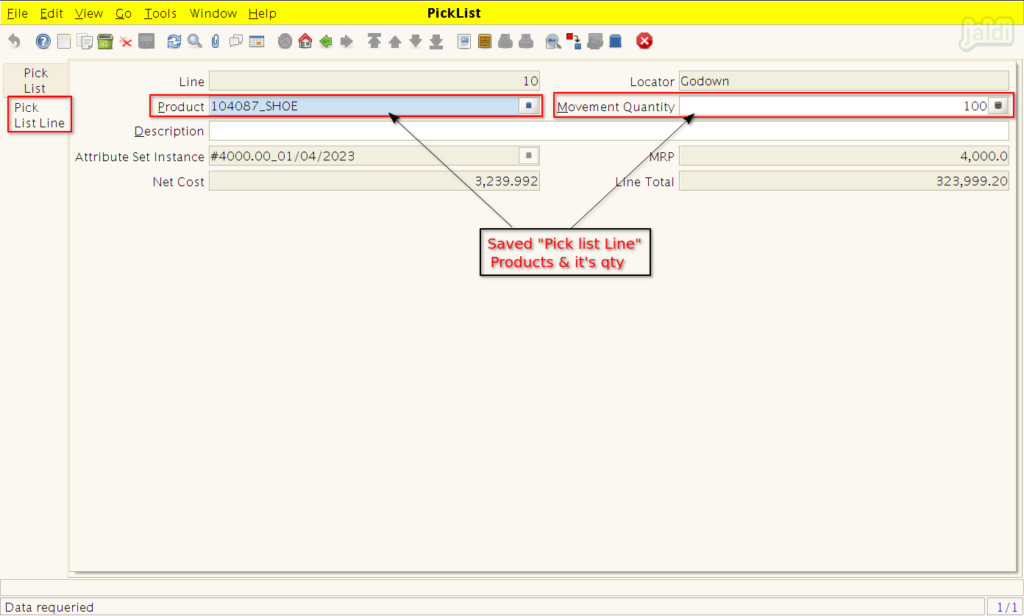
- Once the “Pick Products” screen gets saved, move to “Pick List Line” to check the auto loaded products from the pick products screen like below shown in image.
- After confirming the loaded pick list items, move back to “Pick List” screen and click on the “complete” option to complete the pick List entry.
How to use pick list entry in stock transfer (send)
- Go to stock transfer (send) screen, then click on the “Copy from Pick list” option.
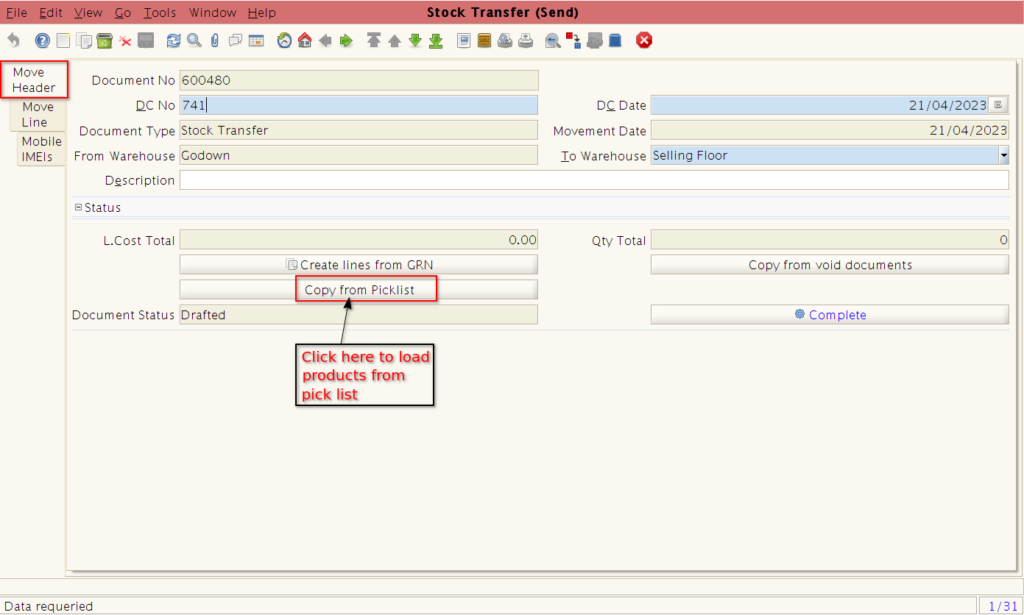
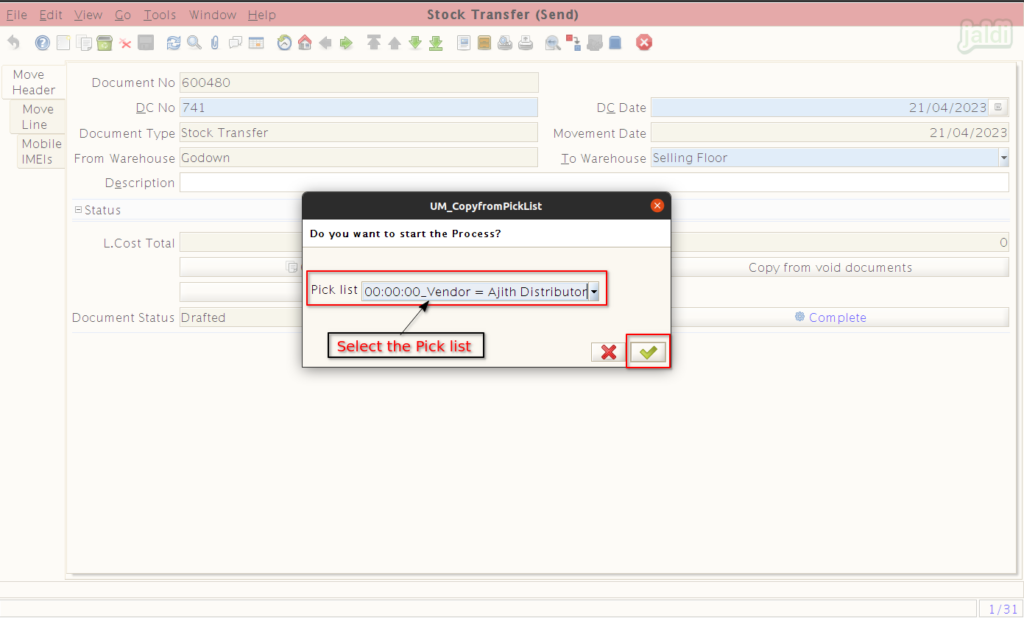
- Then system will show you the popup where you can see all the pick list which is created in this current location.
- Select required pick list in pick list drop down list like shown in below image.
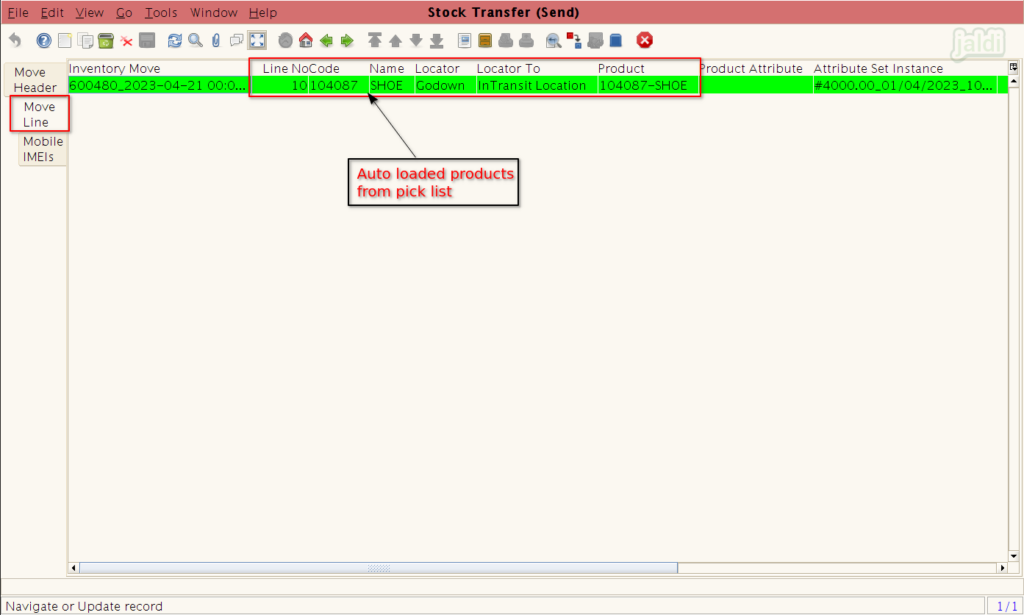
- Then click on the green tick mark to load all the pick list items in “Move Line”.
- Once particular pick list is selected and saved, go to “Move Line” tab and check all the products which is loaded from the selected pick list.
- If there is any mobile products then move to “Mobile IMEIs” tab and enter the IMEI code of each sending mobile products.
- Once all the required details were filled in each tab, go back to “Move Header” tab, then click on the “Complete”.
- Then in another location stock will be received in “stock transfer (receive)” screen.
How to Void stock transfer (send) entry
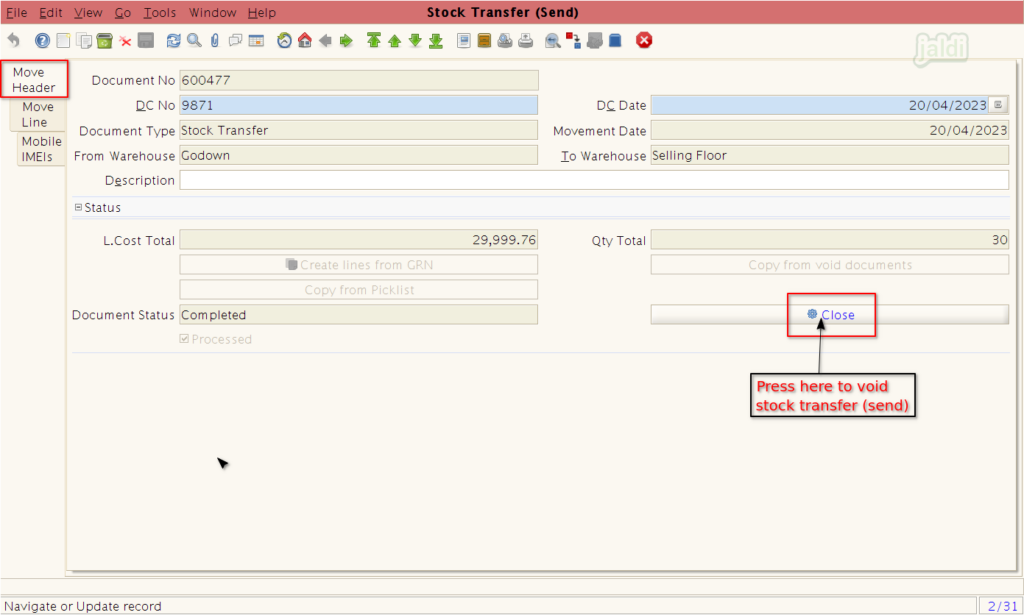
- We cannot edit the completed stock transfer (send) entry.
- Only completed stock transfer (send) entry can be voided.
- Go to stock transfer (send) entry screen, then click on the “Close” option which is marked in below image.
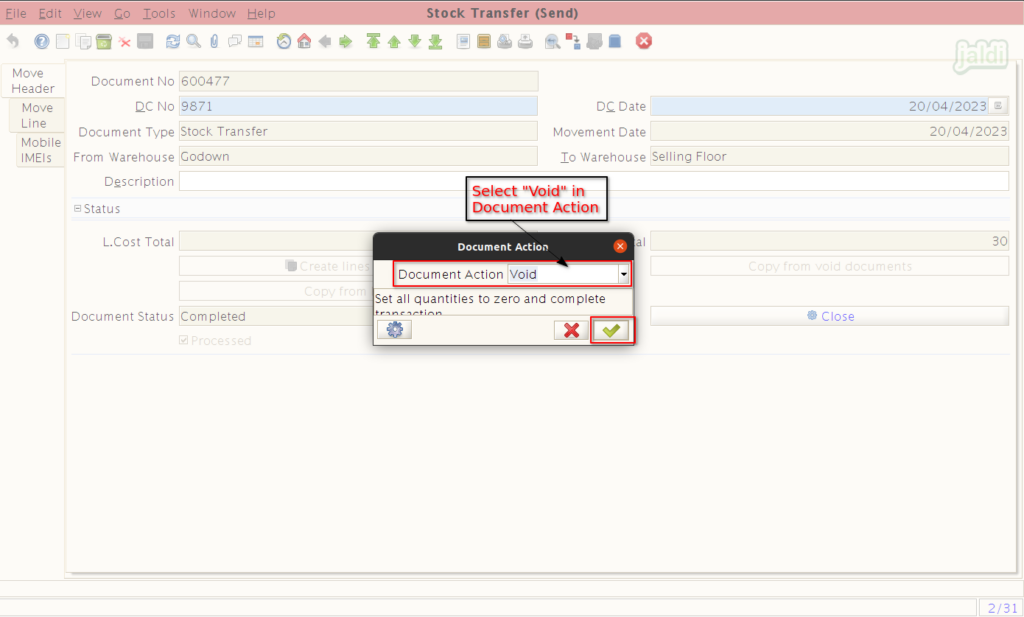
- Then select “Void” option in the document action like below shown image.
- Then click on green tick mark to complete the void process.
How to make new stock transfer (send) entry using voided stock transfer (send) entry
- Go to stock transfer (send) entry screen and press “New” option.
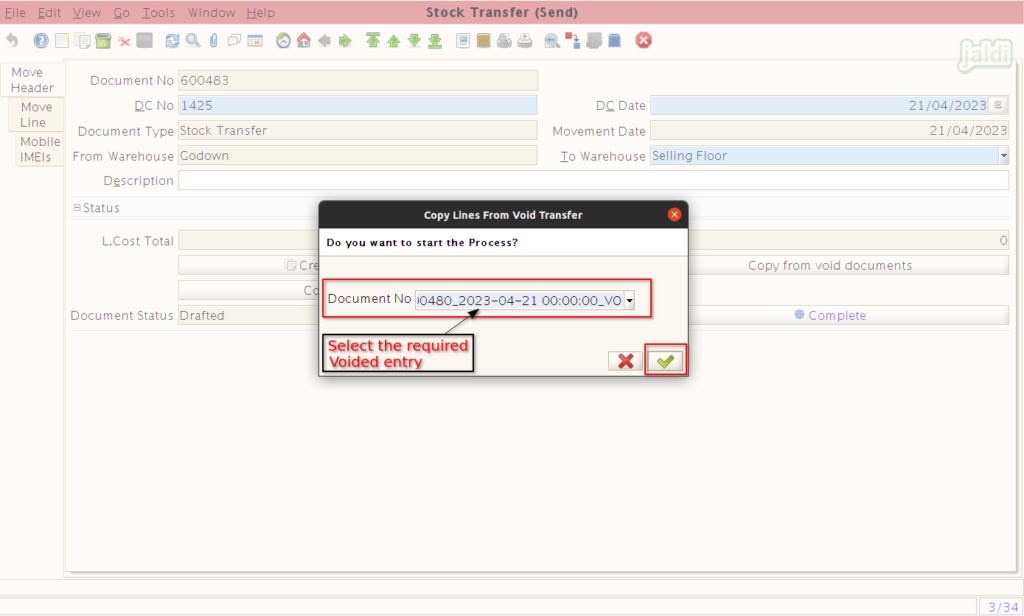
- Then click on the option called “Copy from void documents”.
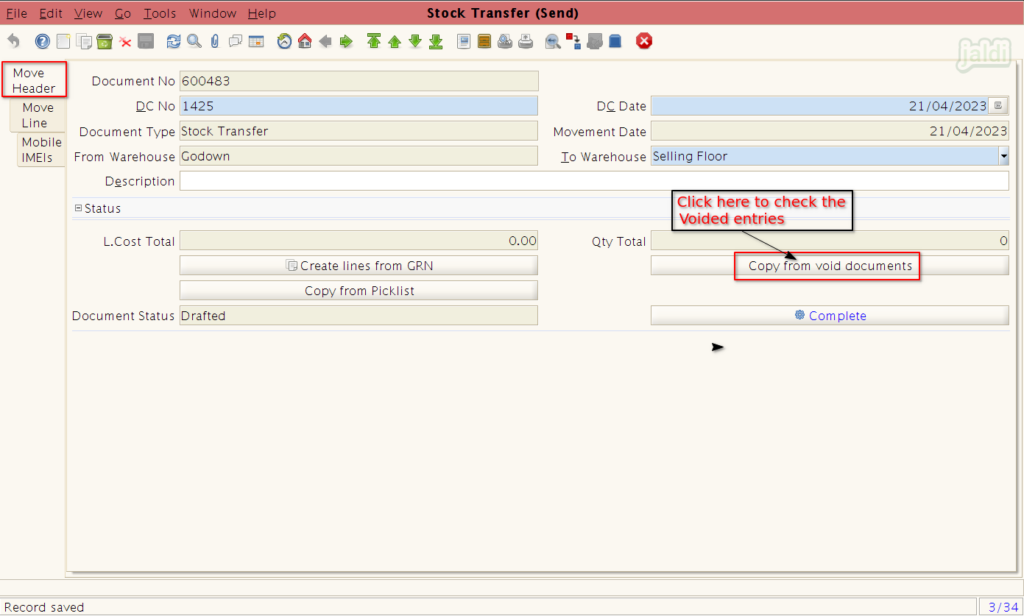
- Then system will show all the voided stock transfer (send) document numbers.
- Select required document no like below shown image and then click on green tick mark.
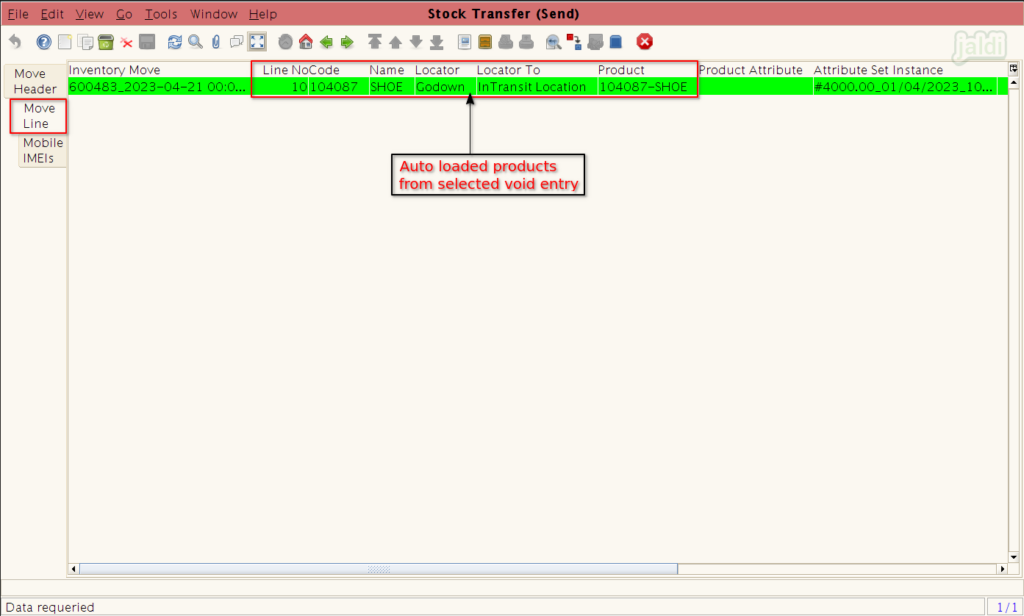
- Then we can see all the products which is from the selected void entry is saved under “Move line” tab.
- After confirming the product details, go back to “Move Header” tab and find the option “complete”.
- Click on the “complete” to complete the stock transfer (send) entry.
- The sent stock will be received in another location using the “stock transfer (receive)” entry screen.